
- KeyLink — Reader Won't Connect, Disconnects, or Crashes
- Issue
- Before you start
- Step 1: Determine the scope
- Step 2: Power-cycle the reader from inside KeyLink
- Step 3: Confirm both apps are current and matched
- Step 4: Clear KeyLink app storage and cache
- Step 5: Rule out Android power management
- Step 6: Test the configuration file
- Step 7: Run the KeyLink Terminal test
- Step 8: Request an RMA
KeyLink — Reader Won’t Connect, Disconnects, or Crashes #
Issue #
KeyLink fails to establish or hold a connection to the reader. Common presentations:
- KeyLink shows a status other than Connected, or will not connect at all
- XPressProx reader open failed
- KeyLink closes or crashes on launch, and a reboot does not clear it
- The reader connects, then drops mid-shift and scanning stops
- Some devices at a site scan normally while others do not
- Badges will not scan or swipe at all
Existing KeyLink documentation covers first-time configuration. This article covers a reader that was working, or that will not come up on a device where configuration is already correct.
Before you start #
Have this ready:
- How many devices are affected, and how many total are on site
- The KeyLink version, shown in the lower-right corner of the KeyLink Main tab
- The XPressEntry handheld app version
- Device serial number(s)
- Whether the devices have ever scanned successfully
Step 1: Determine the scope #
One device affected, others fine → the cause is almost always on that device: firmware, the config file, or hardware. Continue to Step 2.
All devices affected at once → suspect an app version mismatch after an update, or an MDM/policy change pushed to the fleet. Go to Step 3.
Step 2: Power-cycle the reader from inside KeyLink #
A soft reset of the RFID module resolves a large share of “not connected” cases. Do not just reboot the handheld — the reader must be closed and powered down explicitly.
On the KeyLink Main tab, the banner across the bottom tells you the current state. Red means the reader is not connected and the button reads CONNECT. A healthy reader shows a green XPressProx Reader Connected banner, and the button changes to DISCONNECT.
- Exit the XPressEntry Android application completely.
- Open the KeyLink
- Tap Close to close and power off the reader.
- Leave the reader powered off for 10 seconds.
- Re-open the same reader.
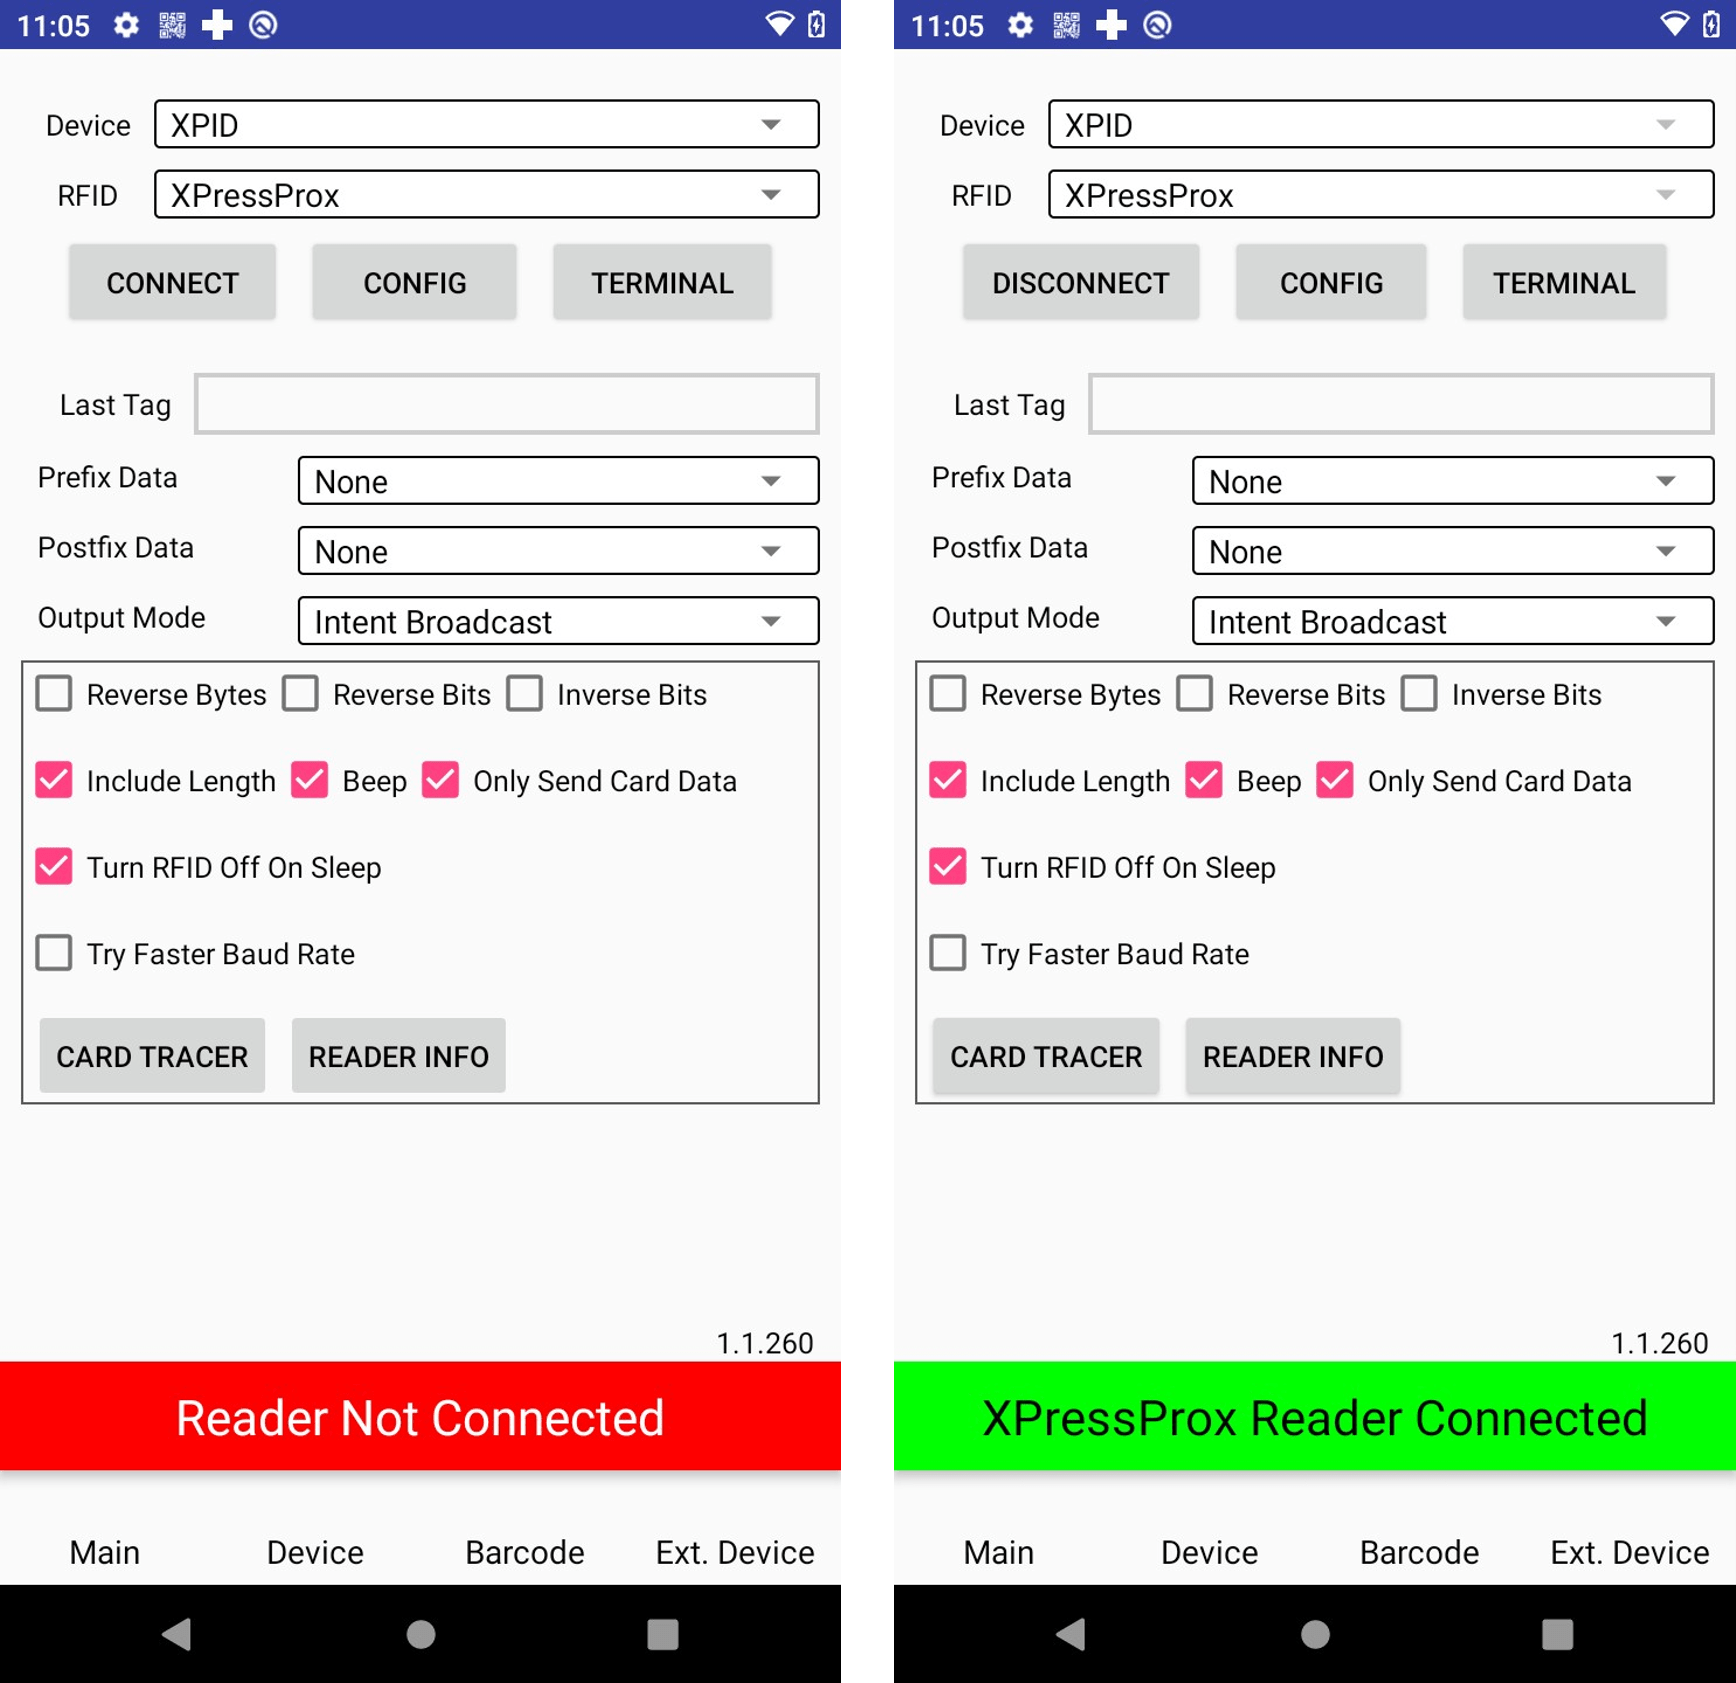
Figure 1. Main tab — reader not connected (red banner, shows CONNECT next to CONFIG & TERMINAL)
Figure 2. Main tab — reader connected (green banner, shows DISCONNECT next to CONFIG & TERMINAL)
Confirm the Device and RFID selectors match the hardware (XPID and XPressProx in the figures above) — a wrong selection here produces the same red banner as a hardware fault.
If the banner turns green, reopen XPressEntry and test a scan before moving on.
Step 3: Confirm both apps are current and matched #
KeyLink and the XPressEntry handheld app are updated separately, and a version skew between them causes connection and crash symptoms. Update both to the current release, then repeat Step 2.
The KeyLink version appears in the lower-right corner of the Main tab (1.1.260 in the figures above). The reader’s own firmware version is separate and is read using the v command in Step 7.
If the devices are managed through an MDM (Intune or similar), confirm the MDM has actually delivered the newer package — a pending or failed deployment leaves devices on mixed versions.
Step 4: Clear KeyLink app storage and cache #
- From the device home screen, long-press the KeyLink app icon.
- Tap App Info → Storage & Cache.
- Tap Clear Cache. If the symptom persists, return and tap Clear Storage.
- Reopen KeyLink and re-open the reader as in Step 2.
Clearing storage removes the loaded configuration, so have the site’s .bix file available before doing this.
Step 5: Rule out Android power management #
Android battery optimization (including the Duraspeed feature on some builds) will suspend KeyLink in the background, which puts the RFID module to sleep. This is the usual cause of a reader that connects fine and then drops out after the device sits idle — and of scanning that stops working only on longer shifts.
Follow Disabling Battery Restriction of XPressEntry and KeyLink (here) and confirm both apps are excluded from optimization.
Step 6: Test the configuration file #
Load a known-good .bix configuration file from a working device onto the affected device and re-open the reader.
- If the working device’s file connects, the original file is the problem — re-deploy it.
- If you get File Select Failed! while loading, see KeyLink Error – File Select Failed! — this is caused by opening the config file with the wrong file browser.
Step 7: Run the KeyLink Terminal test #
This is the decisive test for whether the reader hardware is responding over the serial connection. It separates a configuration problem from a hardware failure, so run it before requesting an RMA.
- Open KeyLink and go to the Terminal
- Check the Baud Rate before connecting. It must be 19200. A wrong baud rate makes a perfectly healthy reader look broken — see the interpretation table below.
- Also make sure that Port is com13.
- Tap CONNECT. The status text changes from Serial Not Connected! to Serial Connected.
- Type each of these commands into the input field and tap SEND, one at a time — do not combine them: c (reports the card technologies the reader is configured for), v (reports the reader firmware version and device type), a (an “are you alive” check).
- Screenshot the History pane, or use EXPORT TEXT to send us the output as a file.
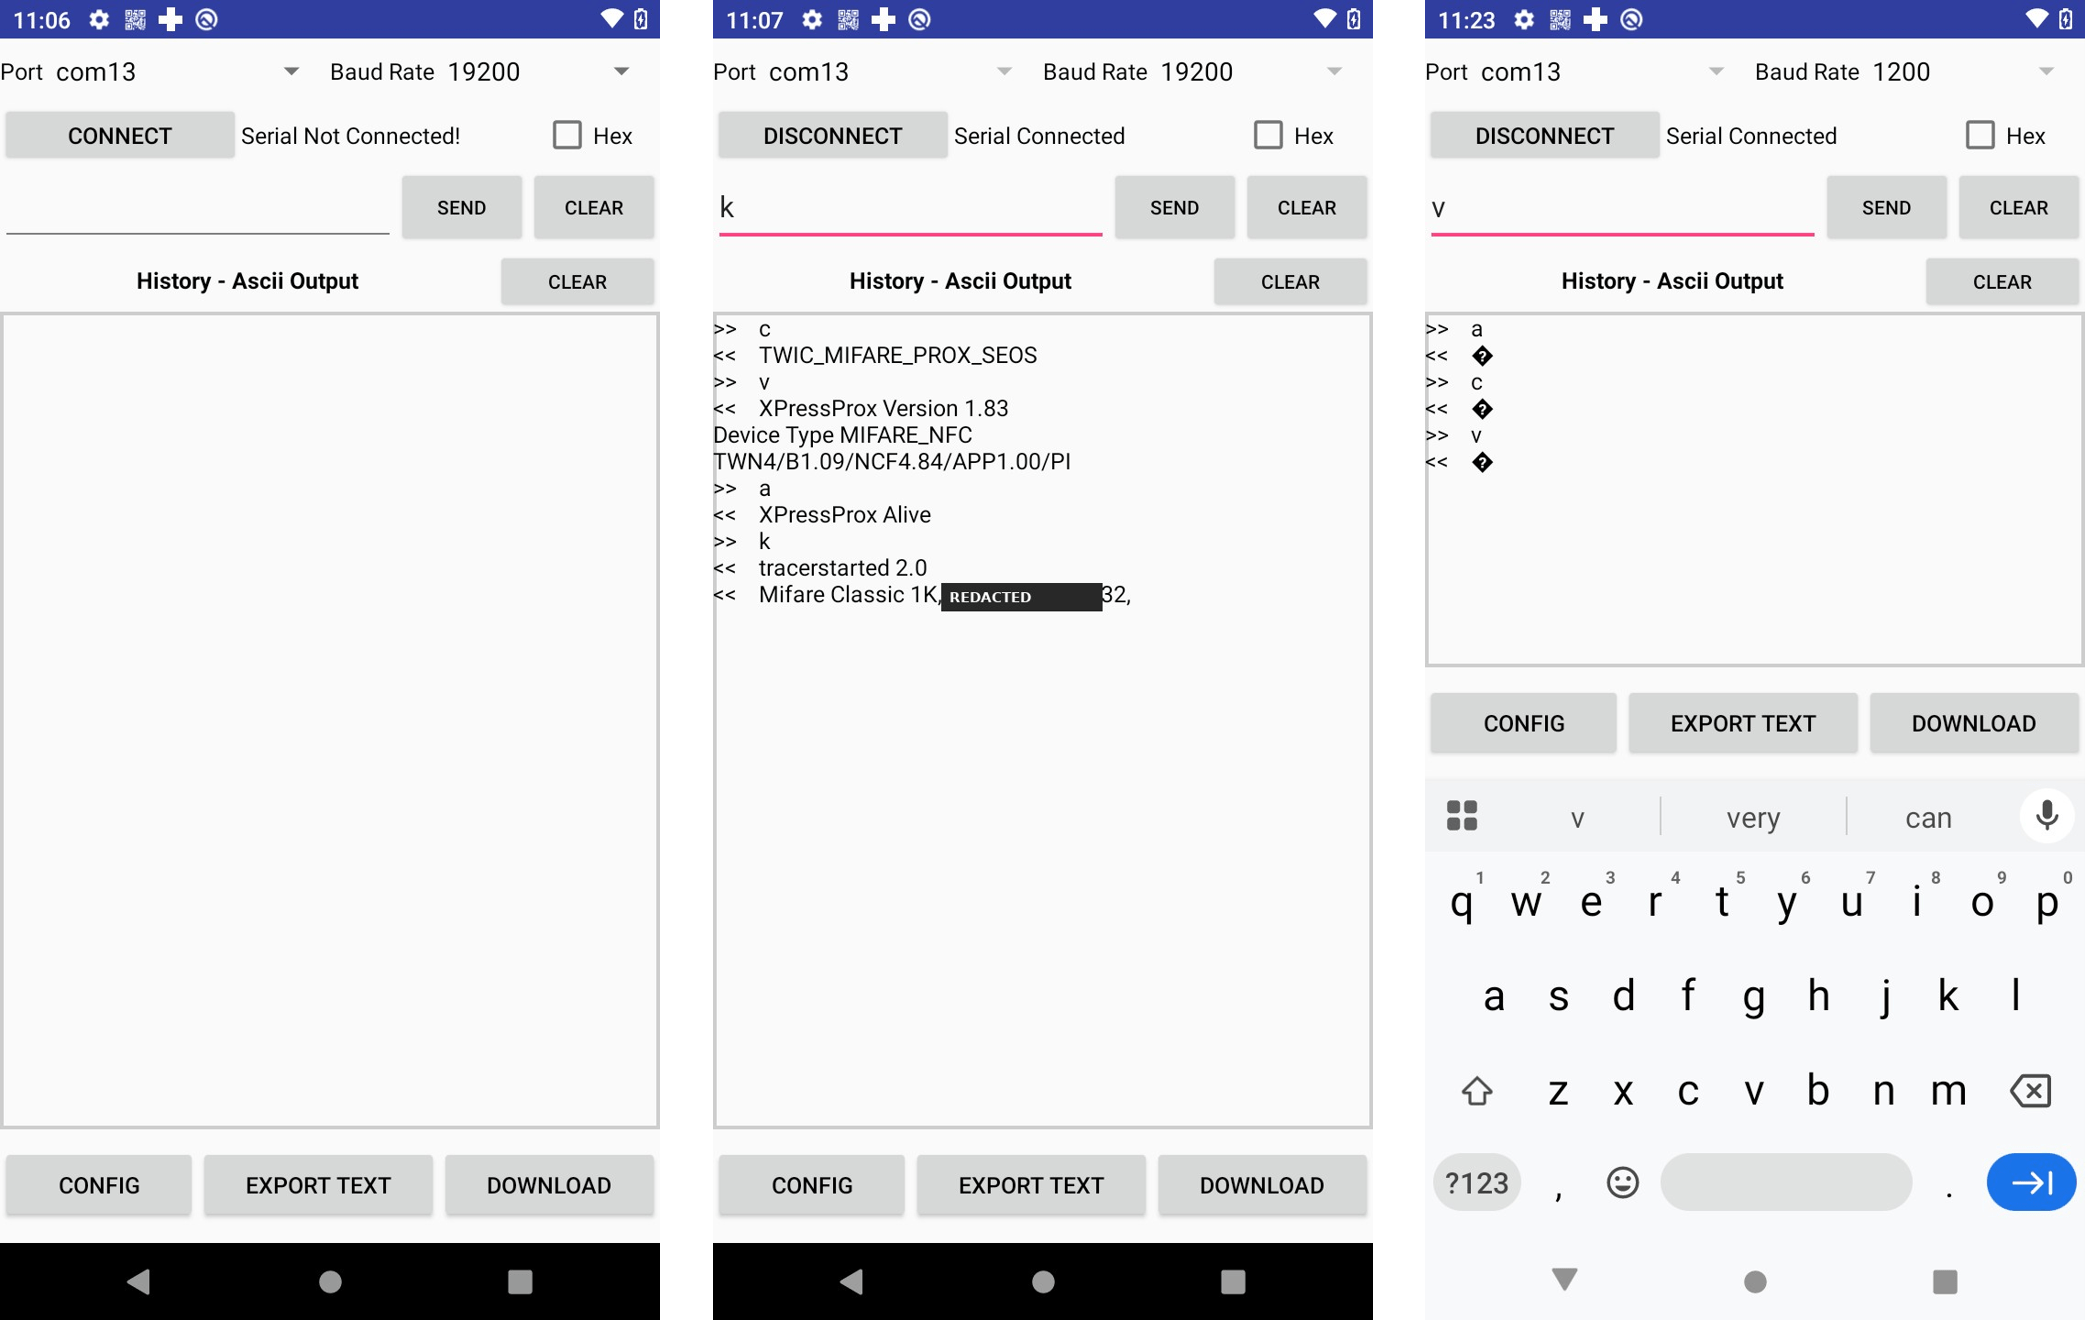
Figure 3. Terminal tab before connecting — port and baud rate selectors, Serial Not Connected!
Figure 4. Healthy reader — readable
Figure 5. Every response garbled.
Interpreting the result #
| What you see | What it means | What to do |
| Readable text responses to all three | The reader is alive and talking. The fault is configuration, firmware, or app-side. | Return to Steps 3–6, then escalate with the
Terminal output |
| Garbled or unreadable characters in place of responses | The reader is responding, but the serial speed is wrong. This is not a hardware failure. | Make sure Baud Rate (19200) and COM (Port 13) are correct. |
| No response at all to any
command |
The reader is not responding over the serial connection. Hardware or firmware fault. | Proceed to Step 8 |
The middle case is the one most often misread as a dead reader. Figure 5 shows the same healthy reader at 1200 baud instead of 19200 — every command comes back as a replacement character.
Optional: confirm the reader actually reads a card #
If the three commands succeed and you want to verify card reads before escalating, send k to start the card tracer (tracerstarted 2.0). Present a badge; the History pane echoes the card technology, the card number, and the bit count. That output also identifies the Wiegand bit length, which is what support needs for any “wrong number” or “unknown user” follow-up.
Step 8: Request an RMA #
If the Terminal returns nothing and a known-good .bix file does not connect, the device needs to come back. Submit an RMA form (here). Include the device serial number — that shortens the evaluation considerably
Would still like troubleshooting?
Open a ticket with Telaeris Helpdesk (here) and attach:
- The Terminal output from Step 7 (screenshot, or the EXPORT TEXT file)
- The KeyLink version from the Main tab, and the XPressEntry handheld app version
- Device serial number(s), and how many of the site’s devices are affected
- The .bix file tested with (if possible)


