Nedap AEOS Synchronization Documentation

1.Purpose
This document is intended to instruct system administrators on how to synchronize an XPressEntry system with the Nedap AEOS access control system.
Overall Order of Operations
- Setup AEOS SOAP API and SocketInterface(for Events)
- This typically includes creating a User Account or credentials within that system
- Setup Readers/Panels/etc in other system to receive events if available to data manager
- Enable Data Manager Synchronization from XPressEntry.
- Initial Data Synchronization and Setup XPressEntry Data
- Set up XPressEntry Handheld Readers
- Scan data on card reader and validate functionality
2.Setting Up AEOS to Synchronize with XPressEntry
It is assumed that AEOS is installed on a server. XPressEntry has been tested with AEOS Version 2019.1.4. For integrations into other versions of AEOS, please contact Telaeris and Nedap to confirm compatibility.
AEOS must have the SOAP interface installed.
AEOS Blue
1. During the AEOS software installation (setup), select SOAP WebService in the Select the desired options for the AEOS application window. If the AEOS is already installed, just run the setup again and don’t change any settings except the selection of the SOAP WebService.
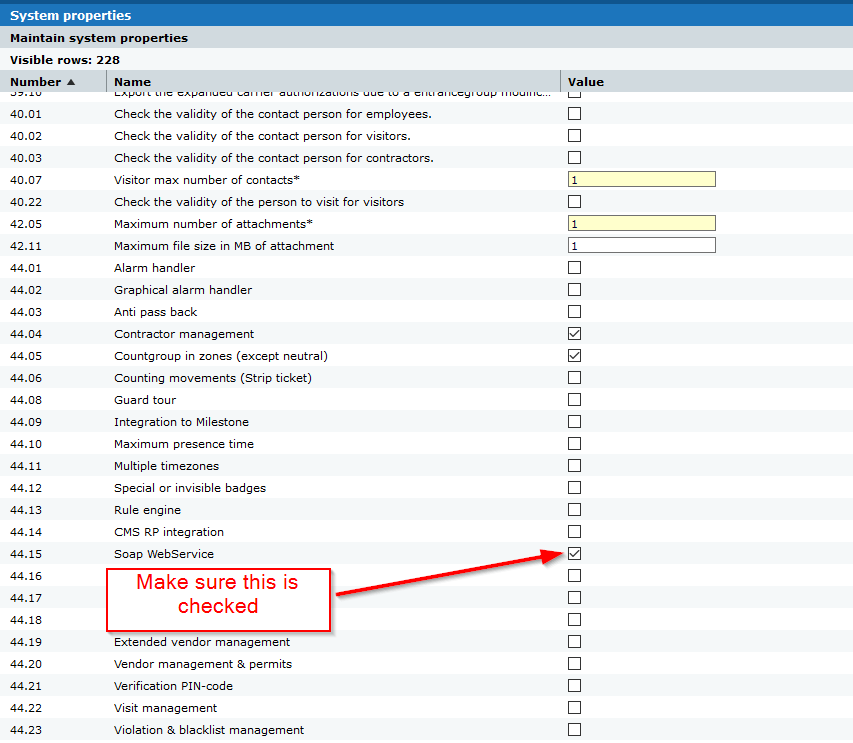
2. In AEOS, enable SOAP in the system properties.
a. go to go to Administration > Maintenance > Settings > System properties.
b. Select the SOAP WebService checkbox (44.15).
c. Click OK.
d. Restart the AEOS application server service (see 6.2).
AEOS Classic
1. Purchase license option 8019223.
2. During the AEOS software installation (setup), activate option 8019223 SOAP WebService.
Follow the instructions from section 1 in the installed “AEOS_WebService_E.pdf” in the AEOS doc directory.
Make sure port 8443(by default, settable in aeos.properties) to enable the API and 8035(by default, settable in aeos.properties) are available from the XPressEntry server.
3.Create User Account in AEOS
Create a User Account in AEOS for API Access. This User should have the minimum required access to synchronize data with XPressEntry.
In general, it needs to be able to Search all tables.
It also needs the permission: Administration, Integrations, AEOS WebService, External calls.
In addition, for Events, the user role must have access to the following functions:
- The function ‘Configuration, Socketconnection, Commands’ enables the user that logs in through the socket connection to send commands to AEOS.
- The function ‘Configuration, Socketconnection, Events’ enables the user that logs in through the socket connection to retrieve the events of AEOS.
4.Setup AEOS Readers and Access Levels
Setup the Entrances and Authorizations in the AEOS system. This can typically be delayed until a later date, but is nice to have before you start synchronizing data.
5.Enable Data Manager Synchronization in XPressEntry
From the main XPressEntry application, go to Tools -> Settings
- Select Data Manager from the list on the left
- Check the “Enable Data Manager” checkbox
- Select NEDAP as the Type
- Click the “Setup Data Manager” button
IMPORTANT NOTE: After any change on the NEDAP Setup Page or the Data Manager view, you MUST hit Save for it to apply.
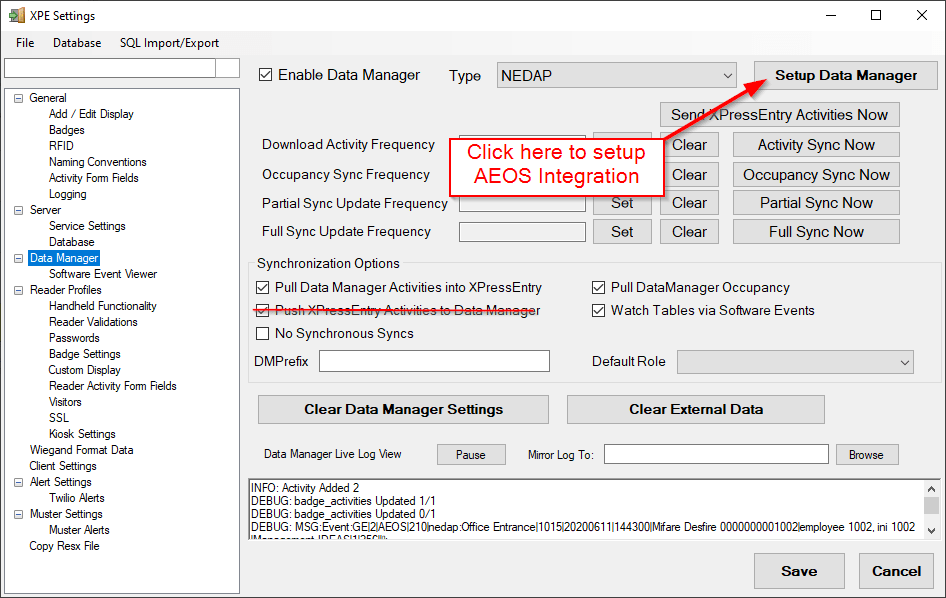
This will take you to the NEDAP Data Manager Setup Form.
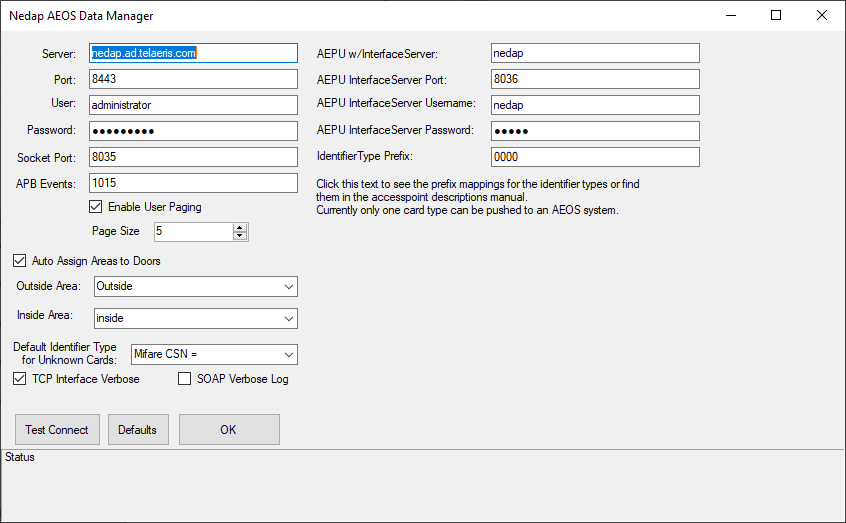
AEOS/NEDAP Setup Page
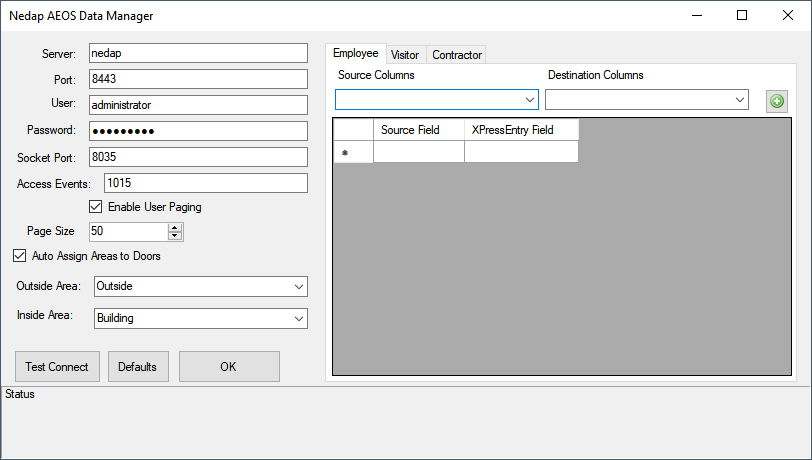
Explanation of AEOS Options
Server: The DNS name or IP Address of the AEOS system
Port: This is typically 8443
User: Username in AEOS for the SOAP calls
Password: The password for that username
Socket Port: For Events, this is the Socket Port (typically 8035)
Access Events: These are the valid access events we are looking at to determine whether a cardholder has entered the facility.
Enable User Paging: Keep this checked unless you have a tiny system. Just keep it checked.
Page Size: The number of records on each paging request.
Auto Assign Areas to Doors: Check this if you want the “Outside Area” and “Inside Area” to be assigned to doors when we can’t determine the proper area from AEOS.
Outside Area: The area assigned to the outside of the door.
Inside Area: The area assigned to the inside of the door.
To test whether the SOAP API is functioning, hit “Test Connect”
You should expect a response like “Connection Success! AEOS VERSION” in the Status field at the bottom of the form.
![]()
Note that this doesn’t check the Socket connection for Events.
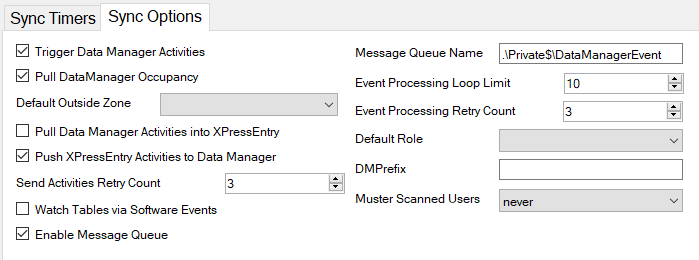
Socket Events
If you plan on getting AEOS Events into XPressEntry, you’ll have to enable the “Watch Tables via Software Events” option. When you hit “Save” on the Data Manager view, you should see something similar to the following in the log:
DEBUG: MSG:Response:acknowledgement=on;
INFO: TCP Client Connected
DEBUG: MSG:Status:connected to AEOS version 2019.1.4 built on 2019-09-10
INFO: Starting Watching Tables
Activity Types:
You can choose to get full Activities from these events or just occupancy updates for your cardholders.
To get full activities, on the Data Manager view, check the “Pull DataManager Activities into XPressEntry”.
To just get occupancy, check the “Pull DataManager Occupancy” option.
If you don’t care about occupancy, don’t check either and don’t check the “Watch Tables via Software Events” option.
6.Initial Data Synchronization and Setup XPressEntry Data
The next step is to synchronize the data from AEOS and setup intervals for synchronization. Below are explanations for each type of synchronization
Full Sync:
This synchronizes all of the data from the AEOS system. This includes cardholders, tokens, visitors and contractors. It should include picture information for cardholders as well.
This also includes all the data from the Partial Sync.
Partial Sync:
This synchronizes the following tables used for overhead:
Zones
Readers
Doors
BadgeTypes
Groups
Group/Reader mappings
Occupancy Sync:
If the option “Pull DataManager Occupancy” is set, this will synchronize the Cardholders with their current location from AEOS.
Activity Sync:
Synchronizes the Events from AEOS. This only applies if the “Pull DataManager Activities into XPressEntry” option is checked.
Data Mappings
Here we define what tables in AEOS map to which tables in XPressEntry
|
AEOS |
XPRESSENTRY |
|
Person / Visitor / Contractor |
Users |
|
Token |
Badges |
|
Entrance |
Door |
|
Access Point |
Reader |
7.XPressEntry Handheld Readers / Doors
XPressEntry handheld authentication is done by two tables. Readers and Doors.
There are three types of Readers in XPressEntry:
- The Server Reader – used to assign badge activities from the server. This will likely be named “Server Reader: COMPUTER NAME” and have a 20-22 character GUID.
- Readers – Logical readers used to assign access control privileges from external systems. In the case of AEOS, they should correspond to Entrances
- Handhelds – These are the physical handheld devices. These are typically an Android or device. These have a GUID based on the physical machine.
Doors are used by handhelds to dynamically assign permissions on a device. By default, the user is allowed to switch doors from the device. The devices use the permissions for the “External Entry/Exit Readers” assigned to the door to determine whether the cardholder has permission to scan at the reader.
For AEOS, carriers who are allowed at an Entrance will allowed at the corresponding doors.
The final piece we need to map for XPressEntry are the Areas/Readers for each Door. To do this, you may need to enable the setting “Allow Editing of External Data”
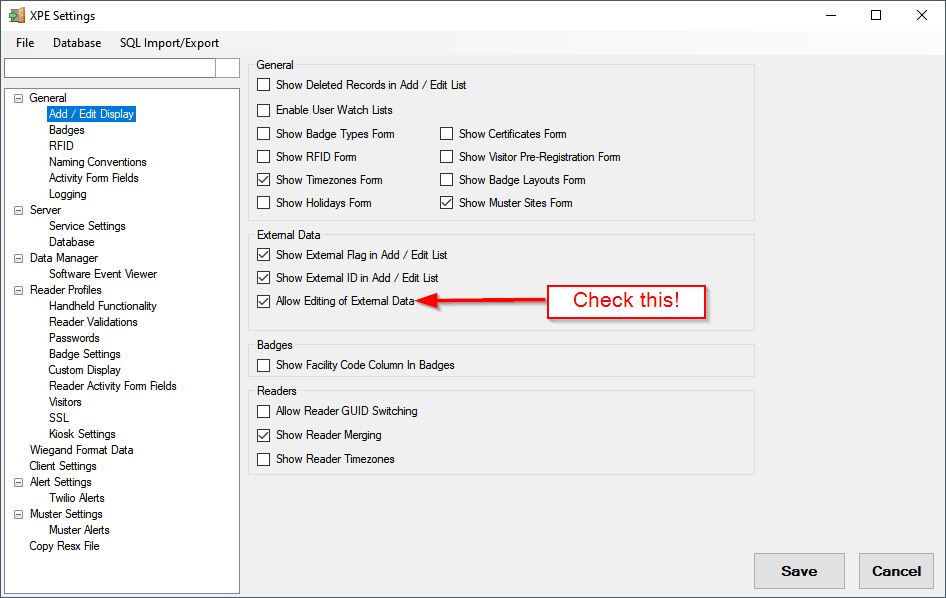
We can then assign the Door Areas/Readers from the XPressEntry Add/Edit Info interface
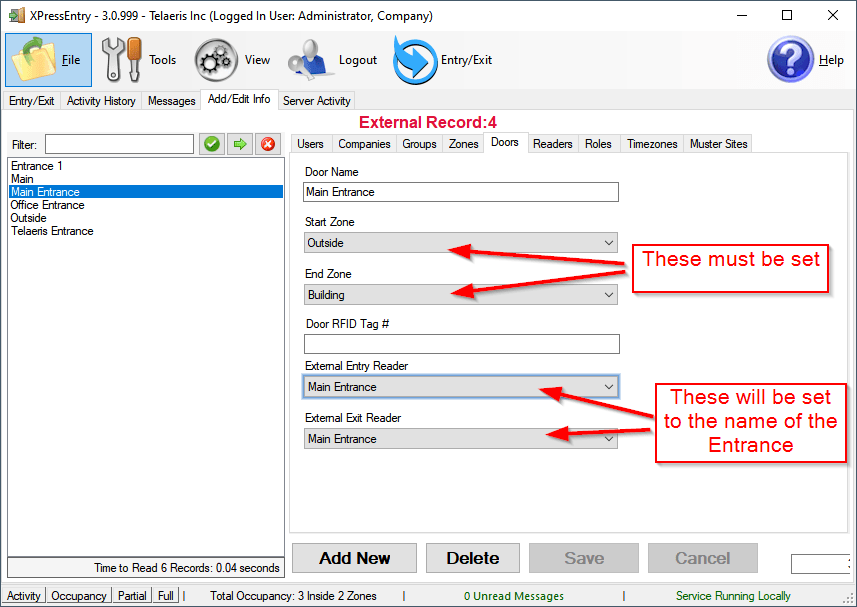
If all Entrances are going to/from the same area, or if occupancy doesn’t matter in your setup, you can choose the “Auto Assign Areas to Doors” option from the AEOS Data Manager Setup page.
For More information on setting up the handheld device and synchronizing with the XPressEntry Service, see the following document:
8.Setup XPressEntry to push badge activities to AEOS
AEOS needs to have an InterfaceServer object setup to receive Events.
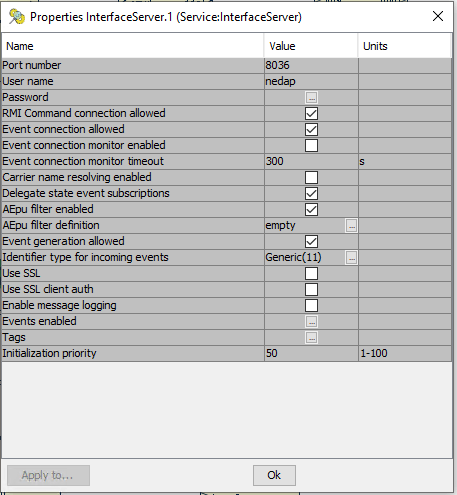
Make sure that the “Event generation allowed” checkbox is enabled.
Each Interface server can only serve one Identifier type. Make sure the Identifier Type selected has the correct prefix set from the following table:

Note that for some Generic types, 0000 is the correct value here.
The Username/Password for this InterfaceServer might be different than the one for the rest of the API, so double check. It’s nedap / nedap by default.
Make sure the Data Manager Option “Push XPressEntry Activities to Data Manager” is enabled.