XPressEntry – Android Documentation

1.Purpose
This document is intended to give an overview of XPressEntry Android Client (XPID100 & XPID200).
2.Welcome
XPressEntry is a tool used for validating credentials of personnel entering facilities using handheld devices. It provides occupancy counts, entry/exit activity, access control groups, muster activity and reporting to help you monitor and secure your facilities.
2.1.Concept
The XPressEntry Server Operator can track when and where each person entered, how long they were in specific locations and can update system information and access control rules for controlled areas. A common use case follows: an employee approaches a door equipped with an XPressEntry Handheld Reader and presents their badge to the attendant to be scanned. If authorized, the software will display the name, time stamp and the picture of the entrant on the screen of the handheld. The entry is recorded in the XPressEntry Server, where the occupancy and activity for that zone is updated with the new information.
The XPressEntry System can be used for a wide variety of purposes, including:
- Entry / Exit Tracking
- Employee Validation
- Remote Parking
- Bus Validation
- Emergency Mustering
- Confined Space Management
- Visitor Management
- Event Management
- Ticketing
- Certificate Tracking
- Handheld Enrollment
XPressEntry may be used as a completely stand-alone system or may be set up to work in conjunction with any access control system, HR database, Club or Resort POS systems, and other database enabled system.
3.XPressEntry XPID Handheld Setup
This is a quick guide for setting up your XPressEntry XPID handheld devices. Below are the steps to set up the handhelds from the XPressEntry Server.
On XPressEntry Server:
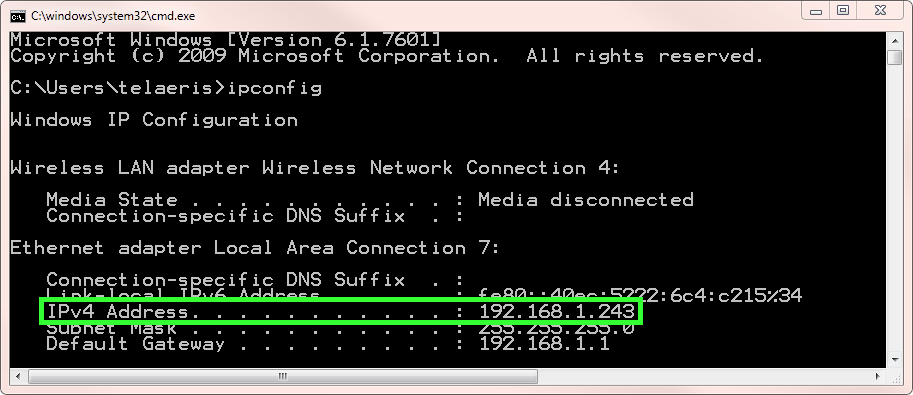
- Determine Server IP Address: The first step in setting up your XPressEntry Handheld is finding the IP address of the Server computer.
- For this document, we will use a server IP address of 192.168.1.243
How to find IP address:
- Open Command Prompt by searching and selecting ‘cmd’ from the Start Menu.
- Type in the following on the command line – ipconfig
- Identify the IP address
- Server Port: The TCPIP port the Server will listen for communications on a default value of 30000. If you specify another port in the XPressEntry Settings page (From Tools→ Settings, it is recommended to pick one that is above 2000 and does not conflict with another program running on your machine.
For the purposes of this document, we will use the default server port: 30000.
On the XPressEntry Handheld
- Network Setup
- Power on the reader and then select the Apps
 icon located on the bottom middle of the Home screen. Tap the Setting icon then the Wi-Fi icon.
 - Select one of the existing networks and enter its password or select Add network to add a network that does not show on the list
- IP Address: Set Static or DHCP IP Address for the XPressEntry Handheld.
- IP Address Options:
- DHCP IP Address: Select this if the IP address will be automatically assigned for the reader.
- Static IP Address: Select this if the handheld is to have a static IP. This will require an IP Address, Subnet mask and Gateway assigned by your company’s IT department.
- XPressEntry Handheld Application: Locate the XPressEntry application from the Apps page and add shortcut.
- From Settings page, locate the XPressEntry app.
- Hold down on the XPressEntry app. This will automatically navigate the app to the Home screen.
- Optional – to make XPressEntry run on Handheld Startup: Navigate to the startup directory and repeat step d. above to paste the shortcut
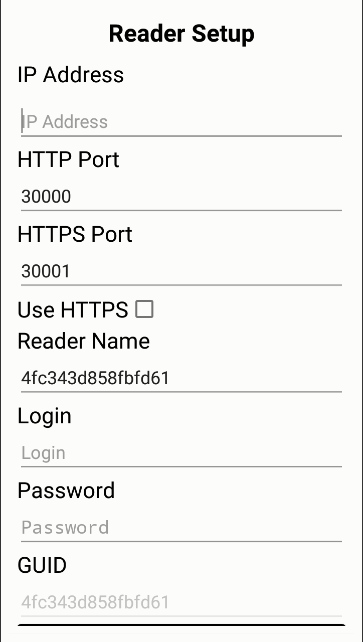
- Reader Setup Page: When the user opens the XPressEntry application for the first time, the settings page will appear.
- Enter the Server information from Step 1 into the IP and Port fields. In our example, we used:
- IP: 192.168.1.243
- Port: 30000
- Click “Update from Server”.
- This will verify that the server can be correctly reached and will update the XPressEntry Handheld database to the version on the Server.
- If this fails, there are a few items that could cause issues which should be checked.
- Verify XPressEntry Server is running.
- Ensure that XPressEntry Server and Handhelds are on the same network.
- Verify that the Windows Firewall on the machine that XPressEntry Server is running is allowing communication for XPressEntry through our designated port (30000).
- If the XPressEntry handheld setup has been successful, the start page determined under “Reader Profiles” in the XPressEntry Server program will appear when the program restarts.
Wireless Network Setup
4.Modes & Functions
4.1.Starting the Handheld
The XPressEntry Handheld is simple to use and easy to set up through the XPressEntry Server.
On the handheld, open the XPressEntry application. XPressEntry Handheld application will open with the Login screen unless this has been disabled in Readers Profile settings, then it will open directly into the normal operating mode.
4.2.XPressEntry Handheld Modes
Depending on the options selected in Available Functionality found in the Readers Profile settings, different mode options will be available to the operator. List of Modes:
- Certificates
- Entry/Exit
- Verification
- Freedom
- Muster
- Activity
- Occupancy
- Enrollment
- Events
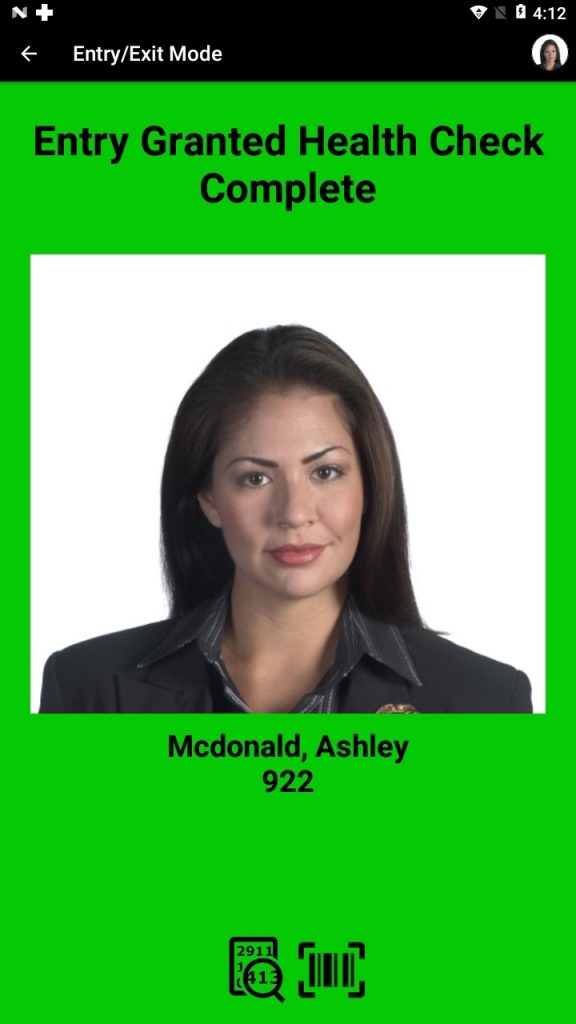
4.2.1.Entry/Exit Mode
![]()
The Entry Mode allows the Reader operator to record users moving from a door’s start zone to the end zone. The Exit Mode allows the Reader operator to record users moving from a door’s end zone to the start zone. Scanning an employee in under this mode will populate the Entry/Exit tab on the server.
There are two main ways to badge users in/out:
- Scan a Badge: Scan a user’s badge until it beeps, displays the Entry/Exit Authorization message, name and image of the scanned employee.
- Manually Entry: Manually enter the badge number; see Manual Entry: for more information.
4.2.1.1.Entry/Exit Menu Options
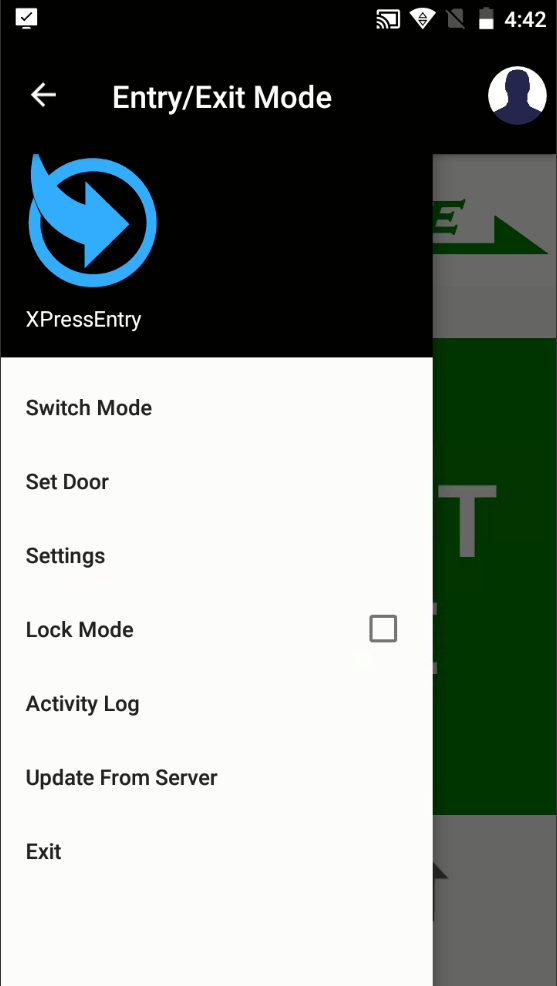
The Entry/Exit Menu Options is found by selecting Menu on the upper left corner of the screen.
For more information on the Entry/Exit Menu Options please see Main Menu, and locate the menu option of interest. The only exception is for, Messages, Set Door, and Lock Mode, which are only available when operating in the Entry/Exit Mode and the descriptions of these screens are found below.
4.2.1.2.Messages
The Messages screen is currently not available for XPID.
4.2.1.3.Set Door
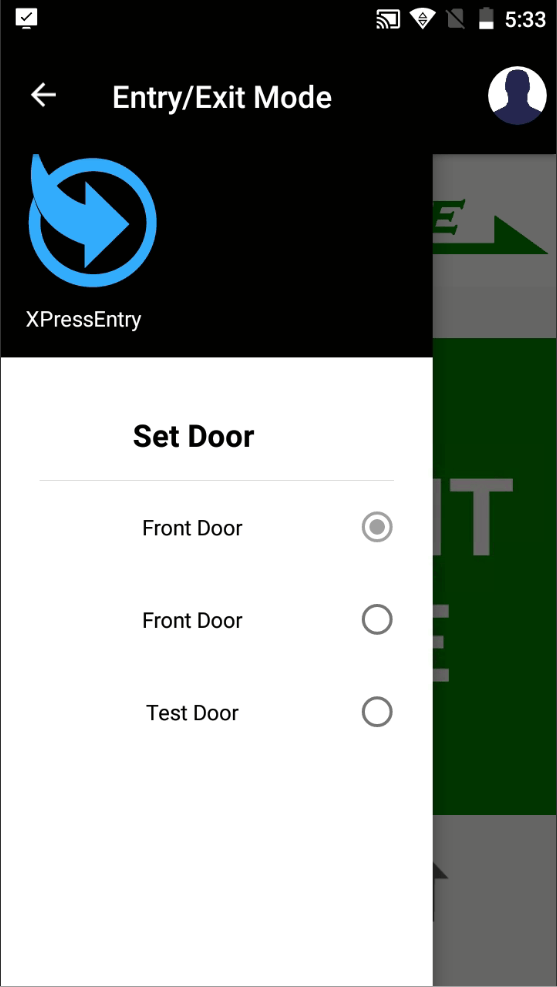
The Set Door menu option will display a list of all available doors. This screen allows the operator to change the door the Reader is currently assigned to by simply highlighting the desired door. This activity will change the doorway and the selected door will appear in the title on the main Entry/Exit page.
4.2.1.4.Lock Mode
Select Lock Mode from the menu options to lock the mode in either Entry or Exit. To unlock, uncheck Lock Mode from the menu items.
4.2.1.5.HealthCheck/Activity Form FIeld
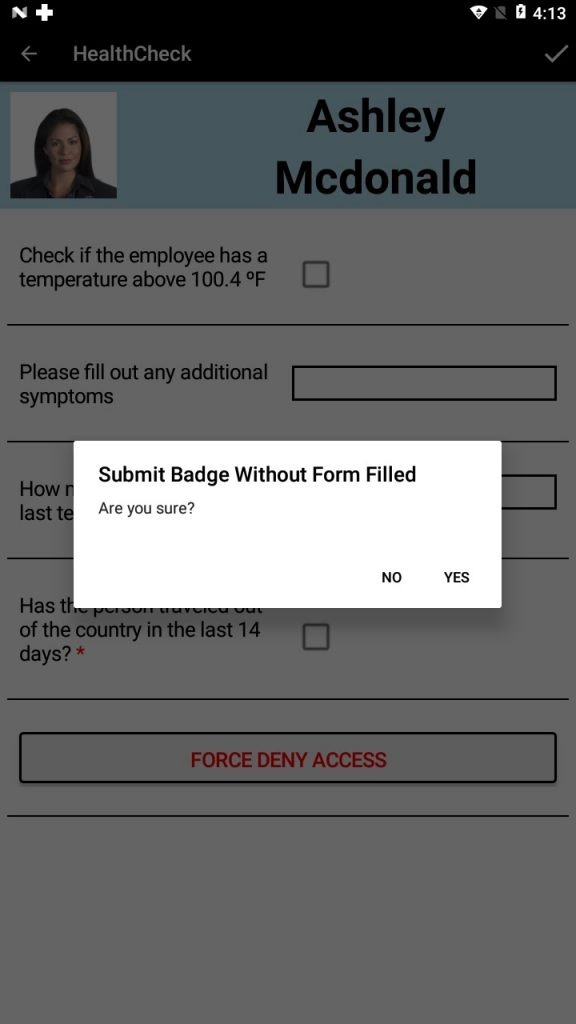
When Reader Profile Setting Enable Form Field on Entry or Enable Form Field on Exit is enabled, on a successful badge scan, the operator will be directed to the HealthCheck/Activity Form Field page. Fill out the form Data. If a prompt has a red asterisk (*), the prompt must be answered in order to submit the results. To submit the results, click the check at the top right.
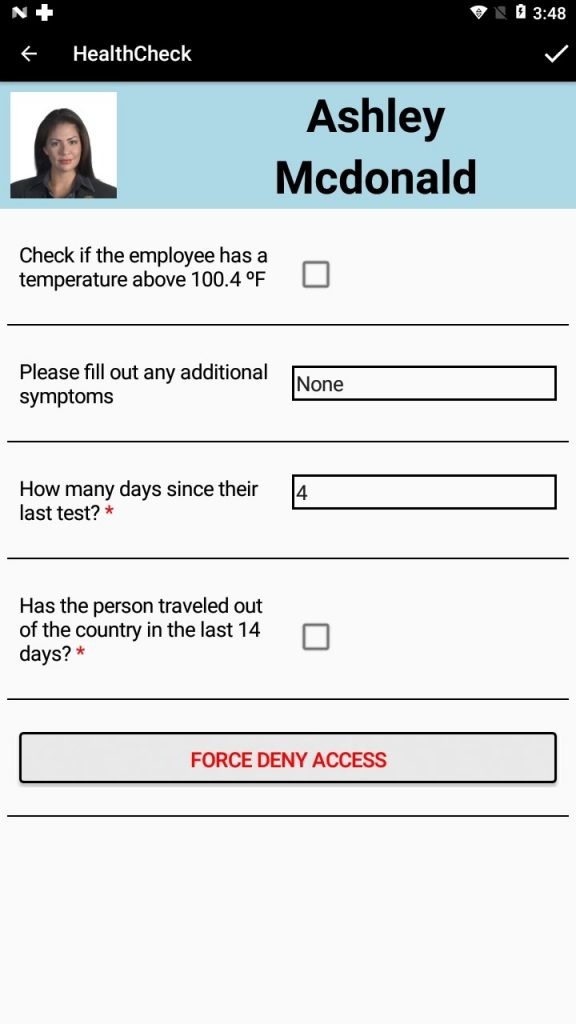
If the user decides to cancel out of the form field by pressing the back button, they will either cancel the submission, or they will be prompted to submit the badge activity for entry and not submit the filled out data.
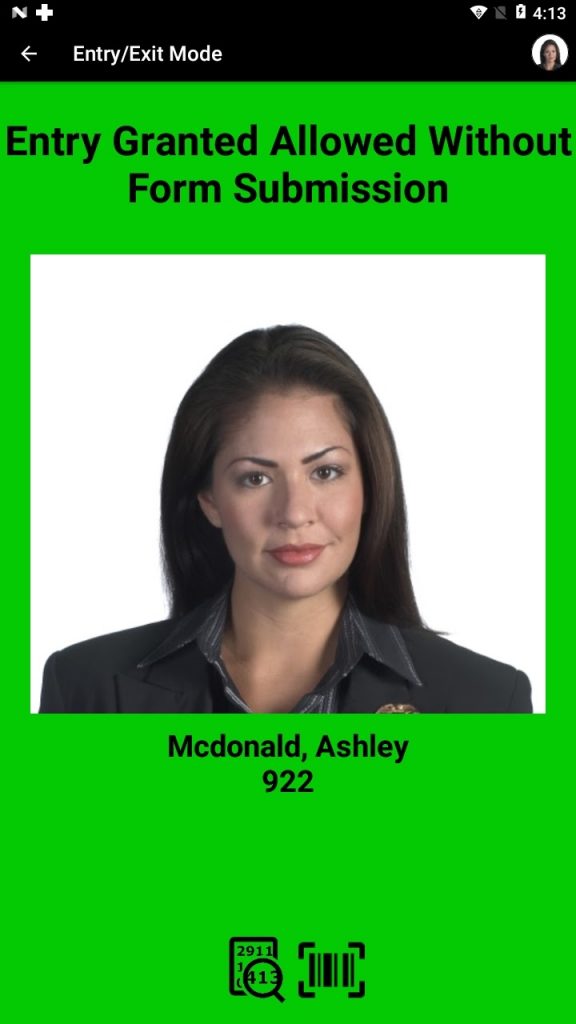
The Entry/Exit badge activity if sent will be seen in XPressEntry, and also the integrated access control system as a standard card access event. The filed out data will be stored within the XPressEntry Database which can be viewed on the server or client.
4.2.2.Muster Mode
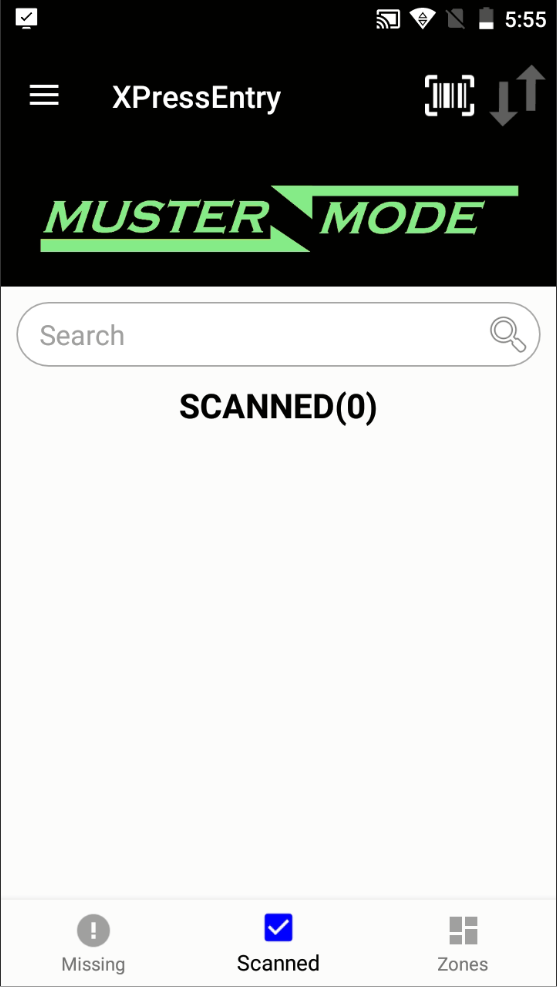
The Muster Mode allows the Reader’s operator to scan employees in mustering emergency situation. Scanning an employee under the Muster Mode will populate the Muster tab on the server.
From the Muster Mode there are several options available to the operator.
Search bar: Operator is able to manually search users with last name, first name or badge #.
Muster Mode window displays the following:
- Select Scanned/Missing Users: Allows the user to display a list of Scanned or Missing users by selecting from the dropdown list.
- Scanned: Displays the total status of the Scanned and Missing users.
- Zone: Displays the Zone(s) included in the muster.
4.2.2.2.Set Muster Point
The Muster Point option will display a list of all zones. This option allows the operator to change the zone to the appropriate one for the muster activity. Simply select the box of the appropriate zone from the list.
4.2.3.Verification Mode
The Verification Mode allows the operator to verify if an employee has proper access to the zone that they are trying to enter. To select a zone, go to Menu> Set Zone> tap to select zone.
There are two main ways to Verify users:
- Scan a Badge: Scan a user’s badge until it beeps, the screen should display the Verification Authorization message, name and image of the scanned employee. Those displayed options vary depending upon the Reader Profile Settings.
- Manual Entry: Manually enter the badge number; see the Search icon for more information.
4.2.3.2.Set Zone
The Set Zone menu option will display a list of all zones. This option allows the operator to change the zone to the appropriate one for the application, simply select from the list.
4.2.4.Certificates Mode
The Certificates Mode is currently not available on XPID.
4.2.4.1.Add Certificate
The Add Certificate feature is currently not available on XPID.
4.2.4.2.Verify Certificate
The Verify Certificate feature is currently not available on XPID.
4.2.4.4.Update Lists
The Update Lists feature is currently not available on XPID.
4.2.5.Freedom Mode
The Freedom Mode allows the Reader’s operator to communicate with an XPressFreedom Board. From the Freedom Mode there are several options available to the operator.
4.3.1.Switch Modes
Depending on the Readers Profile settings, different mode options will be available to the operator. These include: Entry/Exit, Verification, Muster, Enroll, Events, Freedom
4.3.2.Manual Entry
Selecting the Search icon will display the Manual Entry screen. This option allows the operator to search for users by supplying user information:
- Last Name
- First Name and/or
- Badge Number
This screen will list all users who fulfill the search criteria. The operator needs only highlight the correct user from the list and selected the SUBMIT button. The user will now be counted as scanned in the activity.
4.3.3.Occupancy
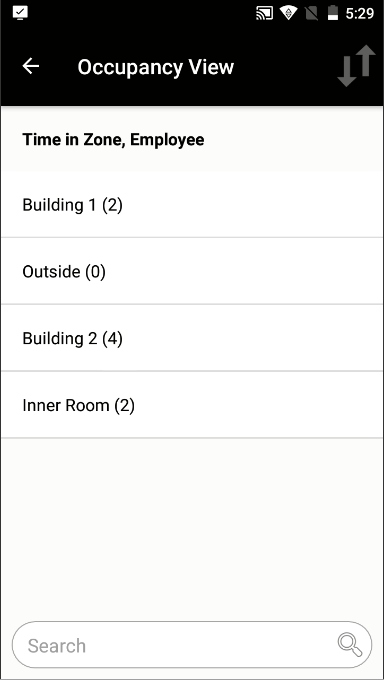
Displays the View Occupancy page, this page lists the zones with their current occupancies. This option is available only when operator is in Entry/Exit, Muster or Verification mode.
Below are a few of the options and their effects:
- Search bar: Allows for filtering by zone name.
- View Occupants: Selecting a zone brings up a list of all users in that zone.
- Return/back: Returns the operator to the previous mode.
4.3.4.Activity Log
Displays a list of queued activities, these activities have not been sent to the Server because of slow connection or non-connectivity issues.
4.3.5.Update from Server
Selecting the Update from Server menu option is comparable to selecting the “Update Lists” from Settings, which updates the local database with the latest data from the Server.
4.3.6.Toggle Keyboard
This enables the handheld operator to toggle the handheld keyboard.
4.3.7.Settings
Displays the Setup page which allows the operator to specify the Server connection info and define the environment for the Reader’s operations.
4.3.7.1.Server
Displays the:
IP – sets the IP address of the Server that the Reader connects.
Port – sets the operating system port that the Server is listening on for Reader communications.
Update Lists– Pressing this button prompts the user and gives the option to clear all data from the local database and download the entire database from the Server, or to just update the local database with the latest data from the Server.
Reader – choose which Reader this handheld is being designated as.
4.3.7.2.Settings
Displays the reader settings, the operator is able to view the handhelds settings but does not have access to modify them. Operators must edit Reader Settings from the server by navigating to Tools→ Settings→ Reader Profiles.
4.3.7.3.Logout
When applicable, logs the current operator out of the handheld, and brings the Reader back to the login prompt.
4.3.7.4.Quit
Selecting this menu option will exit the XPressEntry program.
5.Glossary
Activity – An action involving a particular user or Reader
Administrator – A type of XPressEntry user who has total access over how XPressEntry operates. Administrators can create and edit information as well as change settings. Some features of XPressEntry can only be performed by someone logged in as an administrator. Other features can be performed by both operators and administrators. Administrators are required to have a login ID and password.
Badge – The generic term for a piece of employee identification. It has the employee’s name, company, and badge number, and sometimes other information, such as an employee photo. The badge # may be encoded with a bar code, or be digitally stored on a proximity/smart card.
Badge number – A unique number assigned to an employee as a means of identification in XPressEntry. It can match a company’s existing employee identification scheme, such as use for access control proximity cards. It contains only numerical digits. Badge numbers cannot overlap with stock numbers. This may also be referred to as an employee number.
Entrant – A type of XPressEntry user whose entry and exit activities will be tracked into and out of zones. They can be an employee of the company where XPressEntry is used, or a contractor or subcontractor. Entrants need a badge #, which can be part of their ID badge.
Employee Number – Another term for badge number.
Field – A single category in a database (i.e. Last name or badge number). Each record is made up of multiple fields describing this record. When a database is displayed in a table format, the fields are arranged in columns.
Operator – The type of XPressEntry user whose job it is to run the XPressEntry server, monitor occupancies, activities, and error conditions. While an administrator has access to all of XPressEntry’s functions, an operator has access to the most commonly used functions of XPressEntry, essential to viewing the current operational status.
Record – A single entry in the database corresponding to one user, door, Reader, etc.
A record is made up of several fields. A user record will contain information such as a badge number, first name, middle initial, last name and company. When a database is displayed in a table format, records are arranged in rows.
User – A person who is working with the XPressEntry system.
6.Technical Support
If you need assistance with XPressEntry, Telaeris provides several ways for customers around the world to receive technical support. Telaeris also welcomes input on improving XPressEntry – if there is a function that would add value to your company’s mobile access control system, Telaeris can incorporate those features into the next version of the application. Telaeris can also provide customized features just for your company, including custom report formats.
On the Internet
Visit our website at www.telaeris.com/kb/ for answers to frequently asked questions about XPressEntry, upgrades, tips and techniques, and information about other Telaeris products.
E-mail
Send an e-mail to our technical support department at [email protected].
Before contacting us
Before contacting our technical support department, please make sure that your hardware meets the minimum system requirements and all your hardware and peripherals are properly connected and set up according to their manufacturer’s instructions. Please have the following information ready:
- Product version (find this by selecting “About” from the Options menu).
- Operating system and version
- Description of hardware configuration
- Exact error message, if any
- Steps to duplicate the problem