XPressEntry – OnGuard Documentation

1.Purpose
This document is intended to allow the user to synchronize an XPressEntry system with an OnGuard system.
2.Installation Pre-requisites
- Onguard 7.0 or later Installed
- XPressEntry Server 2.7+ Installed
- OnGuard DataConduIT or OnGuard OpenAccess Enabled
3.License Requirement
- DataConduIT/OpenAccess License for OnGuard – From LenelS2
- XPressEntry License with OnGuard Feature Enabled – From Telaeris
4.OnGuard Services
The following services should be enabled on the OnGuard Application Server or respective server:
DataConduIT:
LS DataConduIT Service
LS Communication Server
LS License Server
LS Linkage Server
OpenAccess:
OpenAccess Service
LS Communication Server
LS Web Service
LS Web Event Bridge
LS Event Context Provider Service
LS Message Broker Service
5.Setting Up OnGuard to Synchronize with XPressEntry
It is assumed OnGuard is installed with DataConduIT or Open Access enabled. If using DataConduIT a user with sufficient permissions for WMI to communicate is logged in.
Order of Operations
- Set up OnGuard Data
- Enable Synchronization from XPressEntry
- Set up XPressEntry Data
6.Setup OnGuard Data and Settings
Handhelds
A XPressEntry handheld can act as any existing reader within Onguard, or as a dedicated entry and exit reader. For the latter, every physical XPressEntry handheld reader can have up to two logical readers in the OnGuard System. These should be distinguished with the words “Entry/Exit” or “IN/OUT” at the end of them. This will allow you to have one logical door for Entry and Exit readers per handheld. For example: Main Gate IN and Main Gate OUT. If only one direction will be tracked per handheld, you only need to create a single reader. For XPressEntry mustering, a reader can be added to exit the individual from the hazardous area.
XPressEntry Panel
Each reader created for XPressEntry will be added to an OnGuard Access Panel. You may create any type of access panel such as an LNL-2000 or LNL-2220. A physical access panel is not required. The “virtual panel” is required for handheld events to appear in Alarm Monitoring. It is suggested to use an easily distinguished name such as XPressEntry. (Note that this can also be an actual panel.) Optionally, if you are using the XPressEntry Device Translator Panel plugin, this may be used as the access panel.
XPressEntry Device Translator Panel (Optional in Onguard 8.0+)
The XPressEntry Translator Panel is used to interface the XPressEntry system as a panel and the handhelds as live readers on the OnGuard System. With the Device Translator installed OnGuard can monitor the Online/Offline status of XPressEntry handhelds and server much like any OnGuard panel.
Device Translator Setup (Optional)
Download the XPressEntry Device Translator Installer and run the installer on the Communication Server. Next, go to C:Program Files (x86)OnGuard, and look for the file xpress_entry_settings.txt. Open this file and modify the settings to your XPressEntry server IP and XPressEntry Admin Login credentials. Save the file. This will add an XPressEntry Panel as an option under the “Other” Panel section. When adding new readers in OnGuard as XPressEntry Panel’s child device, once the reader is assigned to a door in XPressEntry, an Update Hardware Status is required for the correct status to be displayed in OnGuard Alarm Monitoring for the reader.
Panel Setup
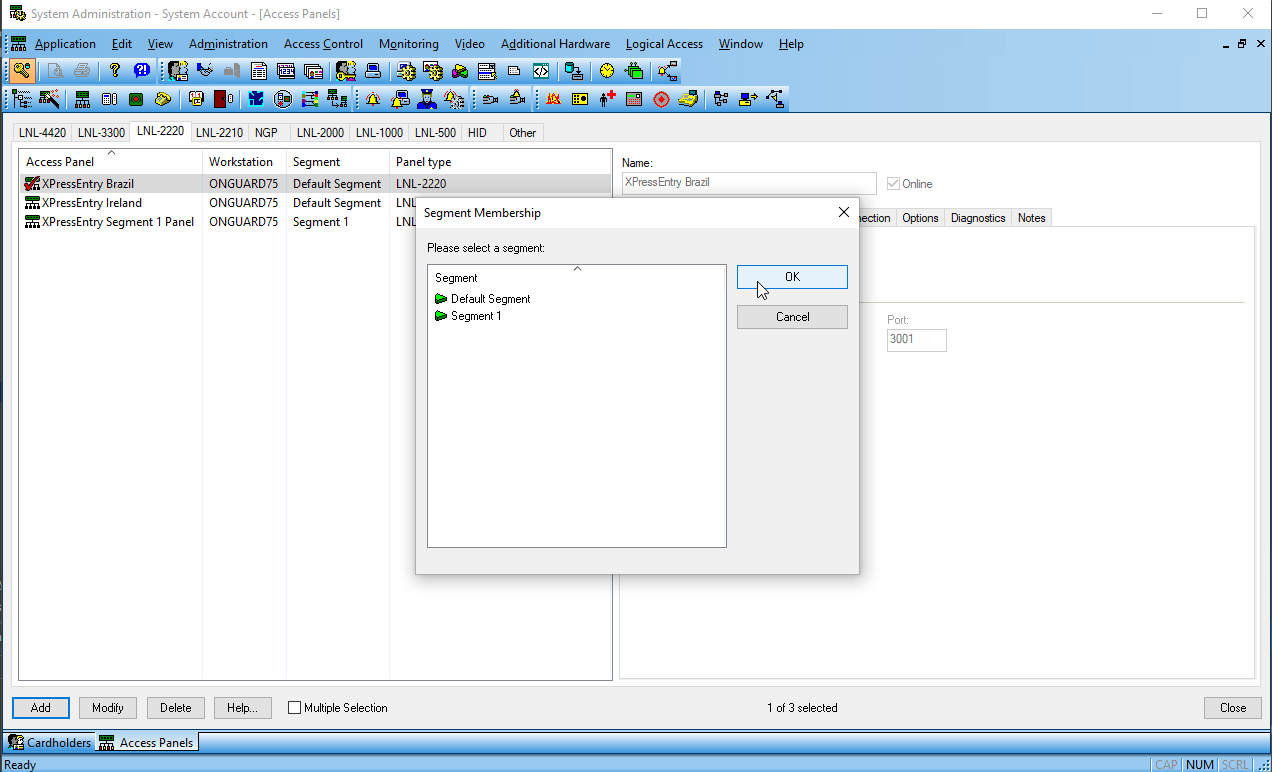
Create a new Access Panel. To create a new access panel in System Administration, select the Access Control Menu Option -> Access Panels. Select the LNL-2220 or any panel type you would like to add. If utilizing the Device Translator Panel, select the “Other” panel type. Click Add at the bottom left. Select a segment if required.
Although we are not connecting to a physical access panel, only three main settings are required.
- Make sure the panel is set to “Online.”
- In the location tab, set a workstation name. This can be the name of the application server for OnGuard.
- Set the Primary Connection. OnGuard requires a default primary connection. Again, this is not connecting to a physical online panel. You may select IPv4, and add invalid IP address into the IP Address box. The other option is to select Direct. Either will work.
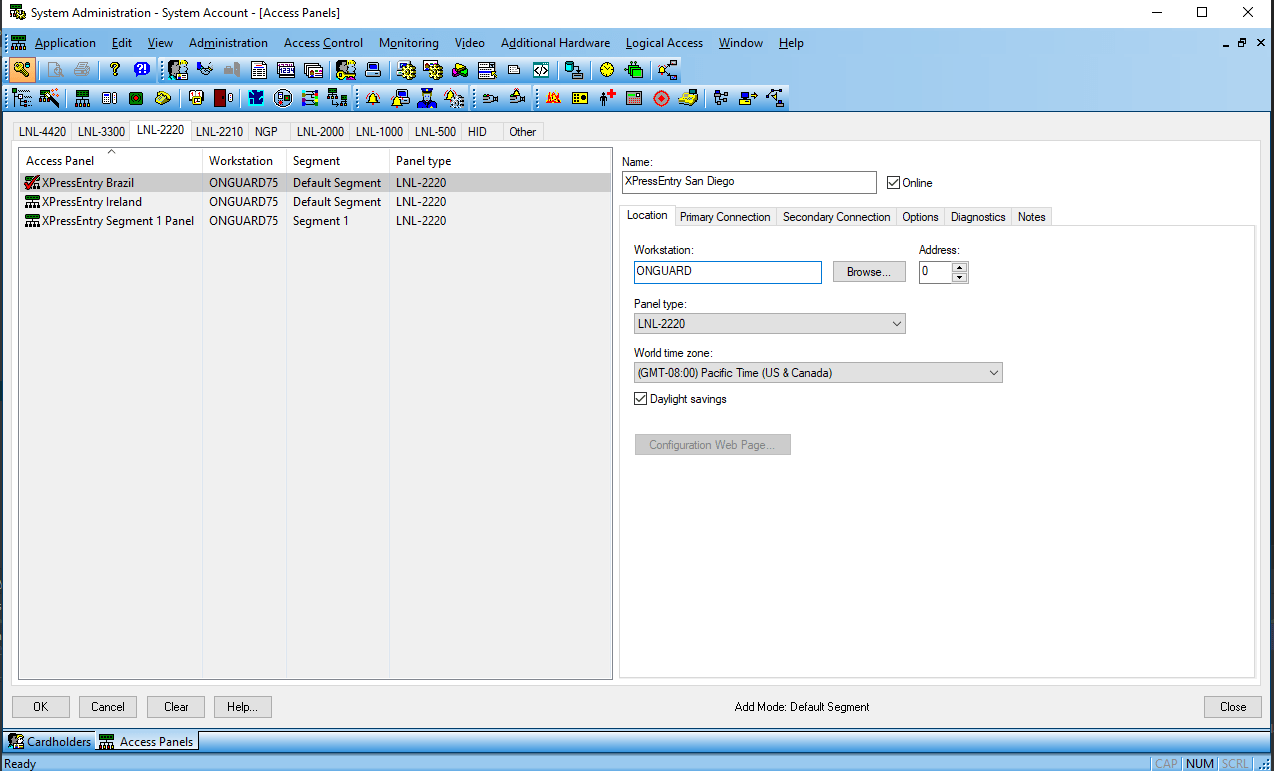
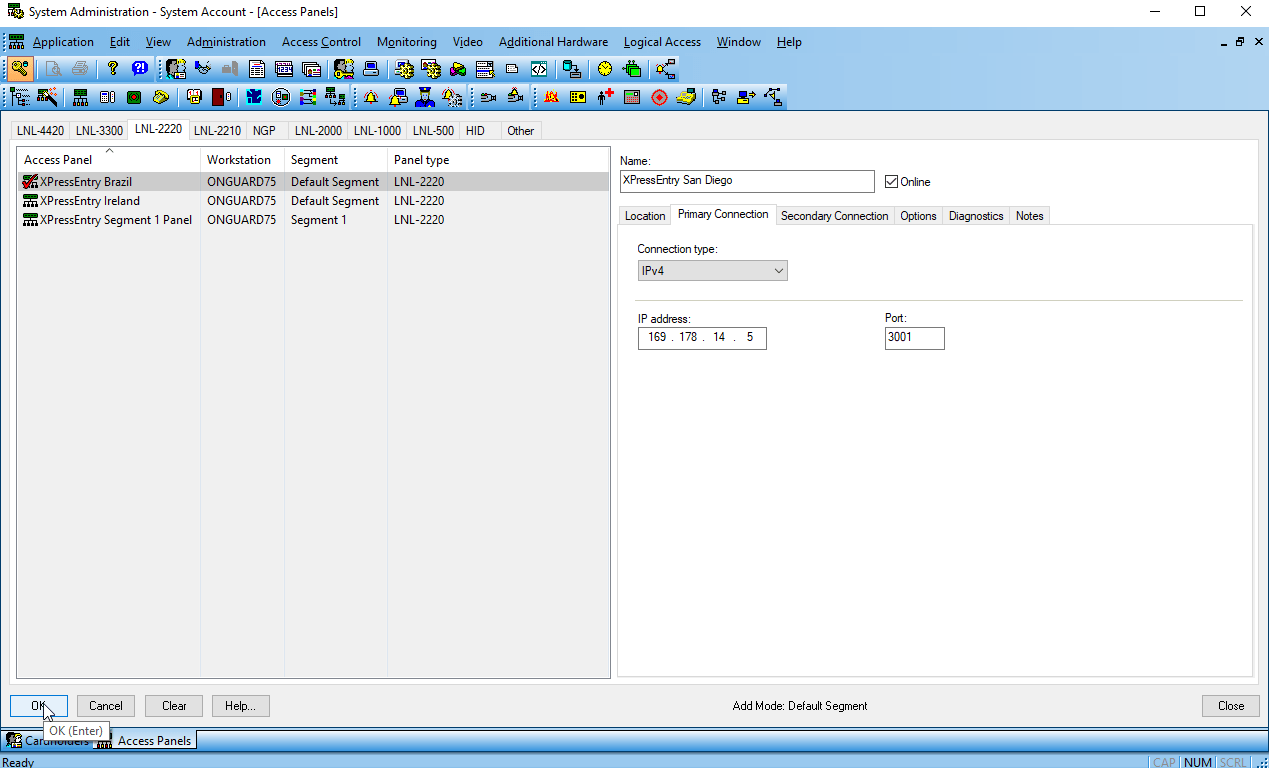
Click OK to add the new panel. Add the panel to the correct Monitor Zone. If you are not sure, select Default Zone.
Adding Entry/Exit/Muster Readers
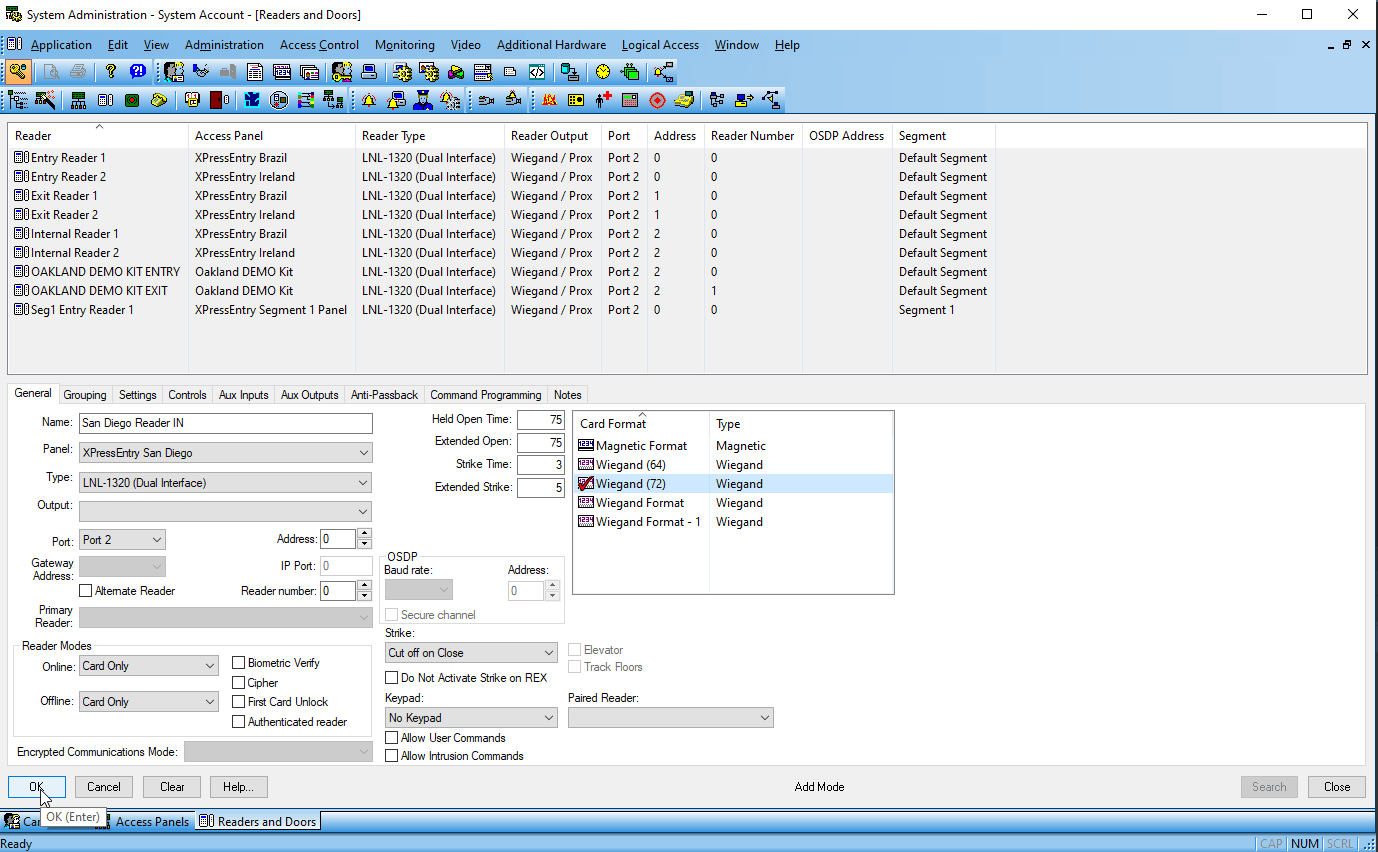
Each Entry/Exit handheld will require two readers. If the handheld is used mainly for mustering, one reader is only required per handheld. To create a new reader in System Administration, select the Access Control Menu Option -> Readers and Doors. Select Add in the bottom left.
Required Fields:
- Name – Set the name of the reader.
- Panel – Select the XPressEntry Panel created.
- Type – Type is required by default. Select LNL-1320 (Dual Interface)
- Output – Select Wiegand/Prox
- Port/Address/Reader Number – Set the port, address, and reader number. The address and reader number will increment for each additional reader added.
- Online/Offline – Set to Card Only.
- Card Format – Select any card format. This is an OnGuard requirement to have a card format selected, but card formats will be configured separately in XPressEntry.
Click OK.
Repeat and create as many readers as necessary.
If the reader is being added as a muster reader, select Anti-Passback tab, and set Area Entering as an Outside, or Muster point area. Set Area Leaving as <Don’t Care>. In this scenario, you will want to check “use soft anti-passback.”
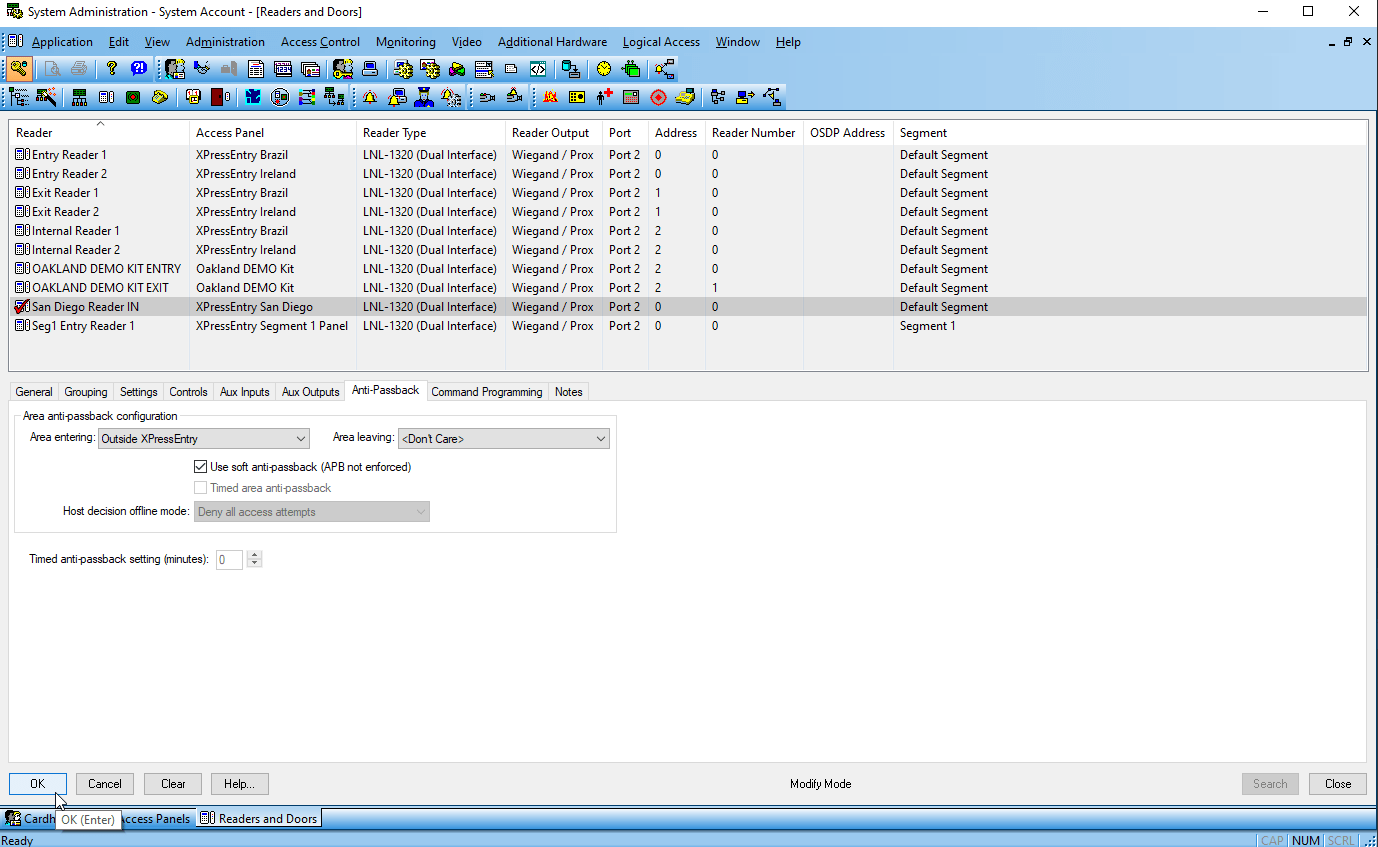
Note that these are setup similar to physical readers in the system, even though the panel may never physically be online. These are just placeholders for events that come in from XPressEntry.
7.OnGuard DataConduIT Setup
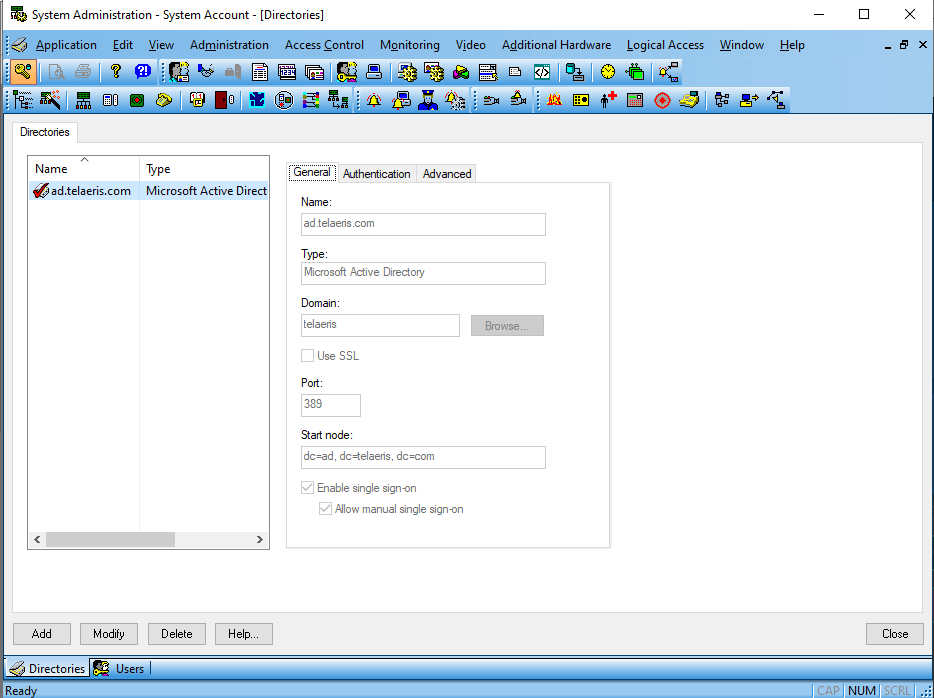
Single Sign-On Directory
When using DataConduIT Single Sign-On is required. In general, this will involve using an existing directory or setting up a new directory (Administration -> Directories) to enable Single Sign-On (SSO). SSO is required for DataConduIT to function properly.
Single Sign-On User
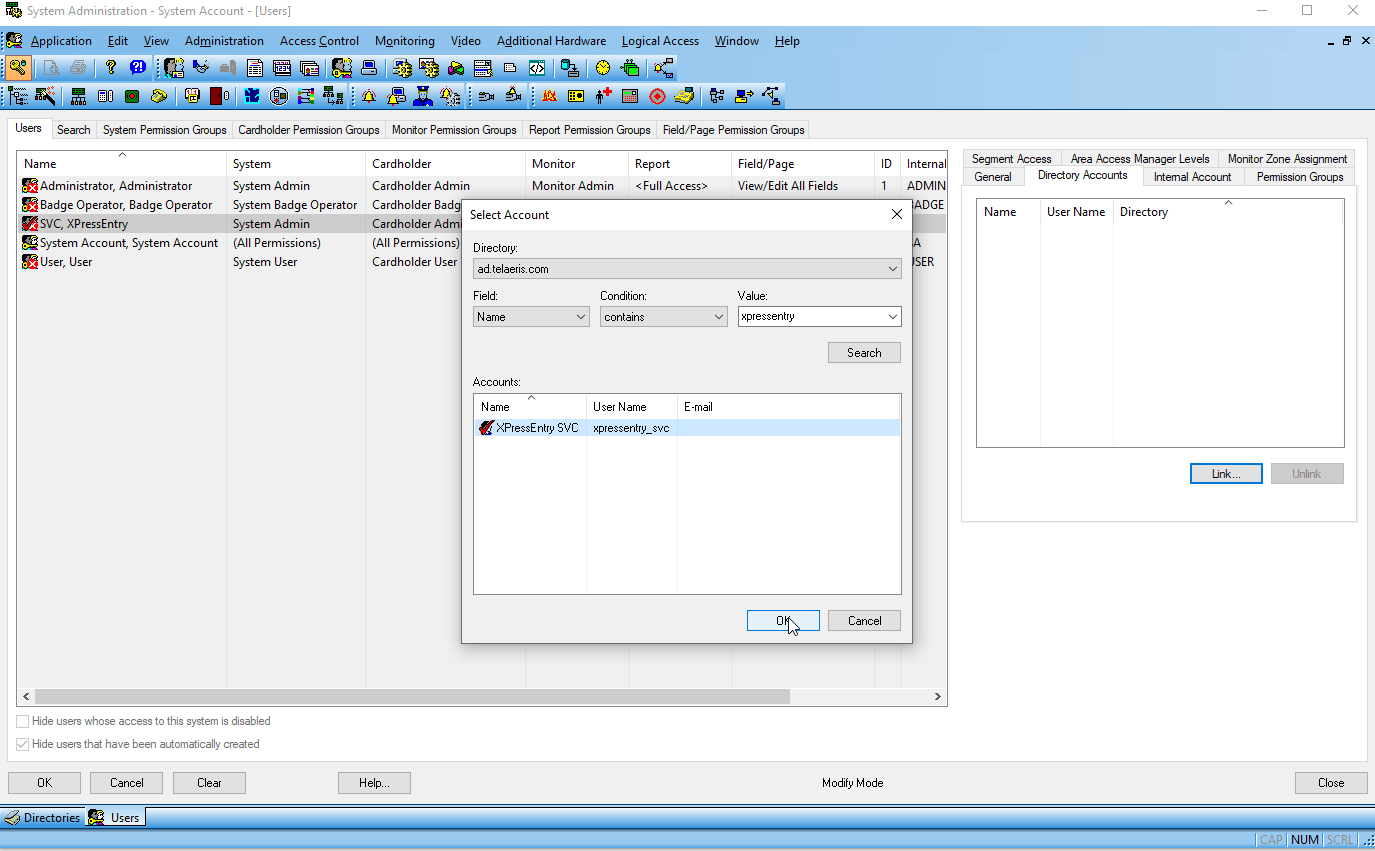
An OnGuard User account is required which DataConduIT can access. (Administration -> Users). This should be linked to a Windows Service account for SSO through the Directory Accounts tab. The SSO Windows Service account will be used to connect the XPressEntry service with DataConduIT.
- Create a Windows Service Account. Ex: username XPressEntry_SVC.
- Create an OnGuard User. The OnGuard User will require System, cardholder, and monitor Admin access levels under Permission Groups.
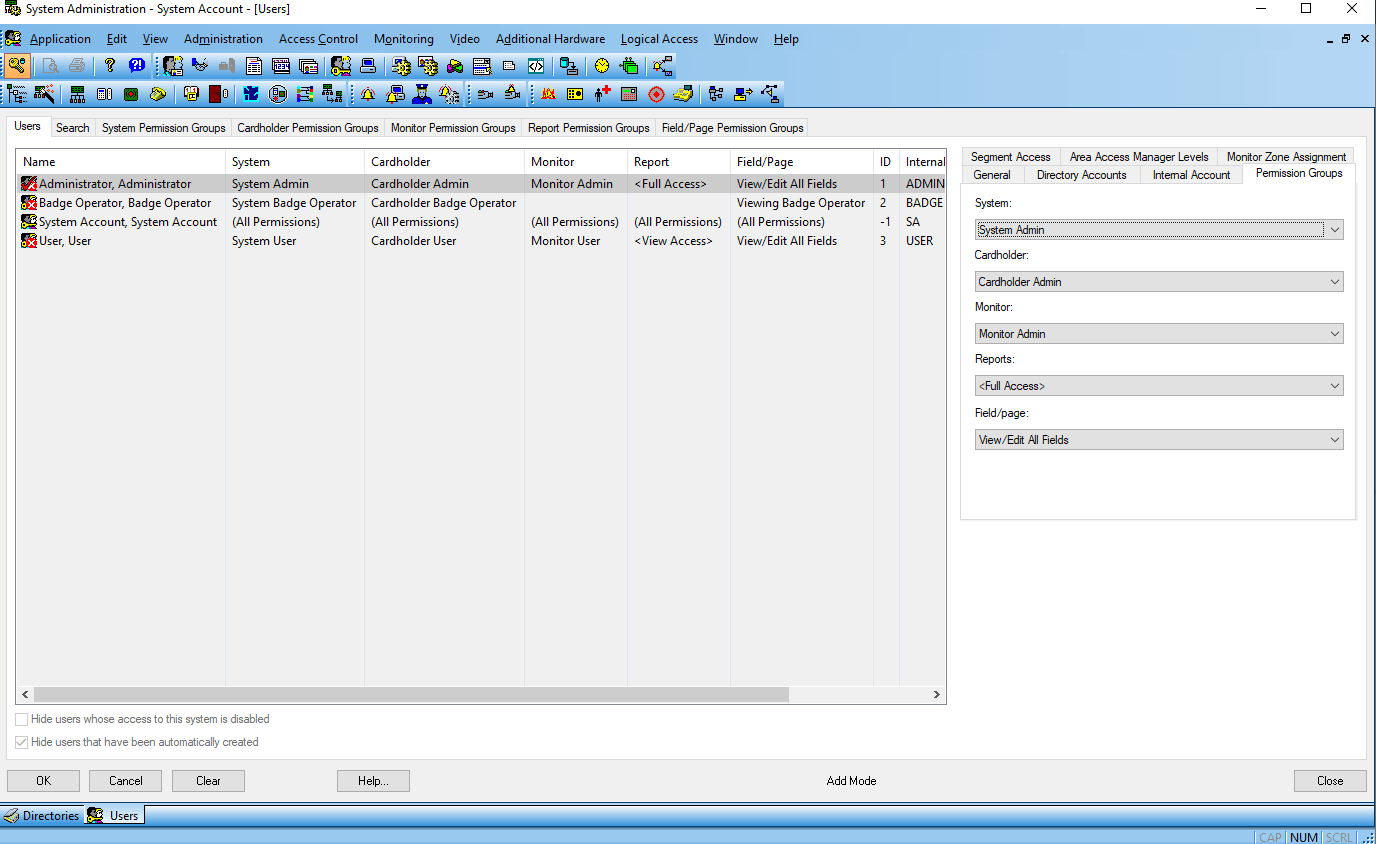
- Link the Windows Service account to the new user
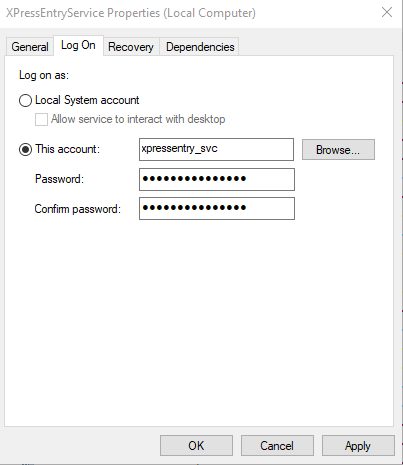
- On the machine that XPressEntry Server is installed, go to Windows Services. Find the XPressEntryService, right-click and click on Properties. Select Log On. Select This account, and sign in with the Windows Service account.
- Open Run with Windows+R hotkeys, type compmgmt.msc and tap OK. Expand Services and Applications and right click WMI Control and select Properties. If using SQL Server as the XPressEntry database, The Windows service account will require db.owner permissions to XPressEntry database.
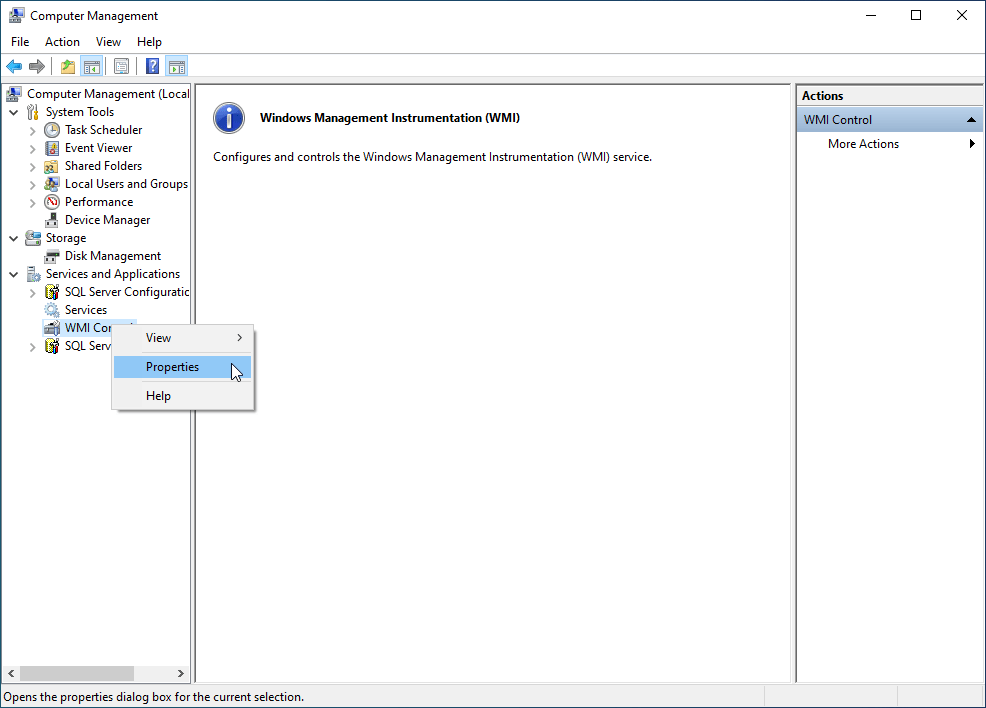
- Select the Security Tab. Expand the Root folder, highlight the OnGuard folder, then click Security Button.
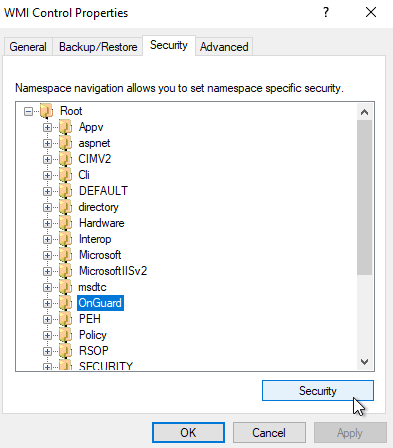
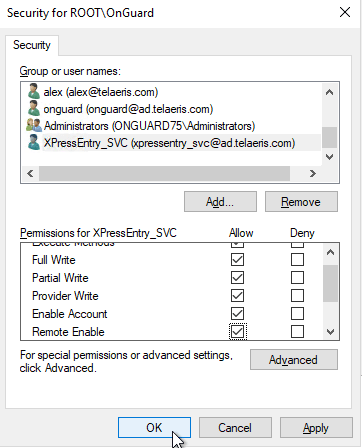
- Click Add, and browse for the xpressentry_svc windows service account. Click OK. Under the permissions for xpressentry_svc, Allow Execute Method, Full Write, Partial Write, Provider Write, Enable Account, and Remote Enable. Click OK.
Software Events / Linkage Server
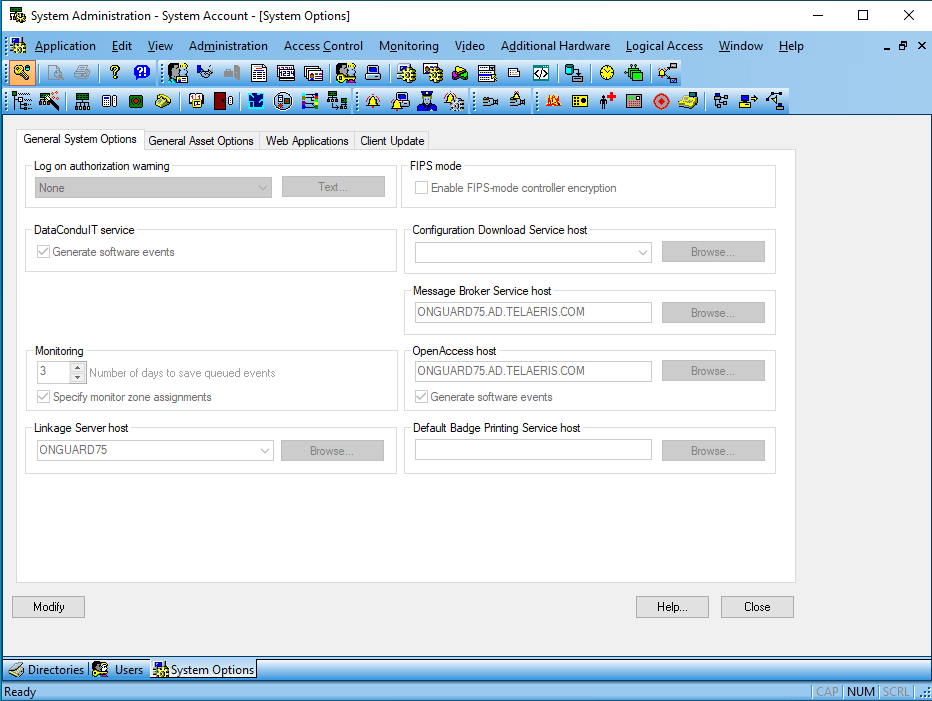
OnGuard Software Events in the system options page must be enabled for XPressEntry to pull occupancy data for mustering, and cardholder and badge changes instantly. This will allow XPressEntry to get user updates from OnGuard via Software Events instead of only during a scheduled synchronization. This is done from the Administration -> System Options page. Enable Software Events for the respective sync method for DataConduIT or OpenAccess.
The Linkage server also needs to be set for software events to function properly. Add the Machine name of where the Linkage Service is running.
Next, to give proper permissions for Software Events the following will be required from the following excerpt in the OnGuard DataConduit.pdf.
“Use domain.exe located in the TroubleShooting directory of the DataConduIT documentation
file structure to determine if this may be the problem. If the NT4Domain is different from the
W2KDomain, then you will need to update the LNL_DIRECTORY.DIR_HOSTNAME to match
the NT4Domain. In case this is Oracle, please use all upper case. A sample SQL query to do this is below; it assumes the NT4Domain name is “Lenel” from domain.exe and that the directory to be
updated is LNL_DIRECTORYID = 1.
update lnl_directory set dir_hostname = ‘LENEL’ where lnl_directoryid=1”
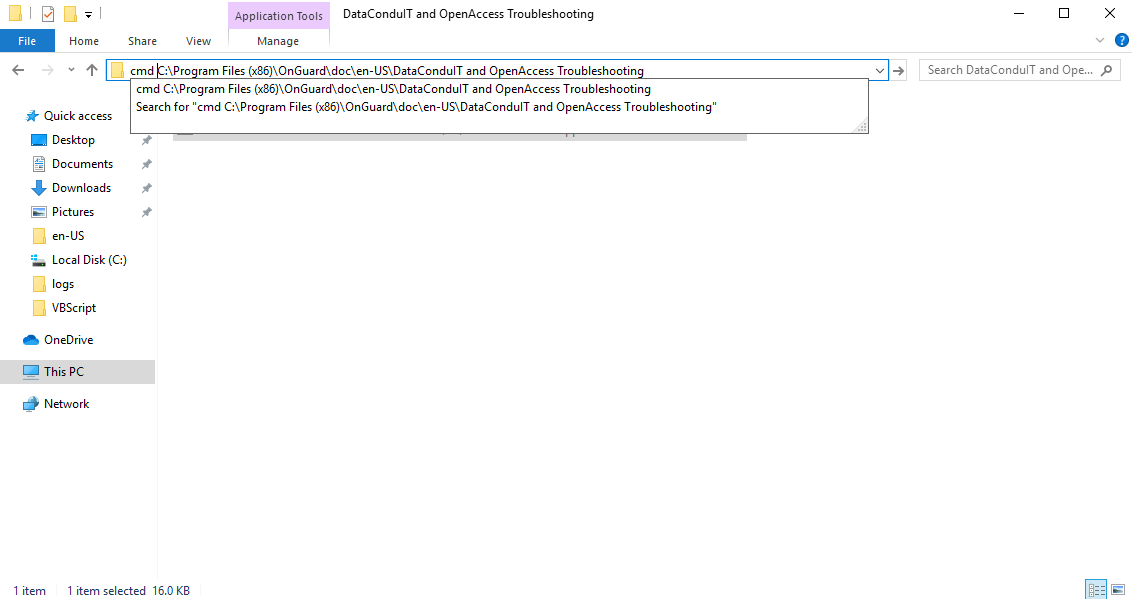
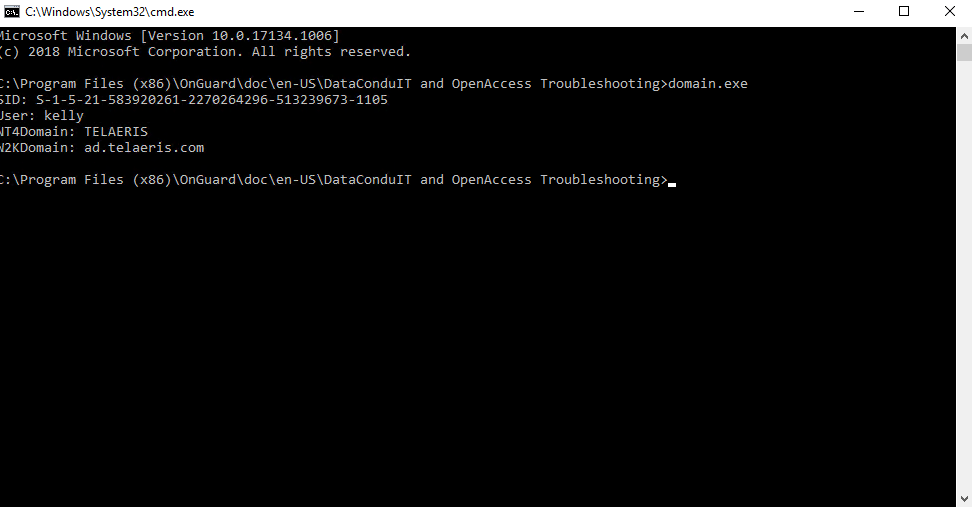
- On the Onguard Application Server, open the following folder location: C:Program Files (x86)OnGuarddocen-USDataConduIT and OpenAccess Troubleshooting
- Click on the path location, and type “CMD“ with the space in front of the path. Press Enter.
- The following Command Line window will appear. Type in domain.exe and press enter.

- Make note of the NT4 Domain Name.
- Connect to SQL Server Management Studio that hosts the OnGuard Database.
- Under Database -> AccessControl -> Tables -> dbo.LNL_DIRECTORY, right click the table, and select Edit Top 200 Rows. Find the directory row of the current domain. Change the Dir_hostname to the NT4 Domain from the command line

8.OnGuard OpenAccess Setup
Available with OnGuard 7.4 and newer.
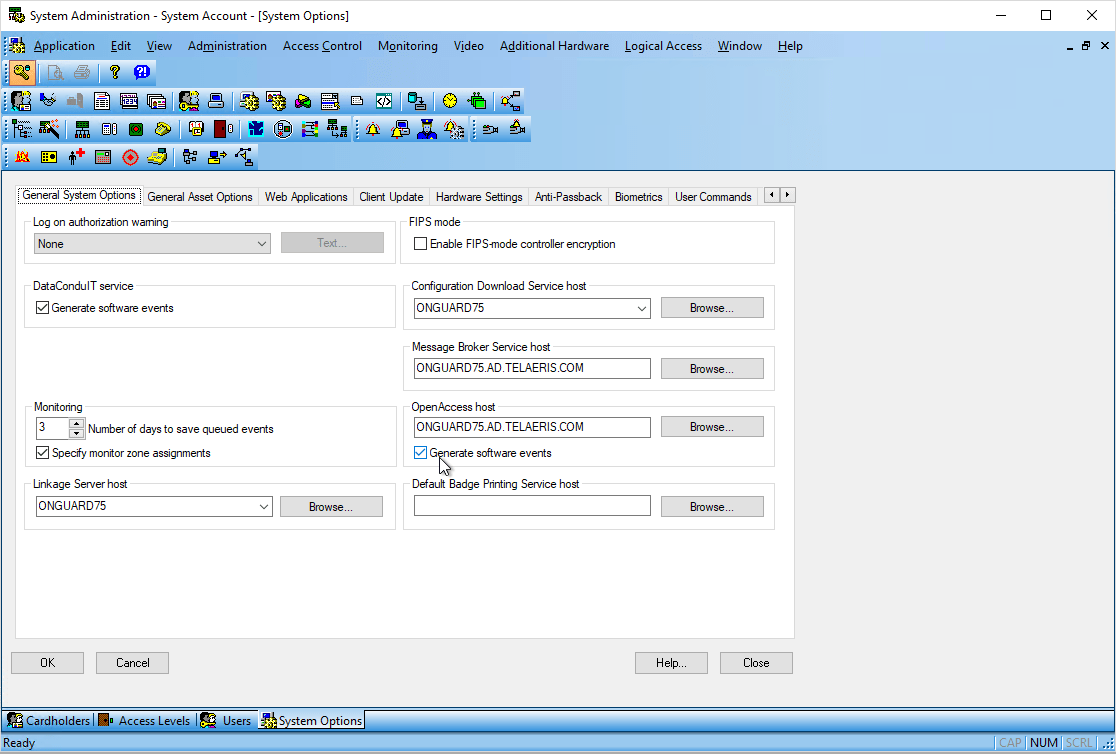
Enable OpenAccess
To enable OpenAccess, from System Administration, Administration -> System Options. Set the OpenAccess Host and select Generate software events. Press OK.
The required running OnGuard Services to run OpenAccess include:
LS OpenAccess
LS Communication Server
LS Web Event Bridge
LS Event Context Provider Service
LS Message Broker Service
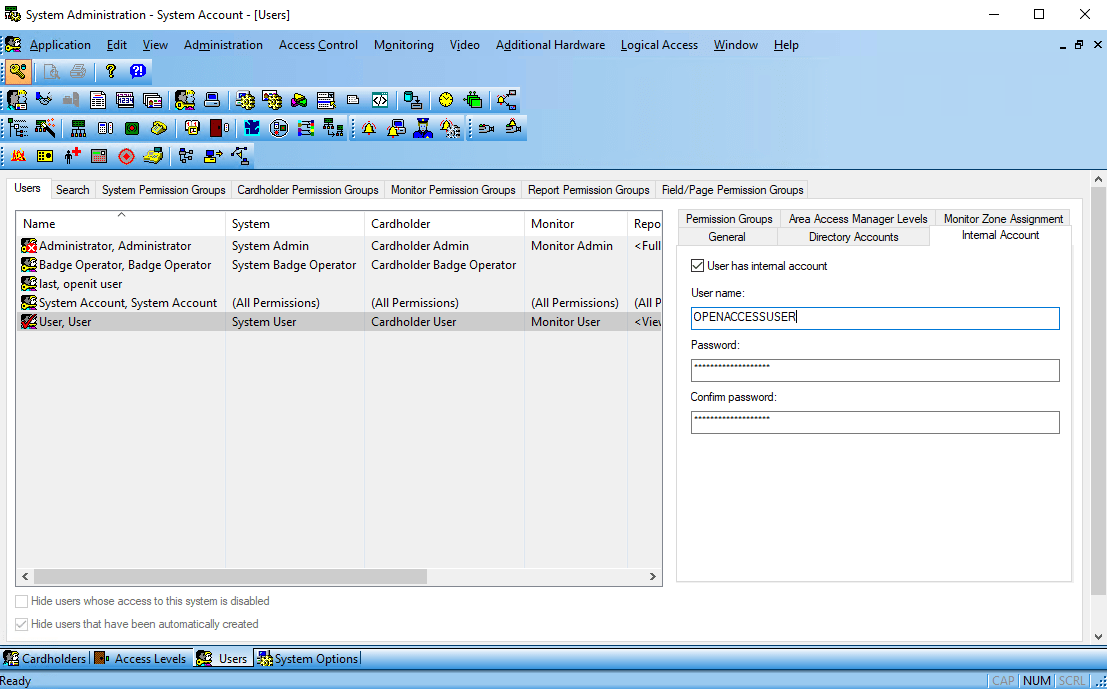
Create OnGuard User
An OnGuard User account is required which OpenAccess can access. (Administration -> Users). Create a new User with an internal account. You can also choose to utilize a Directory account.
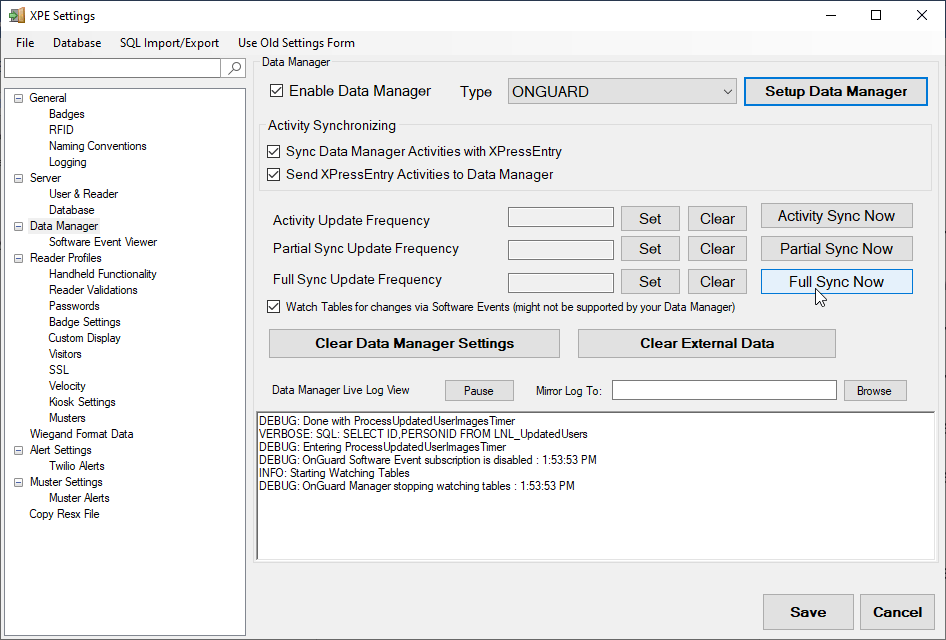
9.Enable Synchronization
XPressEntry uses a module called “Data Manager” to synchronize Cardholders/Cards with OnGuard.
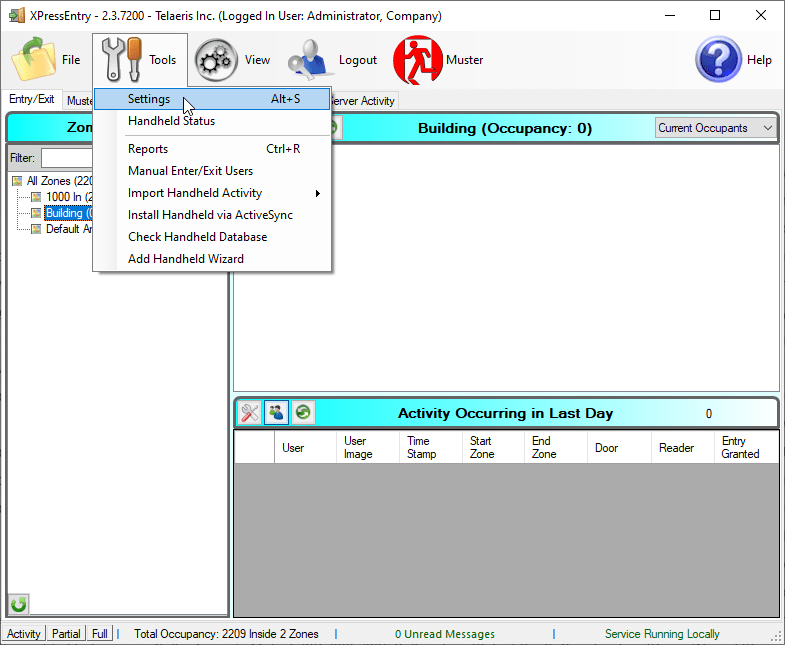
From the main page of XPressEntry, go to XPressEntry / Settings (CTRL+S)
Data Manager Overview
From the Settings page select the Data Manager Tab
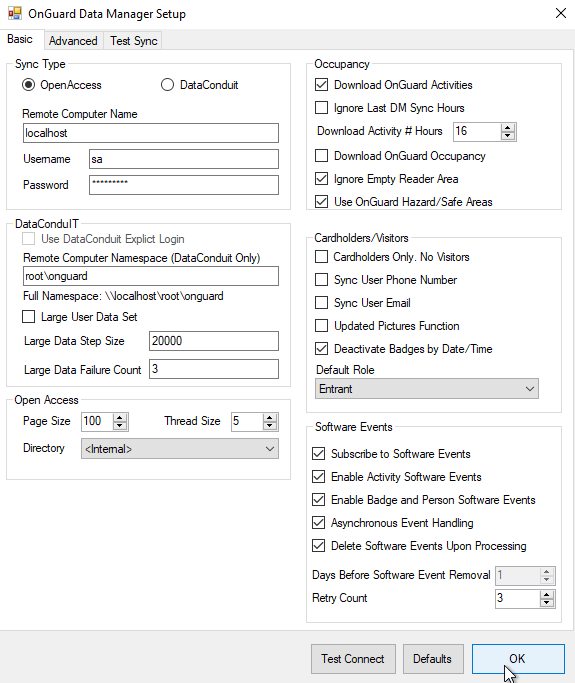
Figure 9- Data Manager
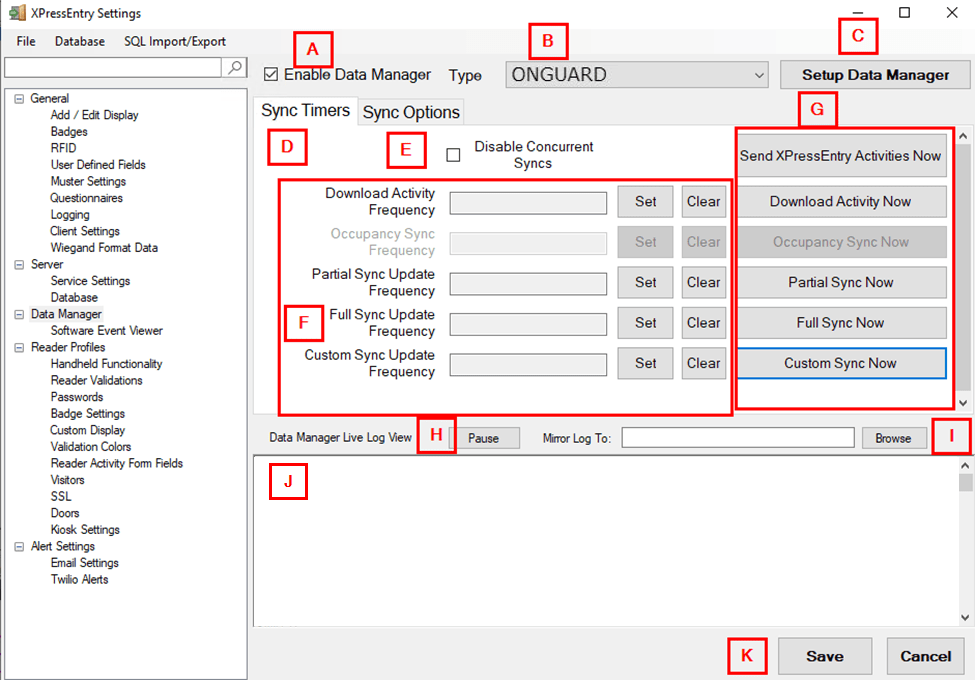
- Enable Data Manager – This must be checked to enable the Onguard Synchronization
- Type – Select Onguard as the Data Manager type
- Setup Data Manager – Opens the Onguard Data Manager Settings
- Sync Timers – Tab controls synchronization timers
- Disable Concurrent Syncs – If checked, this will disable allowing multiple syncs to run concurrently.
-
Update Frequency – Set the update frequency for each sync
- Download Activity – Pull Onguard activities
- Partial Sync Update – Pulls all data excluding cardholder data, including readers, areas, access levels.
- Full Sync Update – Pulls all data from Onguard. Depending on the size of the Onguard system, this sync can take a while. Recommended to sync overnight, once a night.
- Custom Sync Update – A custom set of syncs can be added to run on a separate timer.
- Sync Now buttons – Used to manually sync data. Not required for normal use. Clicking on the specific button will activate the associated sync.
- Pause/Unpause – Can pause or unpause the logs as it populates.
- Mirror Log – Outputs a secondary log file at the chosen location
- Log – Displays all Data Manager Logs
- Save/Cancel – After any changes, press Save to apply changes to any sync. If settings are not saved, the next sync will NOT use the new changes.
Set the Update Frequency to as often as you want the system to update. Note that only one update can run at a time and if this value is very low the system will constantly try to update (this is not always a problem
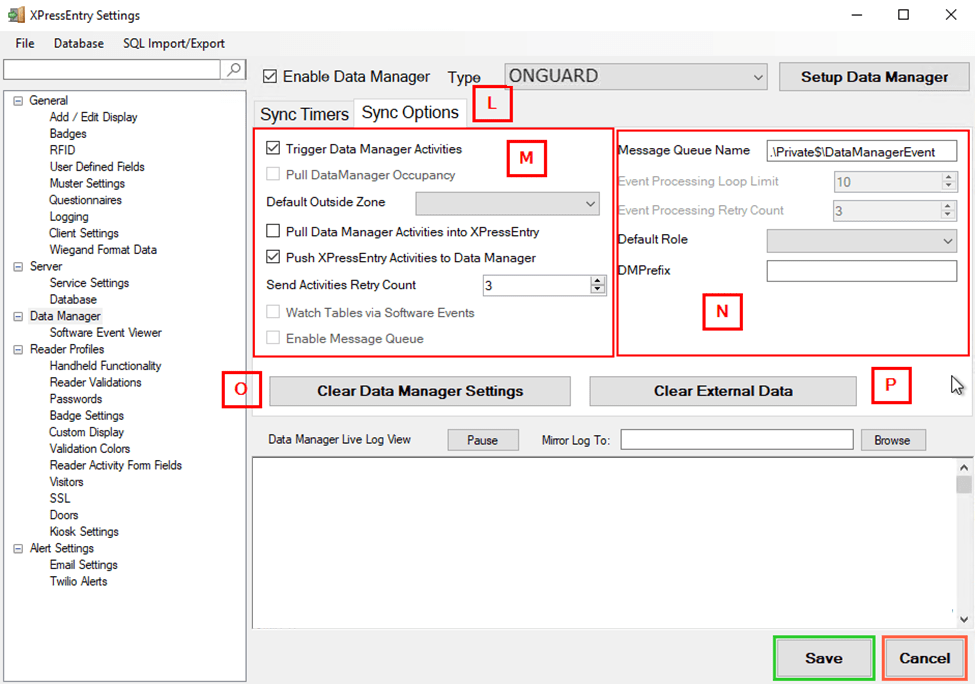
- Sync Options – Tab controls synchronization options with Onguard
-
Sync Push/Pull options
- Trigger Data Manager Activities – Automatically send activities to Onguard after a handheld scan synchronizes to the XPressEntry server. Allows for automatic activity pushes.
- Default Outside Zone – When syncing occupancy, we if the cardholder zone is not in an area, assign a default outside area to place the cardholder.
- Pull Data Manager Activities into XPressEntry – Pull data from Onguard. Mainly used for occupancy tracking.
- Push XPressEntry Activities to Data Manager – Allow sending handheld or server activities back to Onguard as an event.
- Send Activities Retry Count – Times XPE will attempt to resend an activity on failure
- Watch Tables via Software Events – Enable software events
- Enable Message Queue – Utilize the message queue for software event syncs
-
Additional Settings – These settings are advanced options
- Message Queue Name – Name for Windows Message Queue
- Event Processing Loop Limit – Number of times an event may be processed
- Event Processing Retry Count – Number of times and event may be retried on failure
- Default Role – Setting default role on Cardholder sync in XPE
- DMPrefix – Setting a prefix to all eternal ID’s from Onguard
- Clear Data Manager Settings – Clears All settings on this form.
- Clear External Data – Clears all data that was synced from Onguard, including cardholders, badges, reader etc.
OnGuard Setup Page Overview
Press the “Setup Data Manager” button to get the OnGuard specific setup screen.
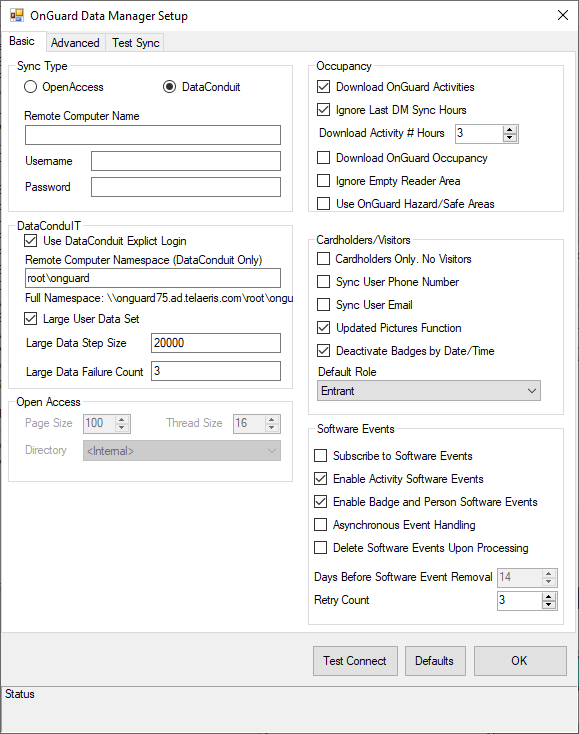
Basic Settings
-
Sync Type – Select which method will be used to connect to Onguard: OpenAccess or DataConduIT.
- OpenAccess – Select if using OpenAccess
- DataConduIT – Select if using DataConduIT
- Remote Computer Name – IP or Hostname of the machine hosting DataConduIT Service or OpenAccess Service. Typical setup has these services running on the main Onguard application server.
- Username – Username for OpenAccess or DataConduIT Single Sign On. (Required for DataConduIT Only if “Use DataConduIT Explicit Login is checked)
- Password – Password for OpenAccess or DataConduIT Single Sign On. (Required for DataConduIT Only if “Use DataConduIT Explicit Login is checked)
-
DataConduIT – Settings specific to using DataConduIT
- Use DataConduIT Explicit Login – In some scenarios, using explicit login for Single Sign-On is required for DataConduIT SSO to grant access. Use this if SSO via the XPressEntry Service Log On user does not work.
- Remote Computer Namespace – Namespace for DataConduIT WMI settings. Default location namespace is rootonguard, and is rarely different.
-
Large User Data Set – For large cardholder systems, breaks down the DataConduIT syncs into smaller batches. Syncs pull records based on cardholder and badge ID’s in order. For instance, the first pull will pull all ID’s between 1 and 20000. The second pull will pull all ID’s between 20001 and 40000. If there are major gap’s between table ID ranges, increate the data step size or failure count.
- Large Data Step Size – Number of records pulled on each instance.
- Large Data Failure Count – Number of pulls with zero records returned, signaling there are potentially no more records to pull.
-
OpenAccess – Settings specific to using OpenAccess
- Page Size – Max number of records pulled per request. OpenAccess max is 100.
- Thread Size – Max number of threads that run concurrently pulling data via OpenAccess. Max 16.
- Directory – Select the directory for Single Sign On via OpenAccess. Requires connection the Remote Computer Name.
-
Occupancy – Settings for occupancy tracking. Used with mustering and anti-passback mainly.
- Download OnGuard Activities – Downloads cardholder activities from either the last sync, or last # of hours from OnGuard, and inserts as badge activities into XPressEntry.
- Ignore Last DM Sync Hours – If checked, will ignore the last sync complete time, and pull all activities from Download Activity # of Hours.
- Download Activity # Hours – Number of hours to pull records from.
- Ignore Empty Reader Area – If readers within OnGuard do not utilize Anti-passback areas, selecting this will not move the cardholder into an empty area and potentially keep them in the marked hazard area.
- Use OnGuard Hazard/Safe Areas – When syncing areas, if an area is marked as a hazardous or safe area, XPressEntry will pull the info and preset the areas accordingly.
-
Cardholder/Visitors – Settings for syncing Cardholders and visitors
- Cardholder only. No Visitors – If checked, will sync only cardholders.
- Sync User Phone Number – if checked, will sync cardholder phone number field.
- Sync User Email – If checked, will sync cardholder email field.
- Update Pictures Function – Uses the updated pictures functions. Check by default in most scenarios.
- Deactivate Badges by Date/Time – Respect badge expirations by date and time.
- Default Role – Default XPressEntry role assigned to cardholders when synced. Typically, Entrant will be set as the default.
-
Software Events – Settings for OnGuard Software Events
- Subscribe to Software Events – Enables software events
- Enable Activity Software Events – Enables software events for all cardholder badge activities. Required for monitoring activities for mustering and anti-passback setup.
- Enable Badge and Person Software Events – Enables software events for any cardholder and badge changes to a cardholder in System Administration. These changes will populate with a few seconds into XPressEntry without requiring a partial or full sync.
- Asynchronous Event Handling – Used for Asynchronous software events. Used in special cases. Ask Telaeris Support for more details.
- Delete Software Events Upon Processing – Software events enter a database queue when added to XPressEntry. Check this to delete the event from the queue once it has created a badge activity.
- Days Before Software Event Removal – Days to hold onto software event queued data.
- Retry Count – Number of attempts to process a software activity in the queue.
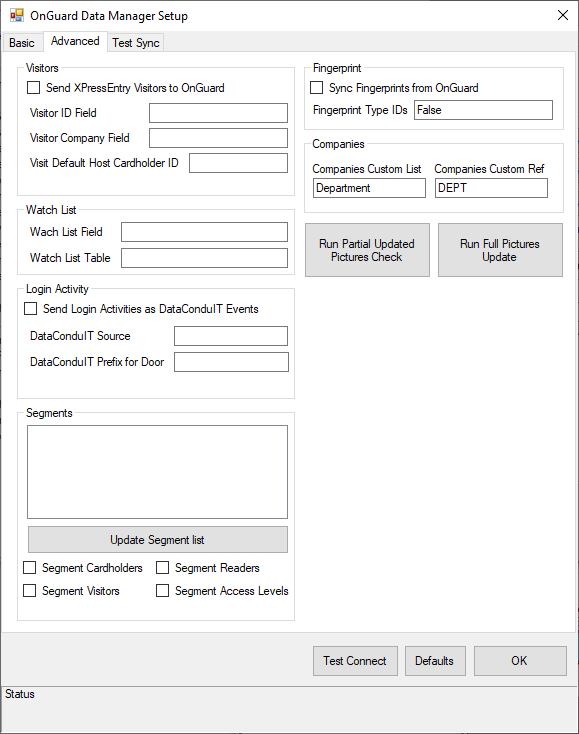
Advanced Settings
-
Visitors – Advance Visitor Settings
- Send XpressEntry Visitors to OnGuard – Add enrolled visitors from XPressEntry to OnGuard.
- Visitor ID Field –
- Visitor Company Field –
- Visit Default Host Cardholder ID –
-
Watch List – Set a watch list customer field for cardholders
- Watch List Field – Field name
- Watch List Table – Table Name
-
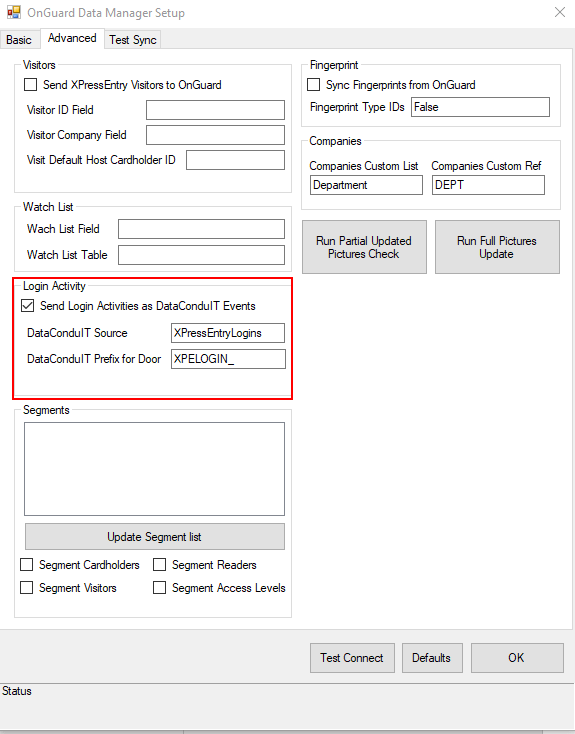
Login Activity – Send XPressEntry handheld login activity to OnGuard as an alarm.
- Send Login Activities as DataConduIT Events – check to send login activities.
- DataConduIT Source – Set the logical source device name from OnGuard
- DataConduIT Prefix for Door –
-
Segments – Pull specific segments if segments are utilized in OnGuard
- Segments – Displays a list of segments from OnGuard
- Segment Cardholders – Segment Cardholders pulled from OnGuard
- Segment Visitors – Segment Visitors pulled from OnGuard
- Segment Readers– Segment Readers pulled from OnGuard
- Segment Access Levels – Segment Access Levels pulled from OnGuard
-
Fingerprint – Pull Fingerprint templates from OnGuard.
- Sync Fingerprints from OnGuard – Enables fingerprint sync
- Fingerprint Type ID –
-
Companies – Pull custom fields to populate companies field in XPressEntry
- Companies Custom List –
- Companies Custom Ref –
The permissions for the user running XPressEntry are assumed to be sufficient to access DataConduIT via WMI. The configuration of the PC with these permissions is assumed to be outside the scope of this document. XPressEntry uses the System.Management.Impersonation level to access DataConduIT via WMI.
DataConduIT and OpenAccess is used for all data transfers between XPressEntry and OnGuard. As a result, you must setup DataConduIT and OpenAccess to use DataConduIT appropriately. This is assumed to be outside the scope of this document.
After any changes to the Data Manager Settings, click OK, and click Save on the Settings Window.
OnGuard Data Manager Suggested Configuration Steps
Below are instructions for a basic setup outside of the default settings. Proper settings may vary and depend upon environment setup and requirements. Please read the Overview sections above for further information on any settings not mentioned in the steps below.
- Select Enable Data Manager in the Data Manager Tab.
- Select the Type drop down, and select Onguard
- Click Save. This will enable the Setup Data Manager button to be enabled.
- If using XPressEntry for Entry/Exit Mode, typical setup would require Send XpressEntry Activities to Data Manager checked.
- If using XPressEntry for Entry/Exit Mode with Anti-passback or Muster Mode, typical setup would require Sync Data Manager Activities with XpressEntry checked.

- Click Setup Data Manager
- Select the sync type we will use to connect to OnGuard, OpenAccess or DataConduIT.
- Set the remote computer name of the OnGuard application server.
-
Login parameters differ between DataConduIT and OpenAccess
- For DataConduIT, it is important that the XPressEntry service is using the LogOn user that has User permissions for DataConduIT. In some instances, such as if the XPressEntry machine is on a separate domain from the OnGuard Application Server, you may be able to check the Use DataConduIT Explicit Login, and add the username and password of the OnGuard user with permissions.
- For OpenAccess, first select the directory that you will be using to signing into OpenAccess. For local OnGuard accounts, select <Internal>. Log in with the proper username and password.
Click Test Connect to see if the connection is successful.
- If DataConduIT is selected as the sync type and OnGuard Cardholder count is greater than 30,000, Select the Large User Data Set checkbox.
- Check Update Pictures Function
- Check Subscribe to Software Events
- If utilizing Muster Mode or anti-passback, check Enable Activity Software Events.
- Check Enable Badge and Person Software Events
- Uncheck the Asynchronous Event Handling.
- Click OK.
- Click Save on the Data Manager Tab.
10.Setup XPressEntry Data
After all settings have been configured, click Full Sync Now on the Settings Data Manager page. This sync may take a while, depending on the number of cardholders. 30k cardholder system can take around 20 minutes.
Note: If utilizing DataConduIT and full sync displays receiving 0/0 data on each table, and no data is being synced into XPressEntry, please check the previous steps for WMI/DataConduIT permission issues.
Once the OnGuard System is set up and synchronizing, you will see all of this data represented in XPressEntry under the Add/Edit Info tab. Data which is imported from OnGuard cannot be changed and is Grayed out.
Priority of Data Synchronization
Any changes made in OnGuard should be shown in XPressEntry in the following order:
Highest Priority: Badge/User/Zone Occupancy changes are updated immediately when software events are enabled.
Lower Priority: Door/Reader/Area/XPressEntry Activities/User Permissions will be updated whenever the Data Manager Synchronizer runs. This can be run manually from the Settings page -> Data Manager tab by pressing “Partial Sync Now”.
Users
Here is a sample of a properly synchronized user:

Those users have the same AccessLevel Permissions from OnGuard:
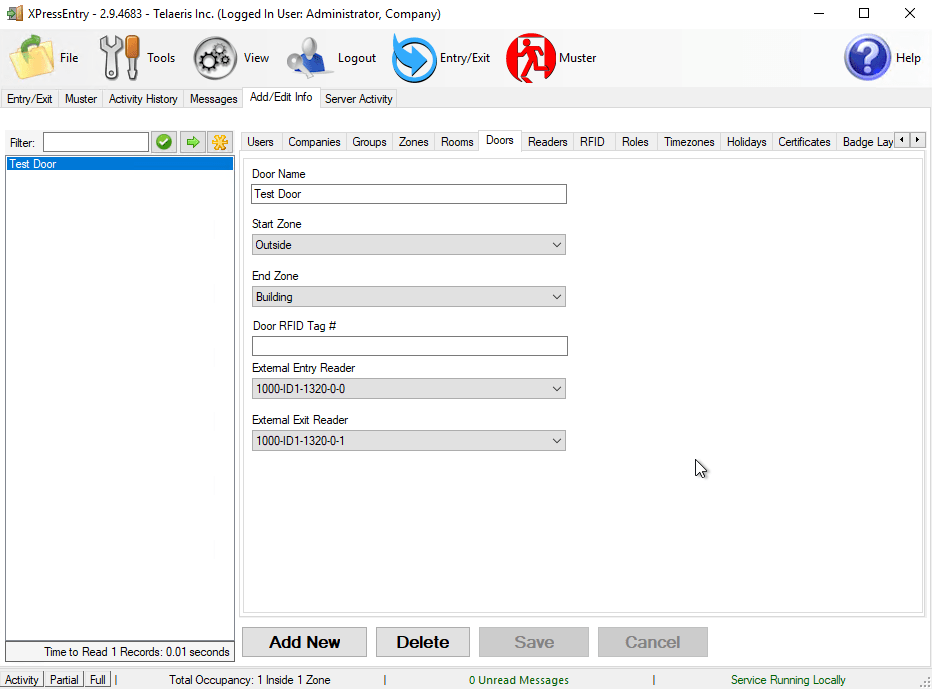
Doors
Entry/Exit permissions in XPressEntry are set by doors. Doors are portals between two zones and can be “Entered” or “Exited”. The permissions for a door are determined by the External Entry Reader and External Exit reader. Users will have permission to Enter or Exit a door based on their OnGuard permissions for the selected readers. These are also the readers in OnGuard an Entry or Exit will be assigned to. For Muster Mode, the handhelds default Door External Exit Reader will be used to move the mustered user to the correct area in OnGuard, and will create an exit read that will show up in Alarm Monitor.
Doors should be set by the user for each Handheld Reader in XPressEntry.
Readers
XPressEntry divides readers up into two categories: “Handhelds” and “Readers”
Handhelds refer to physical readers in the system. All handhelds have a GUID which identifies the hardware. There are currently two types:
The Server Reader – used to assign badge activities from the server. This will likely be named “Server Reader: COMPUTER NAME.”
Physical Handheld devices – These include the XPID 100, XPID 200, and other Android devices.
For mustering scenarios, set the External Muster Reader here per handheld. When a muster scan occurs on this handheld, the muster “exit” scan will be sent to Onguard as this reader.

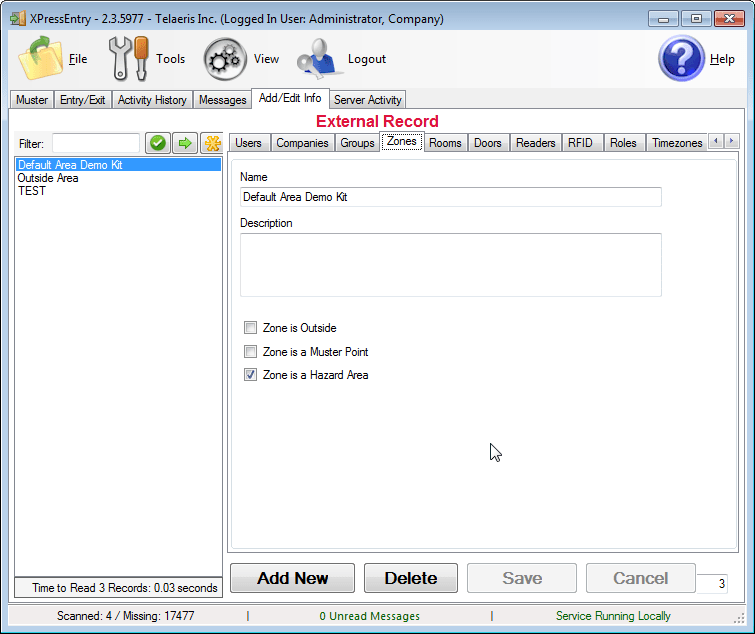
Zones
If you are going to be using OnGuard zones for mustering, it’s suggested you double check the Zone settings.
Any outside zone should have the “Zone is Outside” checked.
In addition, it’s normal to check the “Zone is a Muster Point” checkbox for outside zones.
Any area where you want to track occupancies for mustering should have the “Zone is a Hazard Area” box checked.
Activities
XPressEntry will synchronize activities if that option has been set by Data Manager.
Entry/Exit activities will be sent to the OnGuard reader set for External Entry/Exit Reader on the Door.
Verification and Muster activities will be sent to the specific reader they are scanned at.
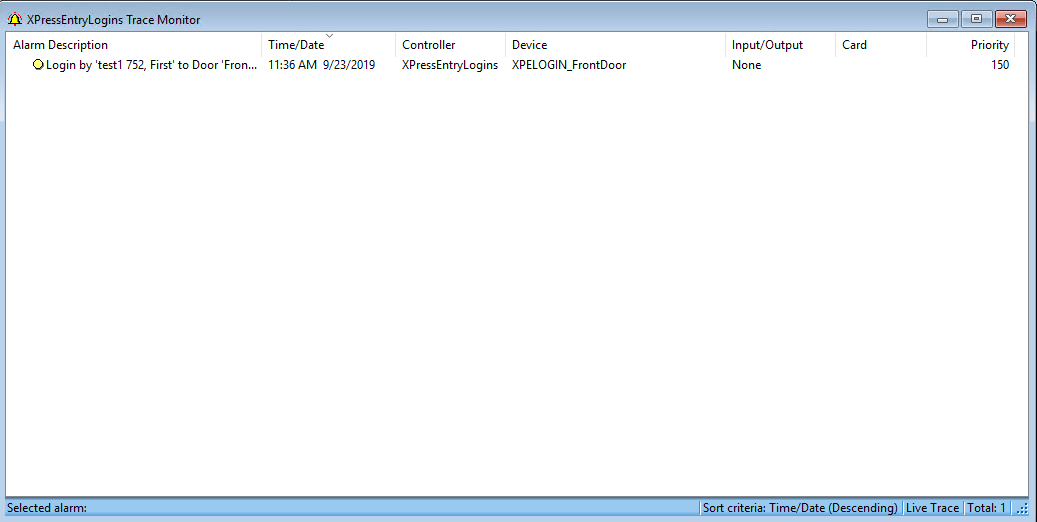
Login Activities
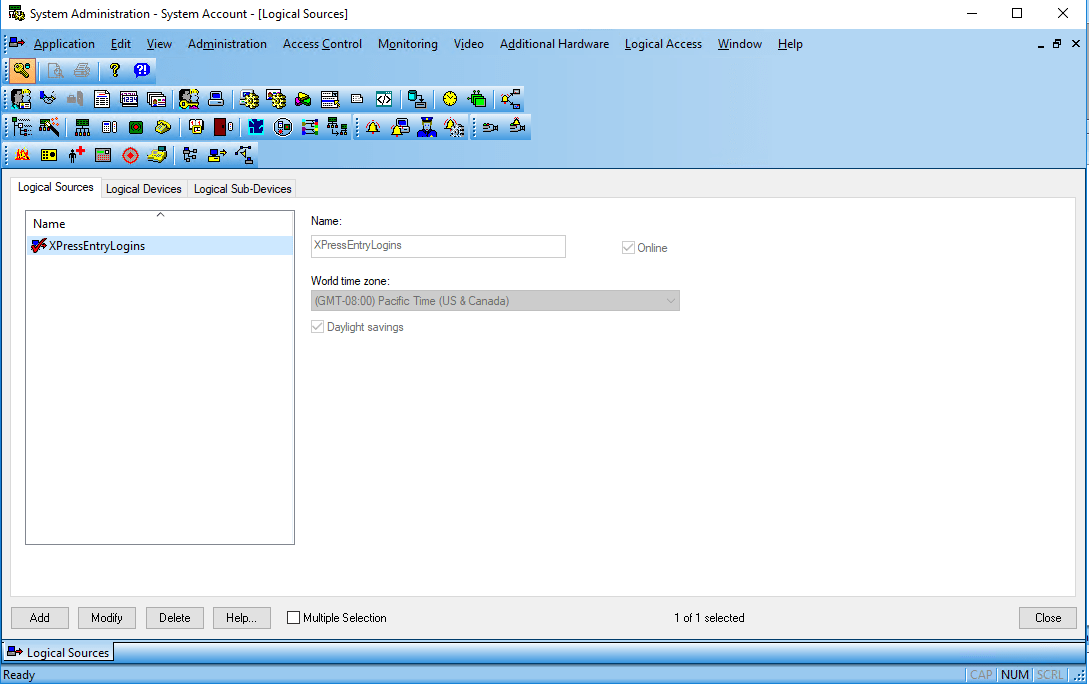
When utilizing handheld device login, the login and logout records can be sent to OnGuard as an Alarm Event. To enable this feature, Start with Creating a new Logical Source. From System Administration, go to Additional Hardware -> Logical Sources.
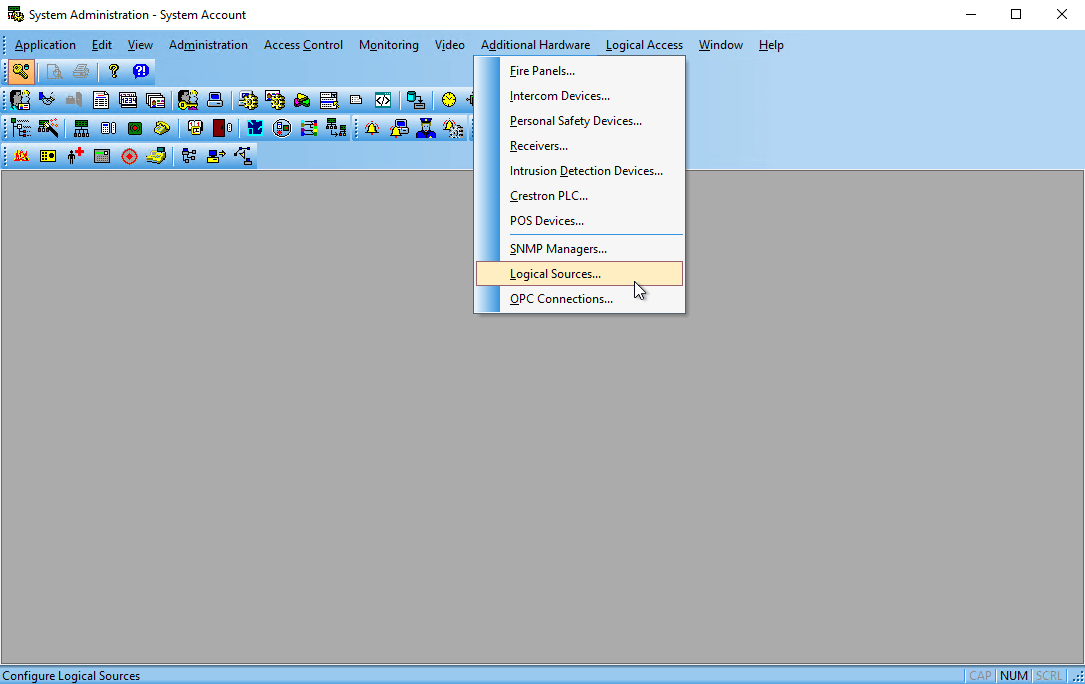
Add a new Logical Source.
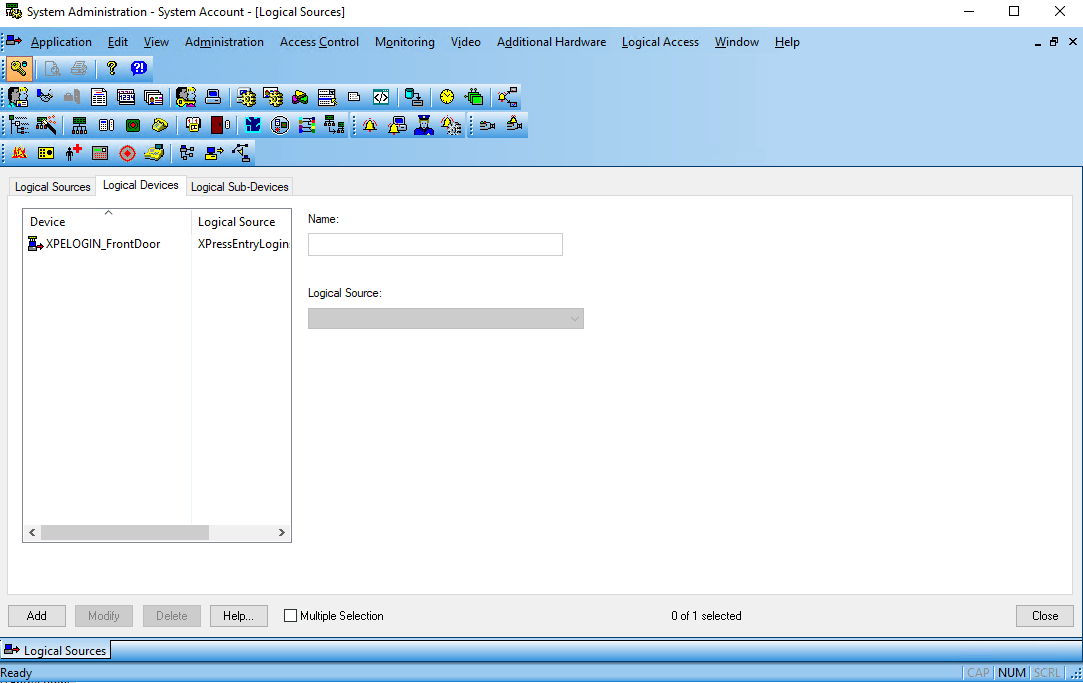
Create a new Logical Device. The Logical Device name is important, and requires 2 things:
- A Prefix Identifier. For example, XPELOGIN_
- The logical device name needs to contain the name of the Door that is created in XPressEntry. For example, FrontDoor is the door name we will be using in XPressEntry for a single unit.
Combine the two to form XPELOGIN_FrontDoor. If there was a different door, the second logaical device can be called XPELOGIN_BackDoor.
Back to XPressEntry DataManager Setup, Under the Advanced Tab, look at the Login Activity Tab. Select Send Login Activities as DataConduIT Events.( At the time of this writing, only DatConduIT events are supported. OpenAccess support coming soon.) Set the DataConduIT Source field to the name of the Logical Source. Set the DataConduIT Prefix for Door as the prefix created for the Logical Device. Press OK, then Save. Login and Logout handheld activities will now be sent to OnGuard Alarm Monitoring when Send XPressEntry Activities to Data Manager is enabled.