XPressEntry – S2 Documentation

1.Introduction
Introduction
XPressEntry is a value add on to an existing Physical Access Control System. XPressEntry provides the PACS a handheld platform that can be used for Entry/Exit, Emergency Mustering, and Verification. The way in which XPressEntry does this is by pushing and pulling useful Access Control data to and from the PACS. We call this process Synchronization.
This document is intended to instruct users on how to synchronize an XPressEntry system with an S2 Netbox system.
XPressEntry is tested against S2 up to Netbox version 4.9.12.
Inserting Activities from XPressEntry to Netbox is only available on versions of Netbox 4.9.12 and newer.
This document assumes that there is already an existing Netbox System setup.
2.Setting Up Netbox to Synchronize with XPressEntry
2.1.Order of Operations
- Configure Netbox for Integration
- Create XPressEntry Handheld Readers in Netbox
- Map XPressEntry Handheld Readers to a Portal in Netbox
2.2.Setup Netbox for Integration
The first step is to configure the Netbox system to allow integration. On the Netbox Controller, Navigate to “Configuration>Site Settings> Network Controller”. Select the Data Integration Tab.
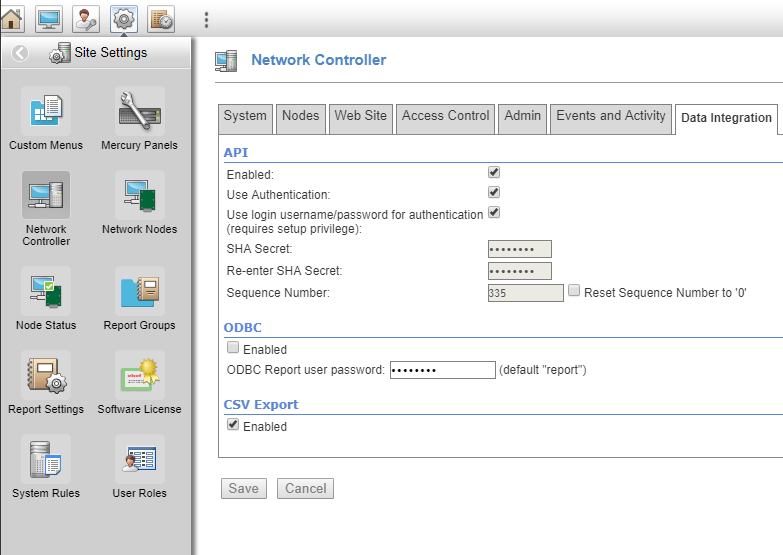
First, select “Enabled” under API.
There are two ways in which you can integrate data.
- No Security (Not Supported or Recommended)
- Use Login username/password for Authentication
- Requires username and password of a user in the system with the System Setup role.
- SHA1 encryption
- Requires an 8-digit secret key and a sequence number to be in line with the same key and a sequence number on the XPressEntry side. Data is encrypted between XPressEntry and S2.
Select the authentication mode that you will be implementing. Once this is configured, select save at the bottom.
2.3.Create Logical XPressEntry Handhelds in Netbox
This step is important if XPressEntry will be used for Entry/Exit, or verification. One of the benefits of XPressEntry is that most configuration can be done in S2. Though it is not required, you can add logical readers that represent your handheld devices in S2. Those reader records will be pulled into XPressEntry for you to use. Additionally, you can assign these logical reader records permissions in Netbox that can be pulled in as well.
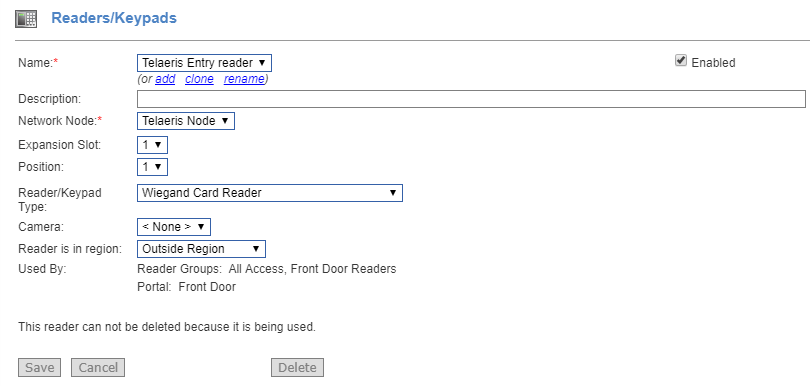
The first step is to create one or more logical Nodes for all Telaeris Handhelds.
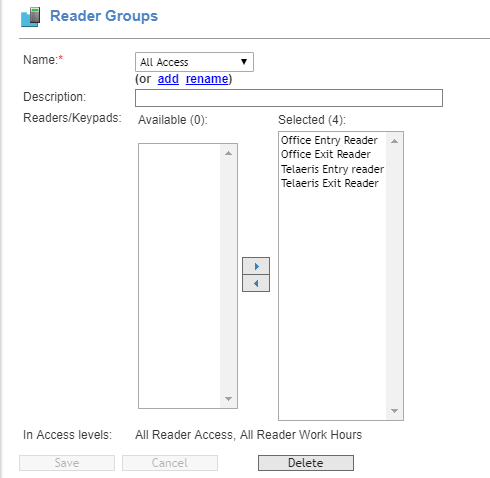
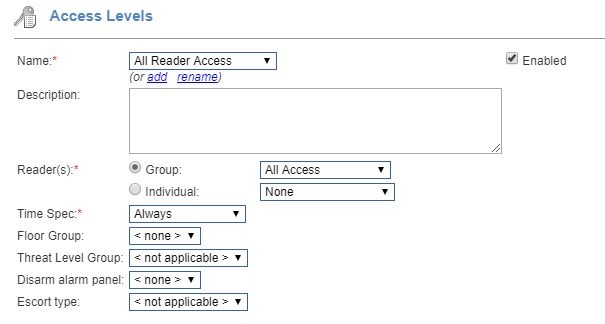
For each location that a handheld will be used at, two logical readers should be created on the Netbox; one for Entry and one for Exit. Each logical reader should be added to an appropriate Reader Group, which should be assigned to the appropriate Access Level.
Example setup-
2.4.Map XPressEntry Handheld Readers to Portal on Netbox
Once the handheld reader records are created on the Netbox, create a portal for each set of them.
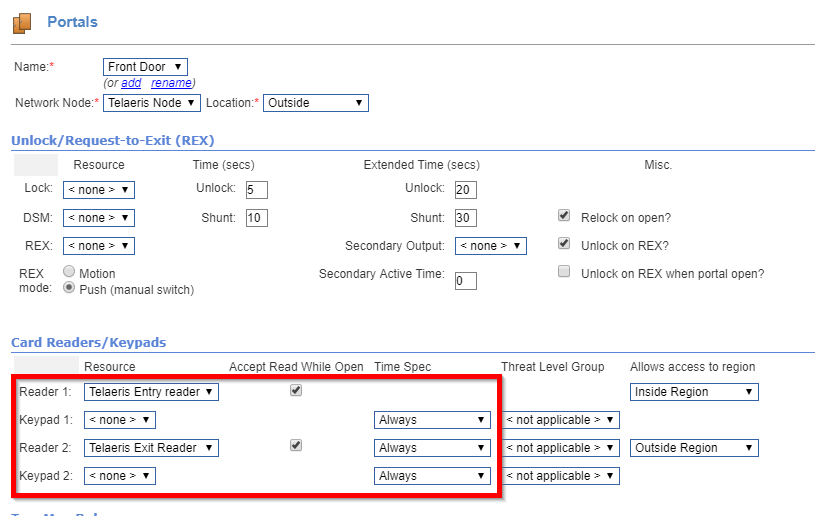
The purpose of this is to associate activities with a portal when activity data is pushed from XPressEntry to the Netbox.
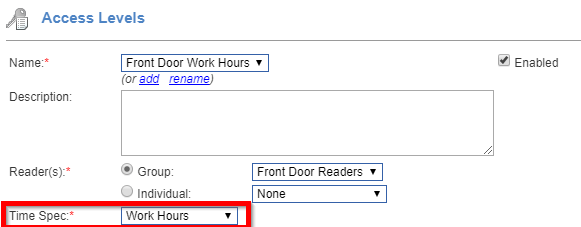
2.5.Time Specs and Time Spec Groups
The Netbox software allows you to assign and Access Level a Time Spec Group OR Time Spec to define the time a person has access to a reader. XPressEntry is able to pull over the time bounds a person has access, however, XPressEntry is not able to use this association if a Time Spec is associated with an Access Level. Instead, it must be a Time Spec Group that is associated. This is a current limitation of the API and may be fixed in future releases. In the meantime, instead of selecting a Time Spec, select a Time Spec Group from the Time Spec Drop down box. This may mean that you need to create a Time Spec Group for each Time Spec that you would like to use.
3.XPressEntry Setup
Once the Netbox is configured, the next order of business is to install the XPressEntry software. Please contact your XPressEntry Dealer to locate the XPressEntry installer file.
3.1.Initial Configuration
Once XPressEntry has been installed, open the software for the first time as an administrator. XPressEntry will take you through an initial setup. Enter a company name and add an initial system admin. By default, the system admin’s username and password is admin, admin.
For more information on how to setup and configure XPressEntry, outside the scope of the integration setup, please see the XPressEntry manual.
4.Enable Synchronization in XPressEntr
4.1.General tab
From the Settings page, select the General Tab
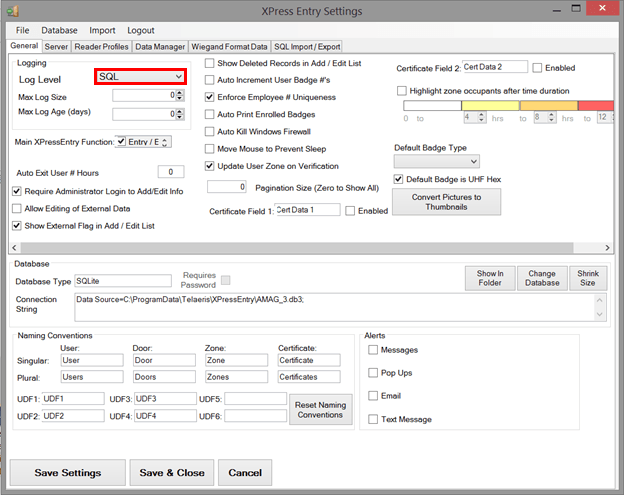
- Set the Log level to Debug or SQL- this will allow you to view log entries during the sync process
- Max log size- 5000 or higher
- 3. Max log Age- 1 Day or higher
Once the integration is complete, set the log level to Critical or Information, so only error messages will be tracked.
4.2.Reader Profile Tab
The Reader Profile Tab is where you configure the handheld settings.
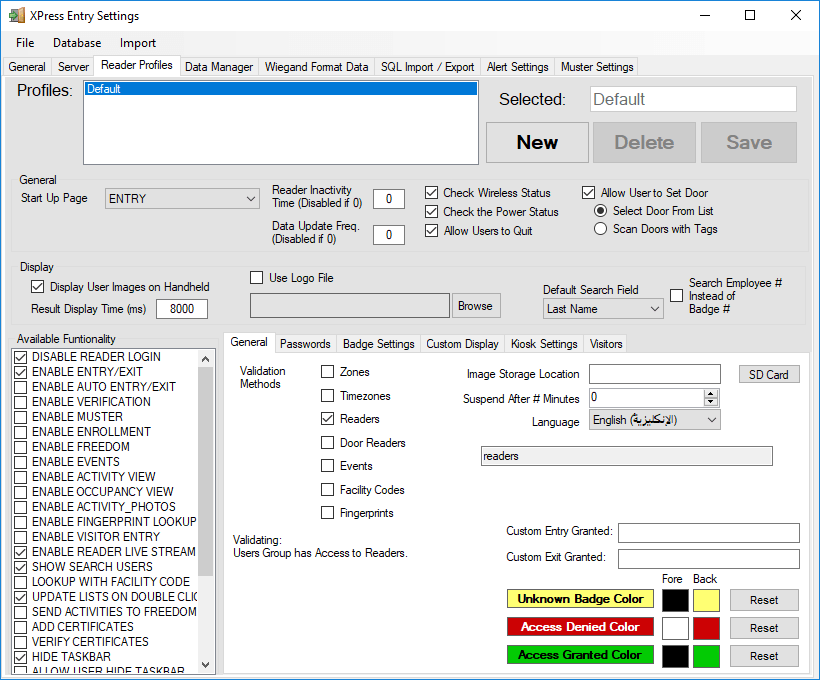
The only important change to make on this tab is to make sure “Door Readers” is the only mode that is checked under “Validation Methods”. Select “Save” at the top right when finished.
4.3.Data Manager Tab
The Data Manager Tab allows you to set up synchronization between S2 and XPressEntry.
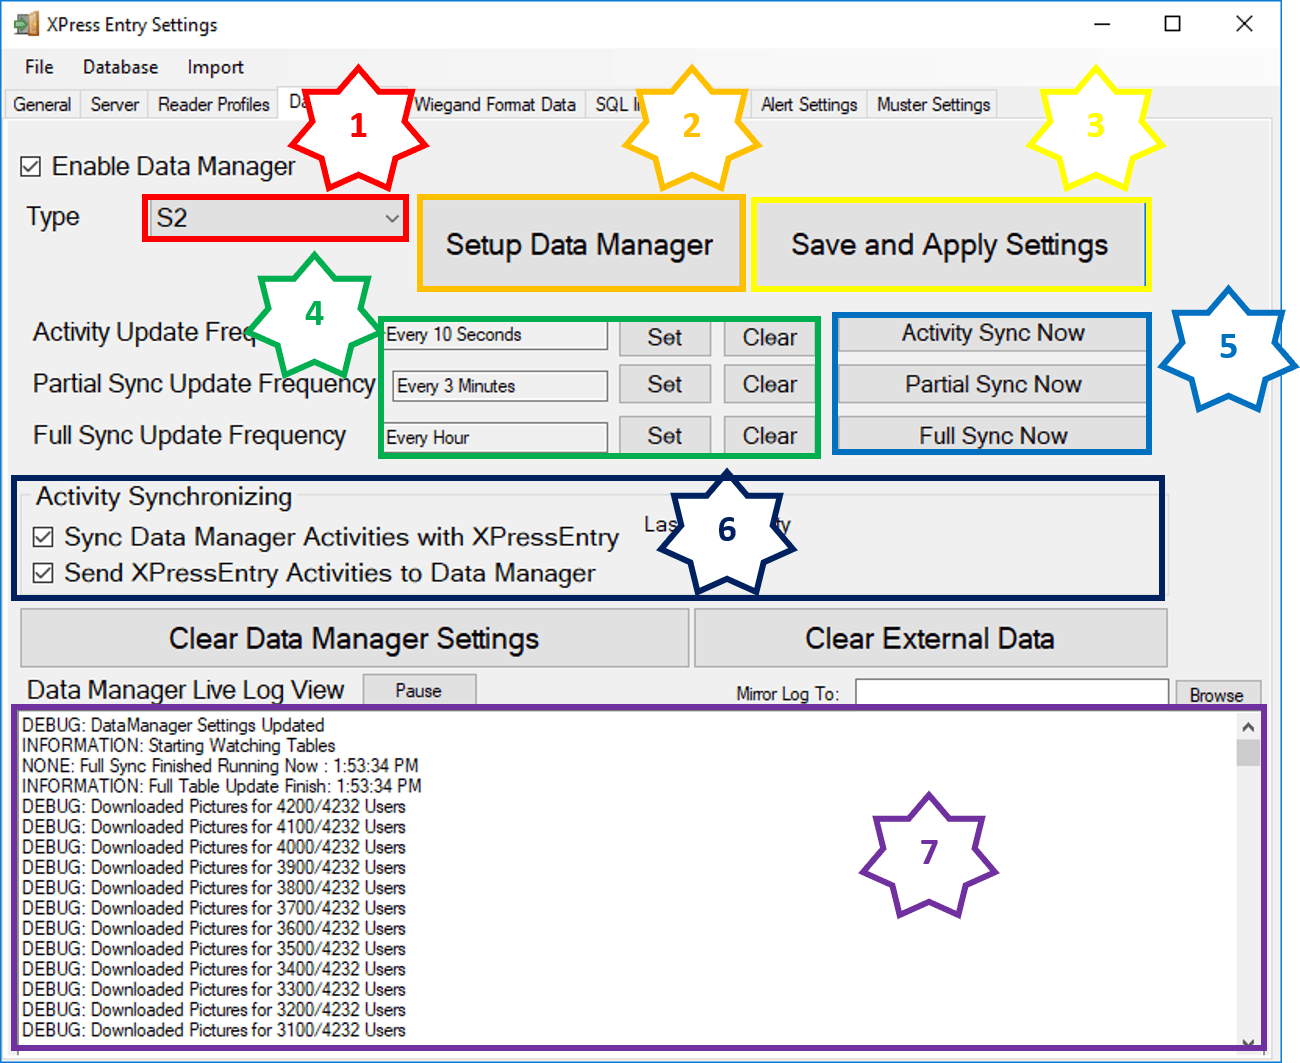
- System to Sync with- Select S2.
- Setup Data Manager Button- Navigates to S2 Specific settings
- Save and Apply Settings- Saves settings to database from S2 Specific Settings and settings shown on this tab
- Update Frequency options- Sets and clears the intervals in which the data manager updates XPressEntry
- Immediate Sync Functions- Starts a data sync immediately
- Activity Sync Options- Used to send XPressEntry Handheld Activities to S2 as Integrate Events
- Live Log- Displays live log messages from each data sync
4.4.Update Frequency Options
Set the Update Frequency to as often as you want the system to update. Each Sync pulls different information.
- Full Sync- This sync will grab all records from all relevant S2 tables and update them in XPressEntry. If there is a large number of users in S2, this sync option can take some time.
- Partial Sync – This sync will pull all records from all relevant tables except users. This sync type will only pull users that were added or updated since the last partial sync. Because the full list of users is not pulled, deleted users will not be removed in XPressEntry during a partial sync.
- Activity Sync- This sync communicates activity data between XPressEntry and S2.
- Sync Data Manager Activities with XPressEntry – This option allows XPressEntry to pull transaction data that occurs in S2. This will change the zone of the user within XPressEntry, if the zones are appropriately mapped.
- Sync XPressEntry Activites to Data Manager – This option allows XPressEntry to push handheld activities to S2.
4.5.Configuring S2 Specific Settings
Select “Enable Data Manager” and select “S2” from the “Type” dropdown.
Next, select “Setup Data Manager” to open the S2 Settings. Once the setup window is open, enter the Server URL of the Netbox. Select the type of authentication that is used (as configured on the Netbox). Enter the username/password if using user authentication or the secret key if using SHA.
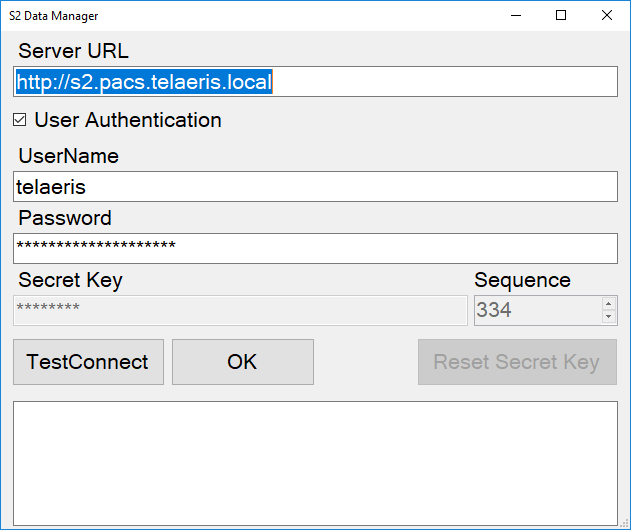
Notes about SHA
- The Sequence number in XPressEntry must be greater than or equal to the sequence number show on the Netbox. The XPressEntry Sequence number is stored in a text file at the following location- “c:\ProgramData\Telaeris\XPressEntry\sequence.txt”.
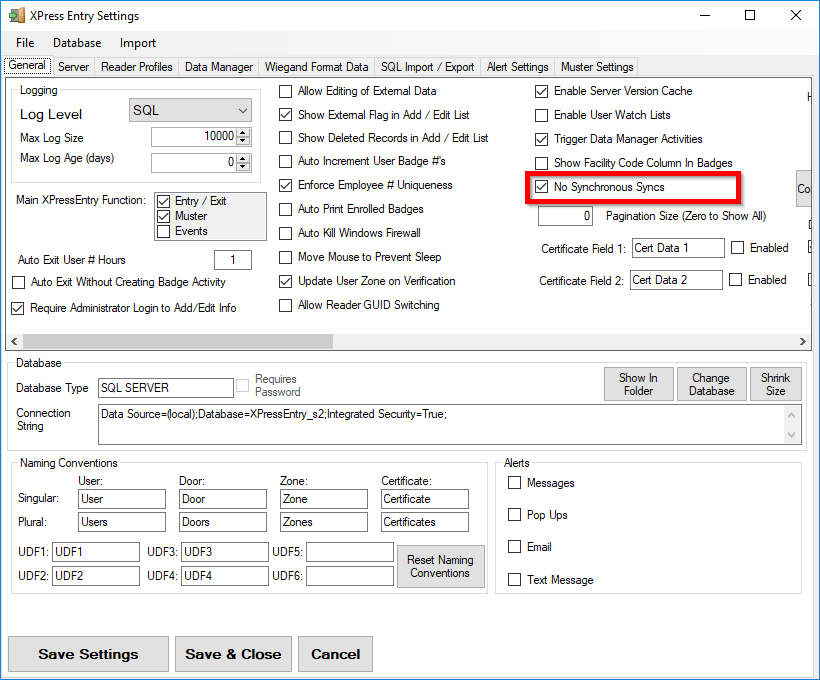
- Only one Sync thread should occur at one time. To implement this, select “No Synchronous Syncs” under the general tab. This is not required if using User Authentication.
5.S2 Sync Check
The purpose of this section is to help the operator understand exactly what data XPressEntry is pulling.
The mapping of each table pulled from XPressEntry is shown below.
- S2>XPressEntry
- Readers>Readers
- Access Levels>Groups
- Reader Groups>Groups Readers
- Person>User
- Picture>Picture
- Credential>Badges
- TimeZones>TimeZones
- Access Level>Groups Users
6.Configuring XPressEntry using S2 Data
Now that XPressEntry contains data from the Netbox, it needs to be configured to use this information. This section is particularly important for XPressEntry Mustering systems. If an emergency evacuation occurs, XPressEntry handhelds can be used to scan people to safety from a list of users who are on site at this time. To create this list, S2 Readers must be mapped to XPressEntry Doors and Zones. This way, XPressEntry can properly interpret S2 transactions and assign people to the correct zones.
6.1.Doors and Activities
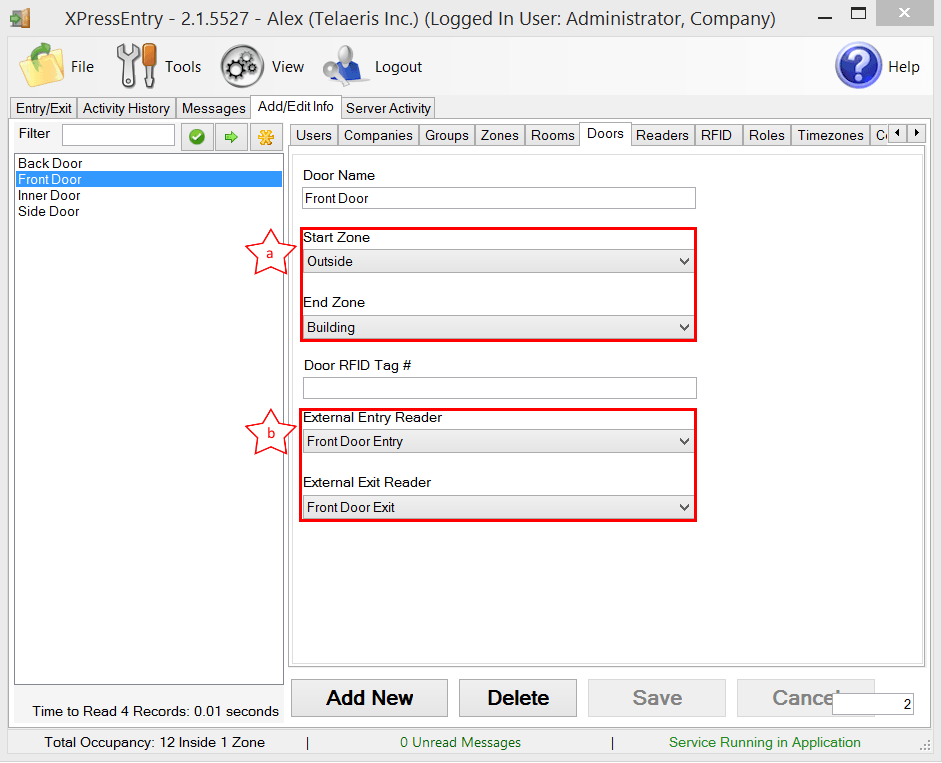
As a rule of thumb, a door should be created in XPressEntry for each Portal that was created on the Netbox. More specifically, a Door should be created for each place a person can entry or exit by scanning at a reader.
- Zones- For each door, set the start zone and end zone. This will “enter” a user in the specified zone when they enter or exit (or scan at a S2 readers).
- External Readers- Select the S2 Entry and/or Exit Readers that are mapped to this door.
Ex.- An S2 Entry and Exit Reader is set up at the front door of a building, leading to the lobby. In XPressEntry, a door should be created for these readers. This door’s fields should be shown as below.
Door Name- Front Door
Start Zone- Outside
End Zone- Front Lobby
External Entry Reader- (Entry Reader Name pulled from S2)
External Exit Reader- (Exit Reader Name pulled form S2)
When a user scans at the External Entry Reader, the user is moved from the start zone to the end zone. When a user scans at the External Exit Reader, the user is moved from the end zone to the start zone.
XPressEntry will synchronize activities to S2 if that option has been set by Data Manager. If XPressEntry is configured to “push” activities, it will send an activity using the external reader record.
Ex. Handheld A is assigned to the “Front Door”. The front door has an external entry and exit reader assigned to it.
When the handheld “Enters” a user through the Front Door, XPressEntry sends the activity to Netbox using the Front Door’s External Entry Reader. When the handheld “Exits” a user through the Front Door, XPressEntry sends the activity to Netbox using the External Exit Reader.
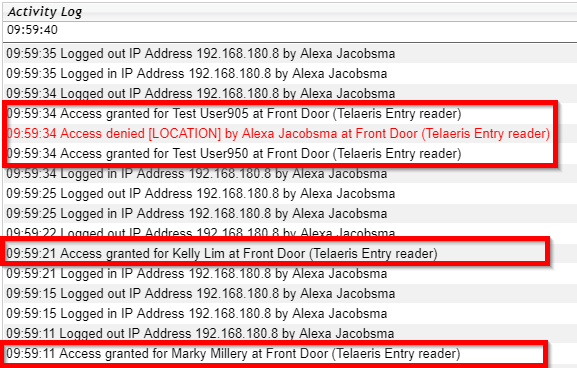
The activities will look as follows in S2.
6.2.Mapping Handhelds to Doors
XPressEntry Handhelds can be assigned to any Door created in XPressEntry, whether they have external readers assigned to them or not. For information on how to set up XPressEntry Handheld, see the XPressEntry Manual.