XPressEntry/Chubb Data Sync Documentation

1.Purpose
The purpose of this page is to instruct the installer on how to synchronize an XPressEntry System with the Chubb Director software.
2.Capability
XPressEntry is an add on to a back end Physical Access Control System (PACS) that is used to provide a mobile platform for the purpose of access control and emergency evacuations.
Through the XPressEntry/Chubb Director Integration, XPressEntry handhelds can authenticate ID cards from the Director system. This can provide security guards the ability to verify a user is in the correct location at the correct time. XPressEntry also keeps track of when a card expires, is lost, or is set as invalid in some other way. XPressEntry also maintains records of all handheld scan activity for reporting after the fact.
Additionally, XPressEntry is constantly monitoring User scan activity in Chubb in order to manage a muster event. XPressEntry handheld devices will give safety personnel a live view as to who is safe and who is still missing in event of a fire or other emergency.
Scan activity from the handhelds cannot be pushed back into the Chubb Director system as the Director interface does not support it.
3.Setting up Director to Synchronize with XPressEntry
Before data can be pulled by XPressEntry, the Director software must first be licensed for integration. If you do not yet have the correct licensing please contact your Chubb Dealer and ask for the license that enables the Database Query feature.
Once the system is licensed, the user must set up “User Logins” within the Director software. For information on setting up “User Logins”, please navigate to page 301 of the Chubb User Guide (500-9041Ev5.0 Chubb Director User’s Guide English.pdf).
You will need the Username- “dbQuery” and password of this username within XPressEntry.
4.Set up XPressEntry to Interface with Director
Open the Data Manager tab within the XPressEntry settings. First, select Enable Data Manager. Select “Chubb” from the “Type” dropdown. Next, select “Setup Data Manager”.
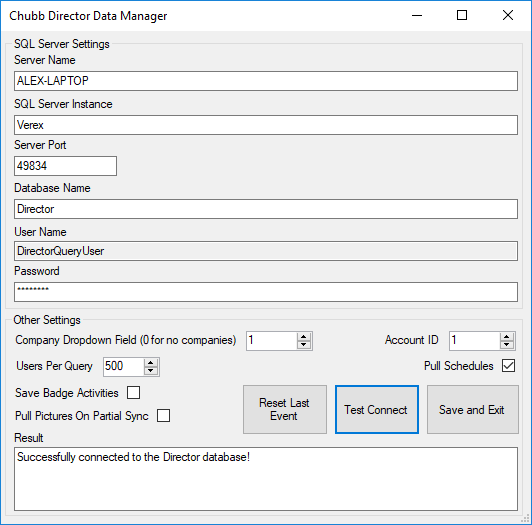
Configure XPressEntry to connect to the Director SQL Server database. Select Test Connect to verify the database connection is valid.
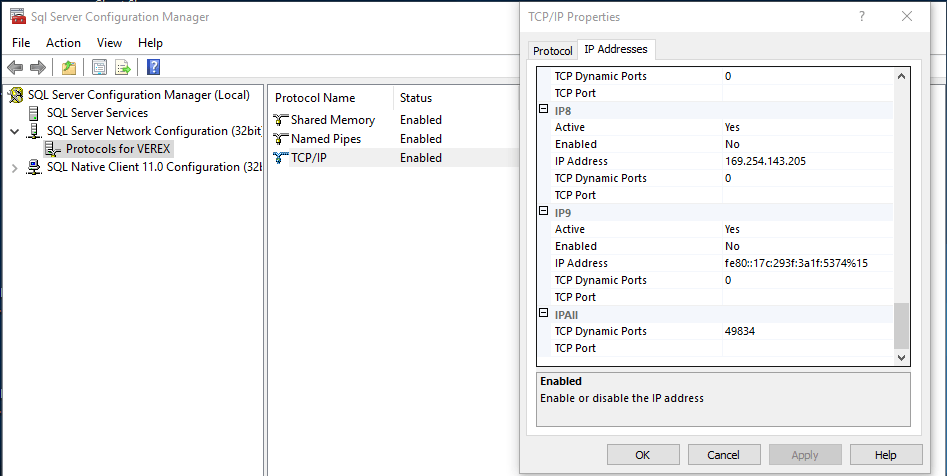
To find the port your SQL Server instance is running on, open the SQL Server Configuration Manager and look at the TCPIP Properties.
Other Settings-
- Company Dropdown Field (0 for no companies)
- If your Director system uses a user defined field as a company field, you can select the user defined field number. This field must be a drop down field type, rather than a single line or multi line entry.
- Account ID
- This is the Director Account XPressEntry pulls companies from. This is only used in regards to companies.
- Users Per Query
- This is the number of users that are pulled at a time. Large database may have too many large pictures for the system to handle at one time. If an error occurs and the message contains “Memory Exception”, lower the number of users per query.
- Default 500 is safe for most systems.
- Save Badge Activity
- XPressEntry can handle Director Activities in 2 ways.
- Update user occupancy
- Pull user scan activity records and update user occupancy
- Pulling user badge activity creates a badge activity record in the XPressEntry database each time a card scan occurs at a door reader in the Director system. This is useful if all activity reporting will be done from within XPressEntry. The drawback is there will be a large amount of duplicate data in the XPressEntry database. This option should only be used if XPressEntry is using a SQL Server database.
- XPressEntry can handle Director Activities in 2 ways.
- Pull Pictures On Partial Sync
- In an effort to make partial syncs faster, XPressEntry will only pull pictures on a partial sync if this option is checked. Full Syncs always pull all user images.
Once all settings are configured and XPressEntry successfully connects to the database, select, “Save and Exit”. This will return you to the Data Manager tab on the settings page.
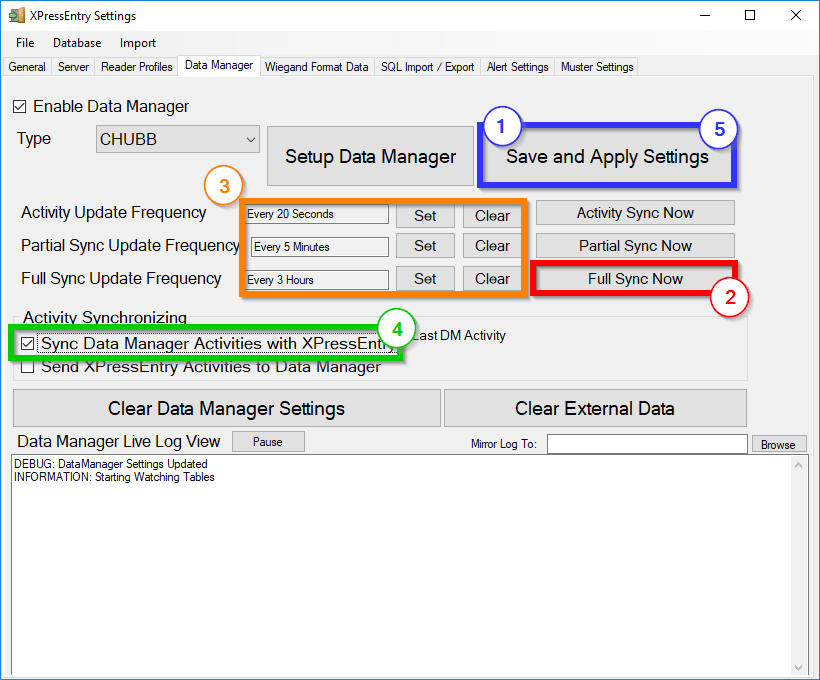
Follow the settings in order.
- Save and Apply- This will apply the Director specific settings.
- Full Sync Now- Run a full sync. This may take some time. Check the XPressEntry data to verify that it matches the director system.
- Set the update frequency.
- Activity Sync- Pulls activities that have occurred in the last day, 10 at a time.
- Partial Sync- Pulls all users without pictures. If pictures option is selected, picture is pulled only if user does not currently have a picture.
- Full Sync- Pulls all relevant director data. All data is added, updated, or deleted.
- Activity Sync can be done frequently. Partial sync should be done often to keep the data up to date. Full syncs should be done infrequently. Exact query times that should be selected depend on the Director database size.
- Sync Data Manager Activities with XPressEntry- If XPressEntry is being used for emergency evacuations, or XPressEntry is used to monitor occupancy, this setting should be checked.
- Save and Apply settings a second time.
If XPressEntry data matches the director system, the database sync is complete.