Barcoding on Android
![]()
Most of the time when employees at Telaeris publish here, it is for real-life examples related to our products. This allows us to discuss a wide area of topics, including barcodes and RFID usage, security or safety system implementation, or tips on running a business. But at the heart of what we do is to come up with neat solutions for tricky problems. The next few blog entries are examples of how two interns at Telaeris started to create a free new mobile product for tracking barcodes and RFID tags from your Android or iPhone mobile device. The system is called DataLockr and has just been launched – I highly recommend you check out the app and system. What they describe in this article are their first steps of how to build a simple barcode reading app using the open-source Zxing library for Android.
This blog is for the hackers out there that like to code. Enjoy!
Implementing a simplified Zxing Library
While we were going through the process of learning how to use the Zxing library, we soon found out that it was a bit troublesome trying to understand what was going on in this huge library. There were many tutorials out there, but a lot of the steps either confused us or were outdated. There were things missing from the code, things that were different based on the library version, or something that was not fully clarified. We wanted to make a tutorial that would help anyone trying to implement a simple Zxing scanning library get a quick start to using it within their own application.
This tutorial uses a torn-down version of Zxing library to teach the basics of how to implement the library into a standalone app and deploy your own native Android app. We are using the Android Development Kit running SDK 19, Android 4.4 library. The library has been modified to be a portrait mode barcode scanner rather than the default horizontal orientation.
You can download our simplified version of the Zxing library to use and test here: CaptureActivity. This is different than the released ZXing library, but is good to get you started.
If you don’t have Eclipse with the Android SDK, download and install the Android Development Kit. Open the Android SDK and install the components needed. Next, open Eclipse.
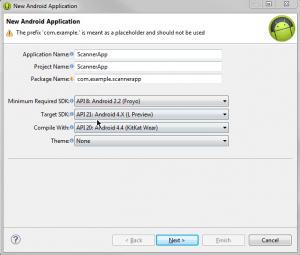
Step 1. First we will create the project.
Go to the top menu File -> new -> Android Application Project. Name your project (we called ours “Scanner App”). Copy the settings below and click next 3 times til the create Activity page. Choose Empty Activity and click next then Finish. The folder will appear on the left side of the screen by default. If not, click the maximize button to open the project screen in Eclipse.
Step 2. Fix theme errors (if you do not have any, skip to step 3)
If you are having errors in your values folders, this may be an Eclipse issue. Open all style.xml pages and delete all style tags and its contents. Also go to your AndroidManifest.xml and delete the android:theme=”@style/AppTheme” under application.
Step 3. Next is to import the scanner library.
If you have not yet, please download the CaptureActivty zip above. Go to File -> Import -> Import Existing Android Code to Workspace -> and open browse and find the Zxing source code that you have downloaded. Check only the first project called CaptureActivity. The path should not contain build/ in it. Click finish. Right click the /CaptureActivity/ Folder in Package Explorer tab and click properties -> Android and make sure the “Is Library” check box checked. Click ok.
Step 4. We must now connect our app with the scanner library.
Right click your Android app folder and then click on properties -> Android. Click on the add button, and click on CaptureActivity. Make sure a green check mark appears after you click okay on the Android screen with the project Scanner. Click ok.
Step 5. We can now start implementing the scanner into our application. Start off with mainActivity.java file.
In your app folder, go to /src/ folder and open up your mainActivity.java file. Below is the code needed. Copy and paste what you do not have. The code you will need to add will be in red text. If you are getting errors, you will need to import certain classes. you can just press ctrl+shift+O, and all needed imports will be imported.
package com.example.scannerapp;

import android.app.Activity;
import android.content.Intent;
import android.os.Bundle;
import android.view.Menu;
import android.view.View;
import android.widget.Toast;

public class MainActivity extends Activity {

   @Override
   protected void onCreate(Bundle savedInstanceState) {
      super.onCreate(savedInstanceState);
      setContentView(R.layout.activity_main);
   }

   @Override
   public boolean onCreateOptionsMenu(Menu menu) {
      // Inflate the menu; this adds items to the action bar if it is present.
      getMenuInflater().inflate(R.menu.main, menu);
      return true;
   }
   public void openScanner(View view){
      Intent intent = new Intent("com.example.scannerapp.SCAN");
      startActivityForResult(intent, 0);
   }

   public void onActivityResult(int requestCode, int resultCode, Intent intent) {
      if (requestCode == 0) {
         if (resultCode == RESULT_OK) {
            String contents = intent.getStringExtra("SCAN_RESULT");
            Toast.makeText(this,contents,3000).show();
         } else if (resultCode == RESULT_CANCELED) {
            // Handle cancel
         }
      }
   }
}
There are two key functions here:
- The openScanner method runs when a button is pressed, and will subsequently open the Scanner.
- The onActivityResult method returns the string of the barcode read. From here, you can open a new intent and pass in variables if you want to display another screen after your scan.
Step 6. We will now change the layout in activity_main.xml file.
Now in your /app/ folder, go to the res folder -> layout -> activity_main.xml file. It should look like the following. Add the following red code:
<RelativeLayout xmlns:android="http://schemas.android.com/apk/res/android"
     xmlns:tools="http://schemas.android.com/tools"
     android:layout_width="match_parent"
     android:layout_height="match_parent"
     android:paddingBottom="@dimen/activity_vertical_margin"
     android:paddingLeft="@dimen/activity_horizontal_margin"
     android:paddingRight="@dimen/activity_horizontal_margin"
     android:paddingTop="@dimen/activity_vertical_margin"
     tools:context=".MainActivity" >

    <Button
         android:id="@+id/button1"
         android:layout_width="wrap_content"
         android:layout_height="wrap_content"
         android:layout_below="@+id/textView1"
         android:layout_centerHorizontal="true"
         android:layout_marginTop="159dp"
         android:text="Scan"
         android:onClick="openScanner"/>

</RelativeLayout>
This adds a button, and when pressed, will run the method openScanner from the mainActivity.java file. You may also need to choose a theme. I chose Theme.holo.
Step 7. The last modification is to edit the androidManifest.xml File.
Go to the androidManifest.xml file under the project directory. The code should look as follows, and again copy the red code
<?xml version="1.0" encoding="utf-8"?>
 <manifest xmlns:android="http://schemas.android.com/apk/res/android"
 package="com.example.scannerapp"
 android:versionCode="1"
 android:versionName="1.0" >

<uses-sdk
 android:minSdkVersion="8"
 android:targetSdkVersion="21" />

 <!-- PERMISSIONS REQUIRED BY ZXING -->
    <uses-permission android:name="android.permission.CAMERA" />
    <uses-permission android:name="android.permission.INTERNET" />
    <uses-permission android:name="android.permission.WRITE_EXTERNAL_STORAGE" />

    <!-- FEATURES REQUIRED BY ZXING -->
    <uses-feature android:name="android.hardware.camera" android:required="true" />
    <uses-feature android:name="android.hardware.touchscreen"  android:required="false" />
    <uses-feature android:name="android.hardware.telephony"  android:required="false" />

<application
     android:allowBackup="true"
     android:icon="@drawable/ic_launcher"
     android:label="@string/app_name"
     android:theme="@style/AppTheme" >
     <activity
        android:name="com.example.scannerapp.MainActivity"
        android:label="@string/app_name" >
         <intent-filter>
             <action android:name="android.intent.action.MAIN" />
             <category android:name="android.intent.category.LAUNCHER" />
         </intent-filter>
    </activity>
    <activity android:name="com.telaeris.datalockrScanner.android.CaptureActivity"
        android:screenOrientation="portrait"
        android:configChanges="orientation|keyboardHidden"
        android:theme="@android:style/Theme.NoTitleBar.Fullscreen"
        android:windowSoftInputMode="stateAlwaysHidden">
        <intent-filter>
         <action android:name="android.intent.category.MAIN"/>
         <category android:name="android.intent.category.LAUNCHER"/>
       </intent-filter>

       <intent-filter>
         <action android:name="com.example.scannerapp.SCAN"/>
         <category android:name="android.intent.category.DEFAULT"/>
       </intent-filter>
    </activity>

</application>

</manifest>
We are adding permissions that android requires to use the camera and including activities to the application to know what files to open when we want to open up the scanner on the device.
Step 8. All done!
You now should be able to compile and run your application on a device. If there are any compiler errors, you may want to clean the project and/or restart eclipse.
Thank You’s
This blog owes big thank you’s to many folks:
- Alberto Landaverde, who interned with Telaeris summer of 2012, who modified the Zxing library and built the initial simplified library
- Kelly Lim, current Telaeris intern, who took this library and moved beyond it to build the DataLockr Android app. Kelly also wrote the content of this blog.
- Jake Pham, current Telaeris intern, who went through the tutorial here to make sure that everything worked as advertised.
Stay tuned for the next installment where we discuss how to make the ZXing library scan in both portrait and landscape modes. And if you have time, take a look at the product of all of their effort – DataLockr.

Leave A Comment