
Overview
This guide provides step-by-step instructions for configuring Okta as an OpenID Connect (OIDC) Identity Provider for XPressEntry. Once configured, users sign in to XPressEntry with their Okta credentials, and their Okta group memberships are mapped automatically to XPressEntry roles.
This document should be read alongside the OIDC Provider Configuration Guide, which describes the general requirements for any Identity Provider, including how to determine the correct redirect URI for your deployment.
Prerequisites
- Administrative access to the Okta admin console
- The XPressEntry redirect URI(s) — see the Redirect URI Configuration section of the main OIDC Provider Configuration Guide for details on determining the correct URI for your deployment
- Knowledge of which Okta groups should map to XPressEntry roles
Step 1: Create the Application in Okta
- Log in to the Okta admin console
- Navigate to Applications
- Click Create App Integration
- Select the following options:
- Sign-in method: OIDC – OpenID Connect
- Application type: Native Application
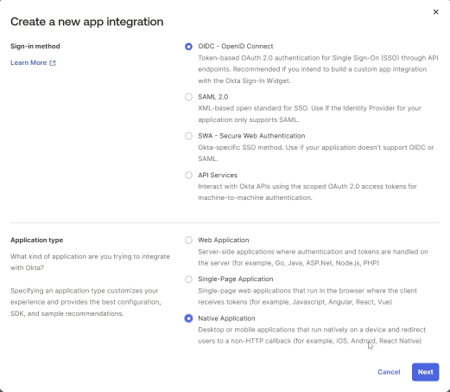
- Click Next
- Enter an application name (e.g., “XPressEntry”)
- Configure the Sign-in redirect URIs. Add the following:
- https://localhost:30001/auth/callback — for local access (client on the same machine as the XPressEntry Server)
- https://<server-ip>:30001/auth/callback — for remote client access (replace <server-ip> with the public-facing IP or hostname of the XPressEntry Server)
- https://localhost:30002/auth/callback — for the Authentication Test App (if testing)
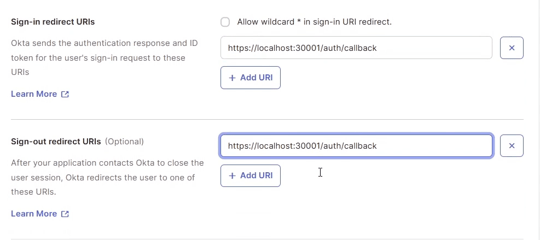
- Copy the Sign-in redirect URIs into the Sign-out redirect URIs field
- Set access control: select Allow everyone in your org to access (or restrict as needed), and enable Immediate access if desired
- Click Save
- Copy the Client ID from the application’s General tab — this is needed for the XPressEntry configuration
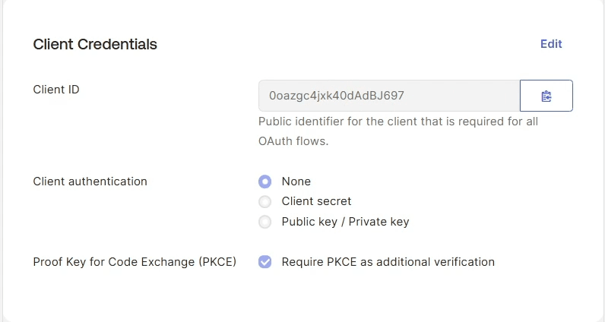
Step 2: Configure the Authorization Server
The authorization server controls token issuance, including which scopes and claims are available and how long tokens remain valid.
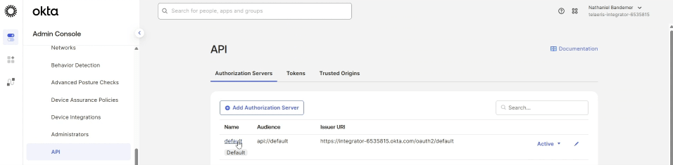
- Navigate to Security > API > Authorization Servers
- Select the default authorization server (or create a custom one)
- Verify an Access Policy exists that allows clients to access the server
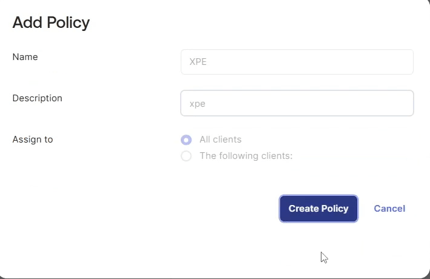
- Create or edit a policy (e.g., named “XPressEntry”), assigned to all clients or specifically to the XPressEntry application
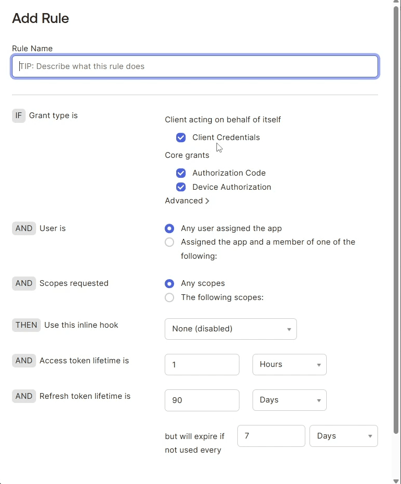
- Add a Rule to the policy with the Authorization Code grant type enabled
- Configure user access (e.g., any user assigned to the app, or specific groups)
- Configure the Access Token Lifetime — this determines how long a user’s session lasts before XPressEntry needs to refresh or re-authenticate
| Important: Copy the Issuer URL from the authorization server settings. This URL is used as the Discovery URL in XPressEntry. |

Step 3: Configure the Groups Claim
For XPressEntry to map Okta groups to internal roles, a groups claim must be included in the access token.
Option A: Add a Groups Claim via the Authorization Server
- Navigate to Security > API > Authorization Servers and select your server
- Go to the Claims tab
- Click Add Claim
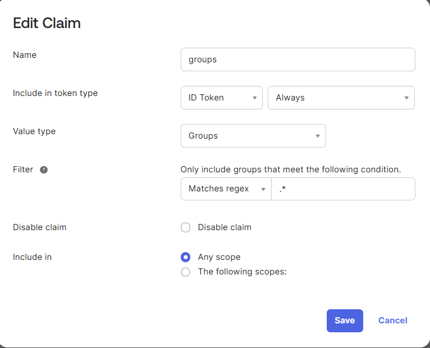
- Configure the claim as follows:
- Name: groups
- Include in token type: Access Token
- Value type: Groups
- Filter: Matches regex .* (to include all groups), or use a more specific filter
- Include in: Any scope (or specify openid)
- Click Create
Option B: Use an Existing Groups Claim
If your Okta configuration already includes group information in another claim (e.g., via a custom claim or app profile attribute), inform the XPressEntry administrator of the claim name so it can be configured accordingly.
| Note: The default group claim name in XPressEntry is groups. If you use a different claim name, the XPressEntry administrator will need to update the Group Claim Name setting for this provider. |
Step 4: Configure XPressEntry Server
After completing the Okta configuration, collect the following values:
| Value | Where to Find It | Example |
| Discovery URL | Authorization Server > Issuer URL | https://your-domain.okta.com/oauth2/default |
| Client ID | Application > General > Client ID | 123456789abcdef12345 |
| Note: A Client Secret may or may not be required depending on the application configuration. If the authorization code flow is configured to require a client secret, provide it as well. |
Configure the Okta Provider
- In XPressEntry Server, navigate to Tools > Settings
- Go to the OAuth Settings tab
- Click Add New
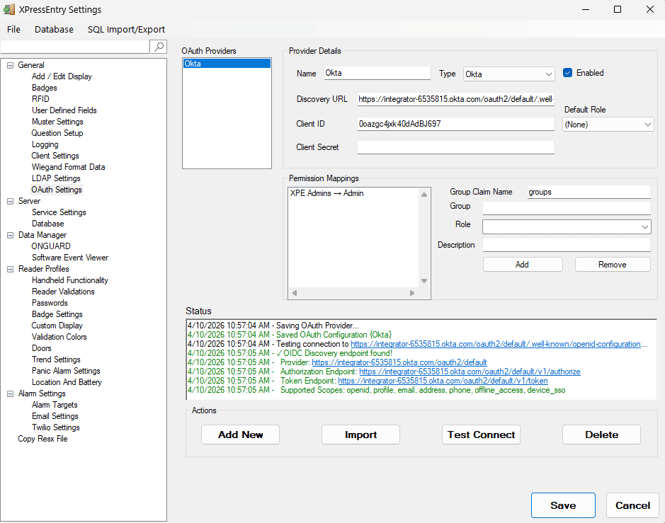
- Enter the following details:
- Name: “Okta” (or desired display name)
- Provider Type: Okta
- Discovery URL: Issuer URL from the Okta authorization server (from Step 2)
- Client ID: Application Client ID from Okta (from Step 1)
- Client Secret: if required by the application configuration
- Click Save
Configure Role Mappings
- If the group claim name is not “groups”, set the proper claim name in the Group Claim Name textbox
- In the provider’s role mapping section, add a new mapping
- Enter the Okta group name exactly as it appears in the token’s groups claim
- Select the corresponding XPressEntry role to assign (e.g., “XPE Admins” > “Admin”)
- Click Add
- Repeat for each group that should be mapped
- Click Save
| Note: If a user belongs to multiple mapped groups, they receive the highest privilege role. |
Test the Login
- On the XPressEntry Server login screen, click the Login Method dropdown
- Select the Okta provider (it appears under the display name configured above)
- Click Login
- A browser window opens to the Okta login page
- Enter your credentials and complete any MFA prompts
- After successful authentication, you are logged in to XPressEntry
| Note: OAuth login automatically creates a user and login entry in XPressEntry Server if one does not already exist for the authenticated email. |
Troubleshooting
User has no roles after login
- Verify the groups claim is configured on the authorization server (see Step 3)
- Check that the group names in the token exactly match the group names configured in the XPressEntry role mappings
- Inspect the token payload to confirm the groups claim is present and populated
Token validation errors
- Verify the Discovery URL is the Issuer URL from the authorization server (not the Okta org URL)
- Ensure the authorization server has an active access policy and rule that includes the XPressEntry application
- Check that the access policy allows the Authorization Code grant type
Redirect URI mismatch
- The redirect URI must exactly match what is registered in Okta (including scheme, hostname, port, and path)
- Use localhost for local access (e.g., https://localhost:30001/auth/callback)
- Use the server’s public-facing IP or hostname for remote client access (e.g., https://192.168.1.100:30001/auth/callback)
- If testing with the Authentication Test App, ensure its redirect URI is also registered (e.g., https://localhost:30002/auth/callback)
- Verify HTTPS vs HTTP matches the XPressEntry Server configuration
Need additional assistance? Contact Telaeris Helpdesk.


