XPressEntry – Genetec Documentation

1.Purpose
This document is intended to instruct users on how to synchronize an XPressEntry system with a Genetec Security Center system.
2.Installation Pre-requisites
- Genetec Security Center 5.6 GA or later Installed
- Genetec SDK installed 5.6 or newer
- Synergis Softwire Appliance Installed
- XPressEntry Server 2.7+ Installed (Proviced by Telaeris)
- Genetec Datamanager Plugin Installed (Provided by Telaeris)
- Genetec Administrator User Login Access
- Synergis Appliance User Login Access
- TCP Ports 5500 and 8012 are open between XPressEntry and Genetec
3.License Requirement
- Genetec SDK License Certificate Part Number: GSC-1SDK-Telaeris-XPressEntry
- XPressEntry License with Genetec Feature Enabled
4.Setting Up Genetec Security Center to Synchronize with XPressEntry
It is assumed that Genetec Security Center and Synergis Cloud Link appliance is installed.
4.1.Order of Operations
- Setup Synergis RIO Protocol
- Setup Genetec Data and Settings
- Enable XPressEntry Synchronization
- Set up XPressEntry Data
5.Setup Synergis RIO Protocol
5.1.Enable RIO Protocol on Synergis™ Cloud Link
- In order to enable the RIO Protocol on the Synergis™ Cloud Link appliance, open a web browser on a PC that can communicate with the Synergis™ Cloud Link appliance. Add the following into the URL:
https://[UnitIP]/Features/DuiRIO/Enabled/Set?value=true
where [Unit IP] is the IP address of your Synergis™ Cloud Link appliance.
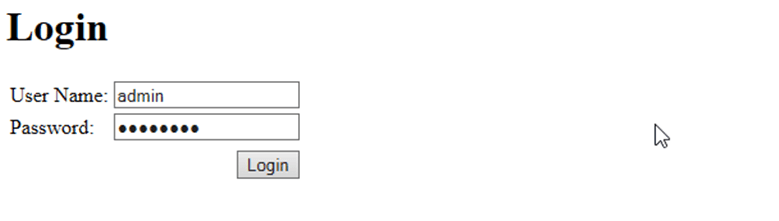
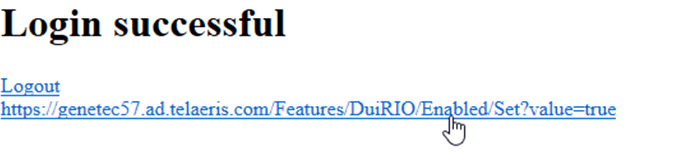
You will need to Login to the Synergis software. (default login is admin default password is softwire) - After successfully logging in, you will need to click the following link below. If successful, you will receive a confirmation that says “Feature enabled.”

5.2.Create XPressEntry RIO Channel
If you have not connected the Synergis Cloud Link appliance to Genetec Security Center before, please do so before continuing.
After connecting the Synergis unit online, we need to add the RIO channel and associated readers that will be associated to the handheld readers in XPressEntry.
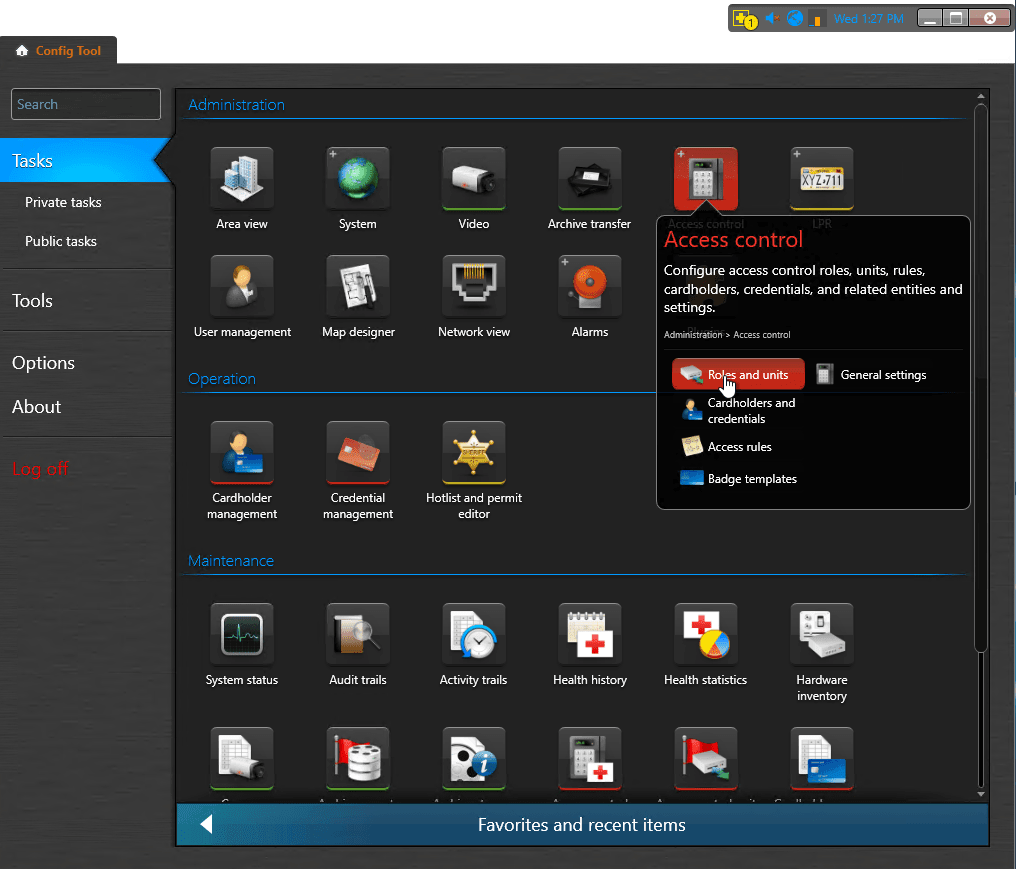
- In Genetec Config Tool, go to Tasks -> Access Control -> Roles and Settings
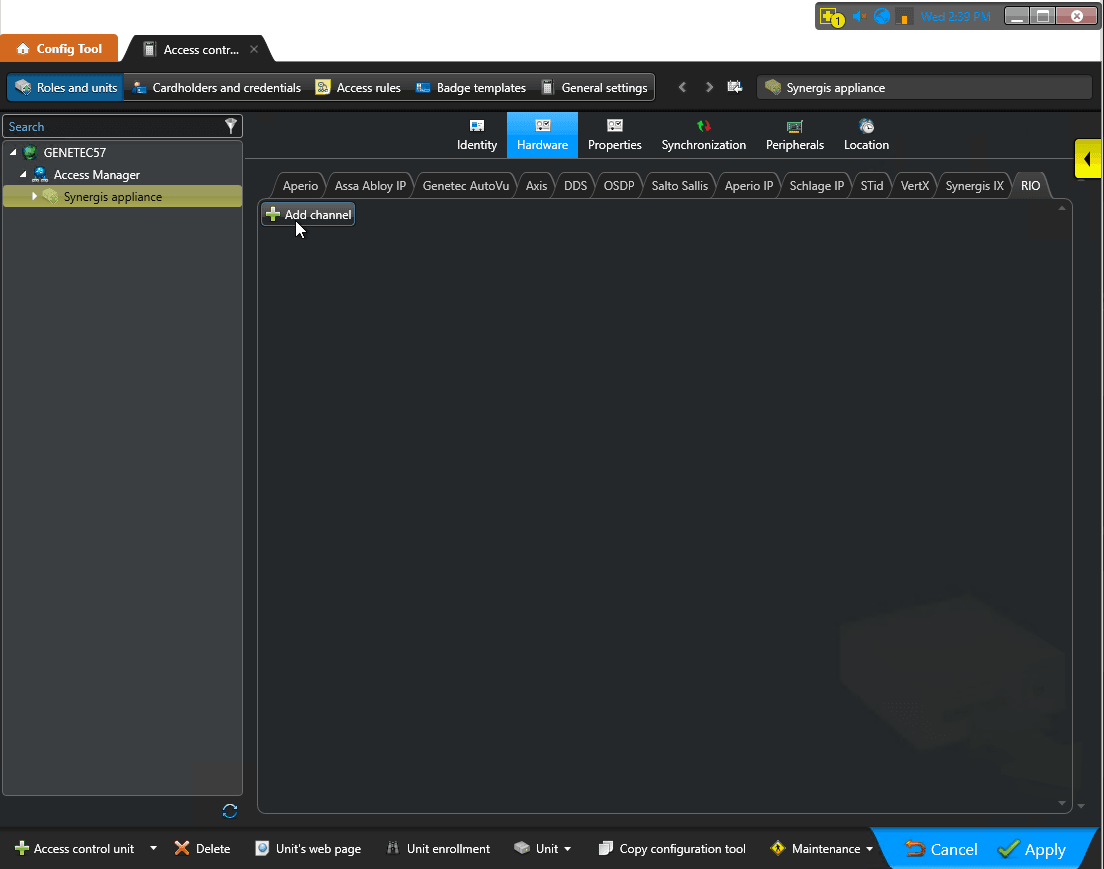
- Select the Synergis appliance that you will be adding the handheld readers too. Select the “Hardware” tab, then Select the “RIO” tab.
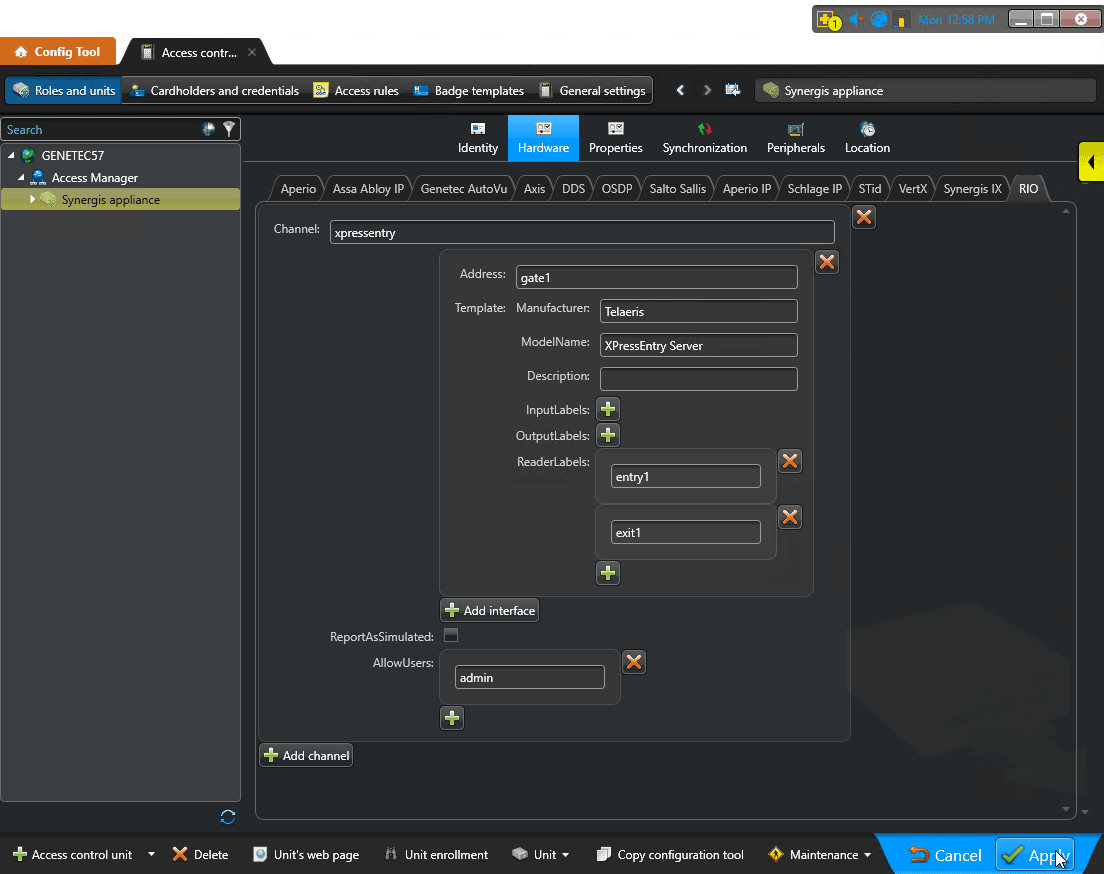
- Click “Add channel.” Create a channel and call this channel “xpressentry”. This MUST match exactly for the events to work.
For each door in Genetec we will create and track, we will create an interface. Click “Add interface”.
The interface’s Address will need to match exactly the name of the door we will create. This allows XPressEntry to send the correct Door name when sending activities back to Genetec. To show the online status of the RIO associated doors, it is recommended to use a unique prefix for ALL RIO doors. For example, two doors should have xpe_ as the prefix. xpe_door1 xpe_door1. Case sensitivity applies.
Manufacturer, ModelName, and Description are optional.
Add a ReaderLabel for each reader we will be adding. A Genetec Door can support 1 or 2 readers. Label these readers as necessary.
If adding multiple Doors, continue adding more interfaces.
ReportAsSimulated is not used. You may leave this unchecked.
Under AllowUsers, add a Synergis user that we will use to connect to the RIO API. The default user is admin.
6.Setup Genetec Data and Settings
6.1.Handhelds
For every physical XPressEntry handheld reader, a Genetec door should be created. Each door must have at least one reader, or up to two. The door created will have to match an interface name created under the Synergis RIO hardware.
6.2.Create Door
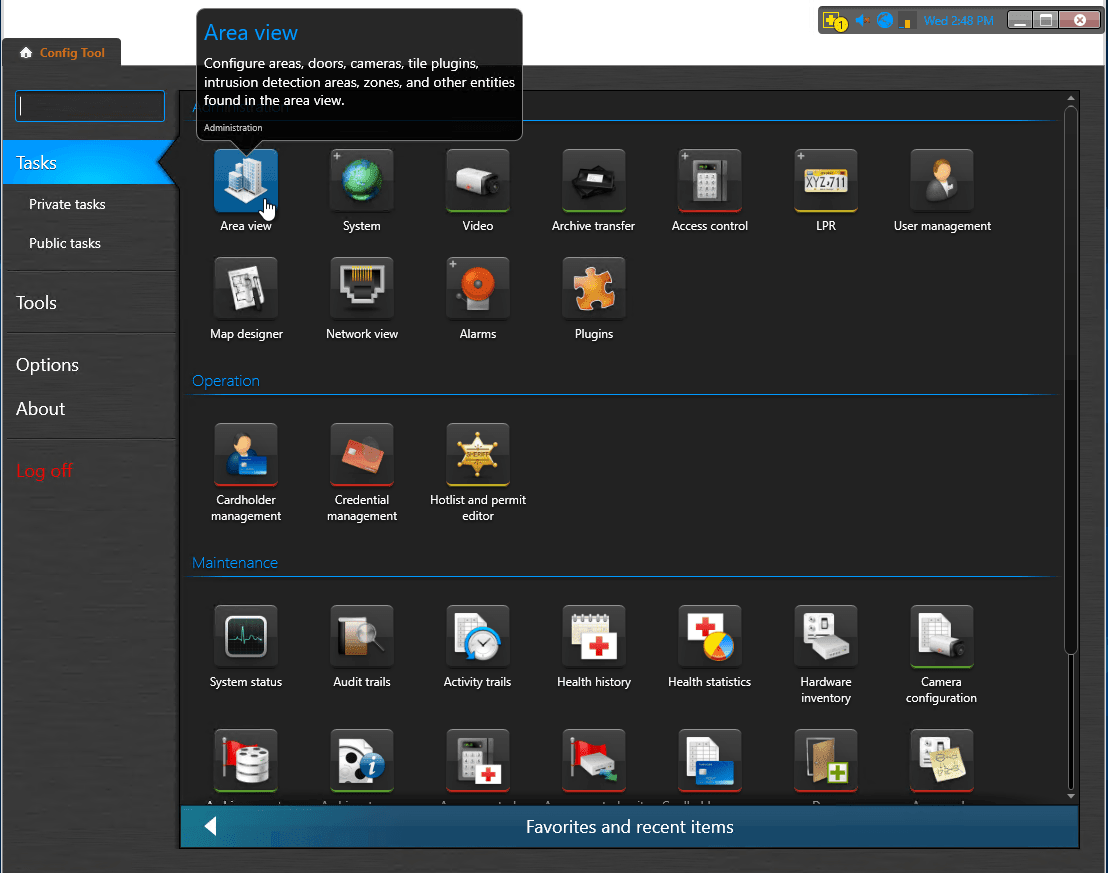
Go to Config Tool -> Area View.
Right click the entity you would like to add the door under. Typically, this is done under an Area.
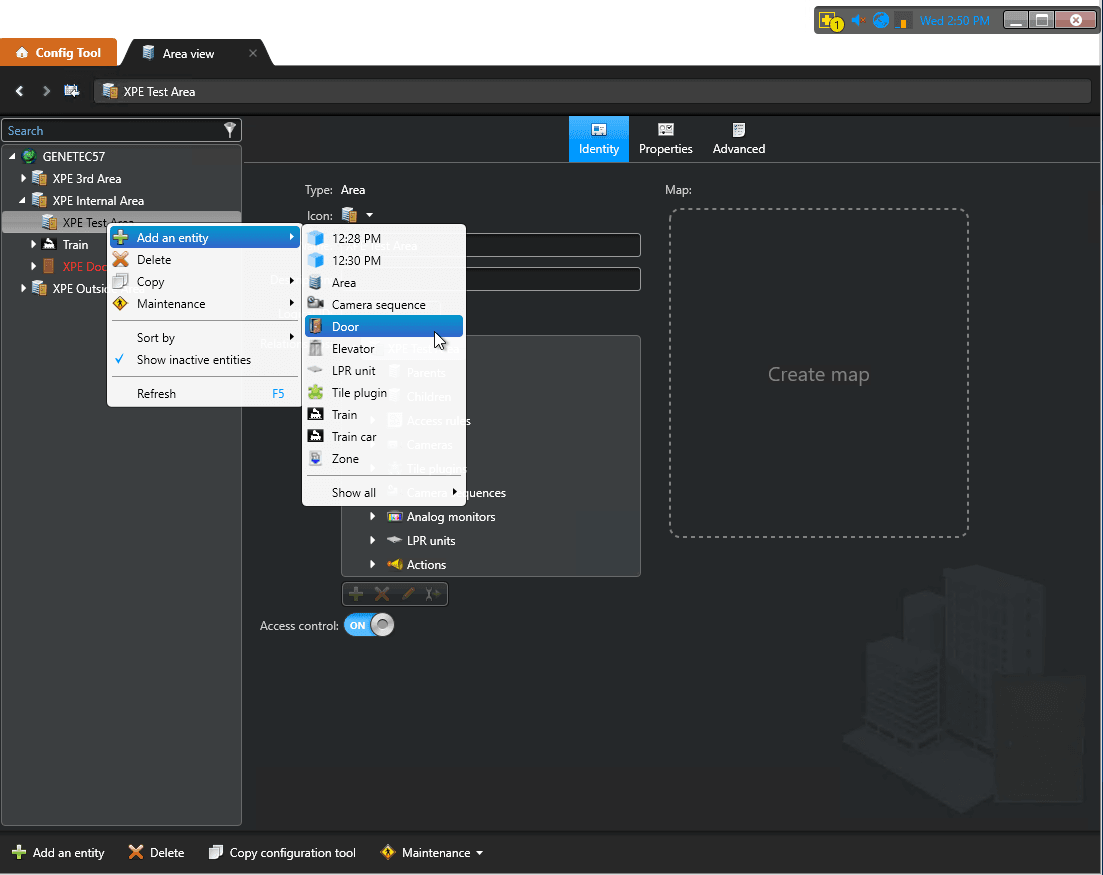
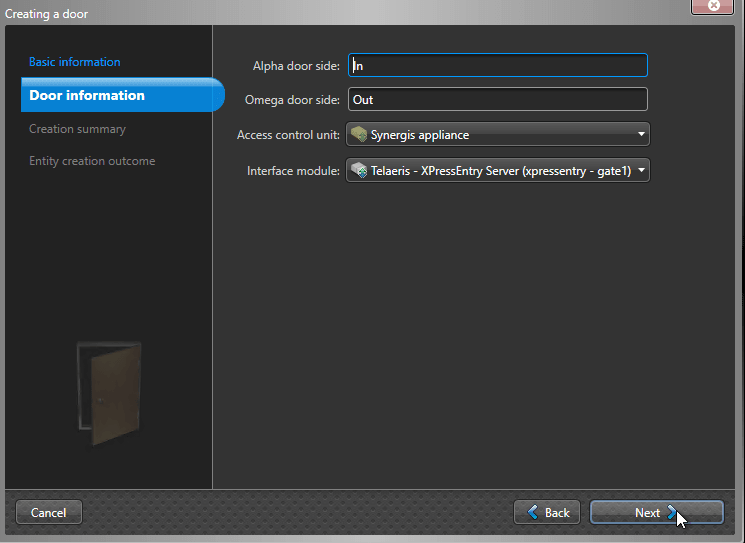
The door entity name must be exactly what the interface address was created as in the previous step. We used gate1 as the Address name in the RIO Channel, so we will call our door gate1.
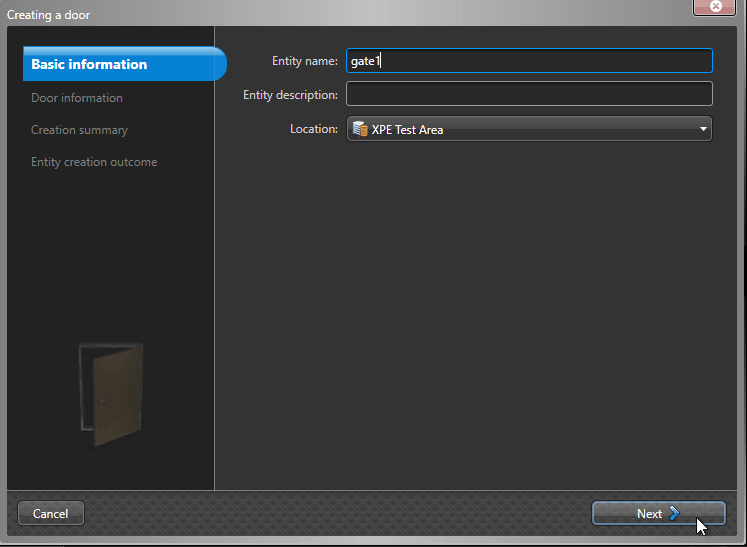
Set the Access Control Unit to the Synergis Cloud Link appliance that was used to setup the RIO Protocol. Set the Interface module created in the RIO Protocol that we are using. Click next, Create, then Close.
6.3.Add Readers to Door
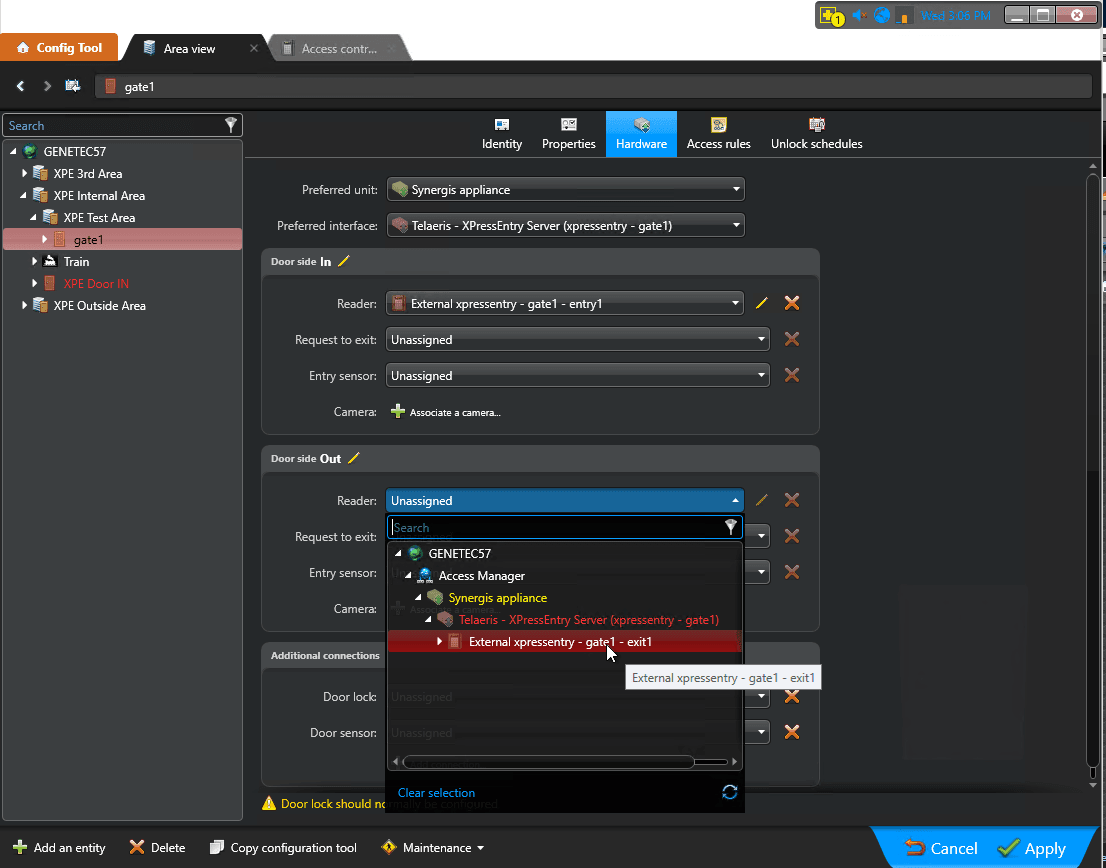
In most situations, you should add two readers (an entry and an exit) for each door. Usually, there should be at least one XPressEntry handheld for each door you are tracking.
Assign the Door Side reader with the ReaderLabels created from the RIO Protocol. The Alpha side is the Entry Reader, while the Omega side is the Exit Reader. Click Apply when done.
Don’t forget to add the door or parent entity to an access group.
7.Enable XPressEntry Synchronization
XPressEntry uses a module called “Data Manager” to synchronize Genetec data into XPressEntry.
From the main page of XPressEntry, go to XPressEntry / Settings (CTRL+S)

7.1.Choosing the Genetec SDK to Run
XPressEntry utilizes the Genetec SDK installed on the same machine. XPressEntry can support the Genetec SDK 5.6 and newer. The version of Genetec SDK must be within 2 versions of the version of Genetec Security Center that is installed. For example, Genetec SDK version 5.6 could be used for Genetec Security Center versions 5.6 or 5.7. Genetec SDK version 5.8 could be used for Genetec Security Center versions 5.8 and 5.9.
A few things need to be done, depending on the version of the Genetec SDK that is being installed.
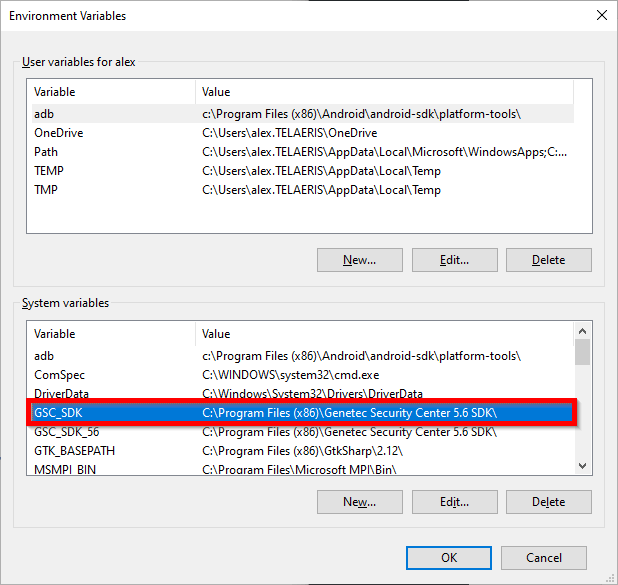
7.2.Environmental Variables
XPressEntry determines where to find the Genetec SDK through an environmental variable. Make sure the path of this variable points to the appropriate Genetec SDK folder as shown below.
7.3.Binding Redirect Based on SDK Version
You may need to change the SDK version that XPressEntry Targets. You will be editing XPressEntryService.exe.config and XPressEntryServer.exe.config.
Navigate to XPressEntry’s installation folder. Open XPressEntryService.exe.config as an administrator. (C:\Program Files (x86)\Telaeris\XPressEntry\XPressEntryService.exe.config)
At the very bottom, you will find a section that looks as follows:
<dependentAssembly>
<assemblyIdentity name=”Genetec.sdk” publicKeyToken=”a446968a32b751de” culture=”neutral” />
<bindingRedirect oldVersion=”0.0.0.0-5.8.0.0″ newVersion=”5.8.0.0″ />
</dependentAssembly>
If you are using 5.9, Change the “NewVersion” to 5.9.0.0 and so forth depending on version of the SDK you are running. Save the file.
Do the same in the XPressEntryServer.exe.config file. The location of the Genetec.sdk binary redirect may differ.
7.4.Data Manager Tab
From the Settings page select the Data Manager Tab
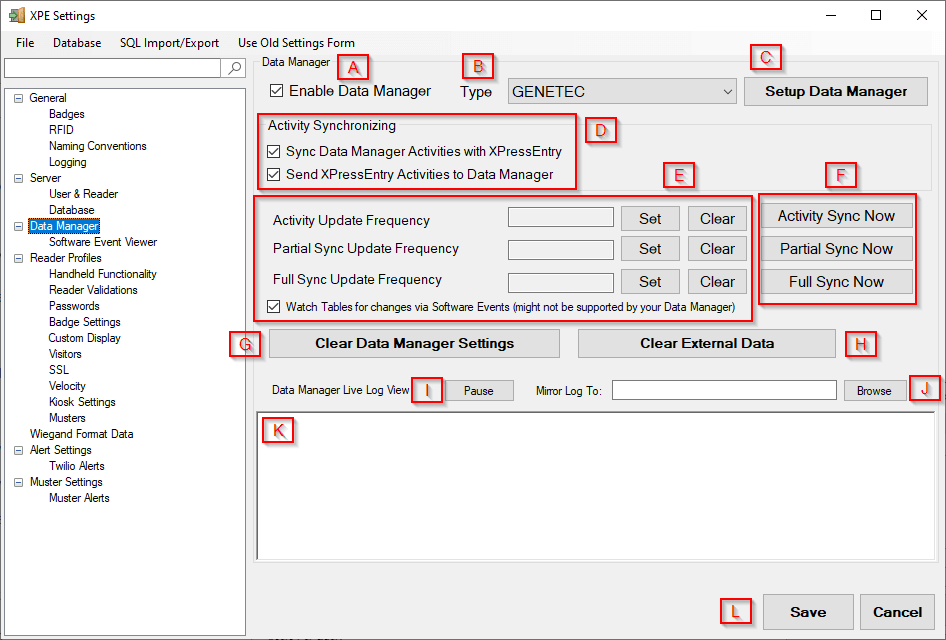
- Enable Data Manager – This must be checked to enable the Genetec Synchronization
- Type – Select Genetec as the Data Manager type
- Setup Data Manager – Opens the Genetec Data Manager Settings
- Activity Synchronizing – Controls the bi-directional communication between XPressEntry and Genetec.
- Sync Data Manager Activities with XPressEntry – Pull data from Genetec. Mainly used for occupancy tracking.
- Send XPressEntry Activities to Data Manager – Send handheld or server activities back to Genetec as an event.
- Update Frequency – Set the update frequency for each sync
- Activity Update – Push and pull Genetec activities
- Partial Sync Update – Pulls all data excluding cardholder data, including readers, areas, access levels.
- Full Sync Update – Pulls all data from Genetec. Depending on the size of the Genetec system, this sync can take a while. Recommended to sync overnight, once a night.
- f. Send XPressEntry Activities to Data Manager – Send handheld or server activities back to Genetec as an event.
- Clear Data Manager Settings – Clears All settings on this form.
- Clear External Data – Clears all data that was synced from Genetec, including cardholders, badges, reader etc.
- Pause/Unpause – Can pause or unpause the logs as it populates.
- Mirror Log – Outputs a secondary log file at the chosen location
- Log – Displays all Data Manager Logs
- Save – After any changes, press Save to apply changes to any sync. If settings are not saved, the next sync will NOT use the new changes.
Set the Update Frequency to as often as you want the system to update. Note that only one update can run at a time and if this value is very low the system will constantly try to update (this is not always a problem
7.5.Genetec Data Manager Setup Page
Press the “Setup Data Manager” button to get the Genetec specific setup screen.
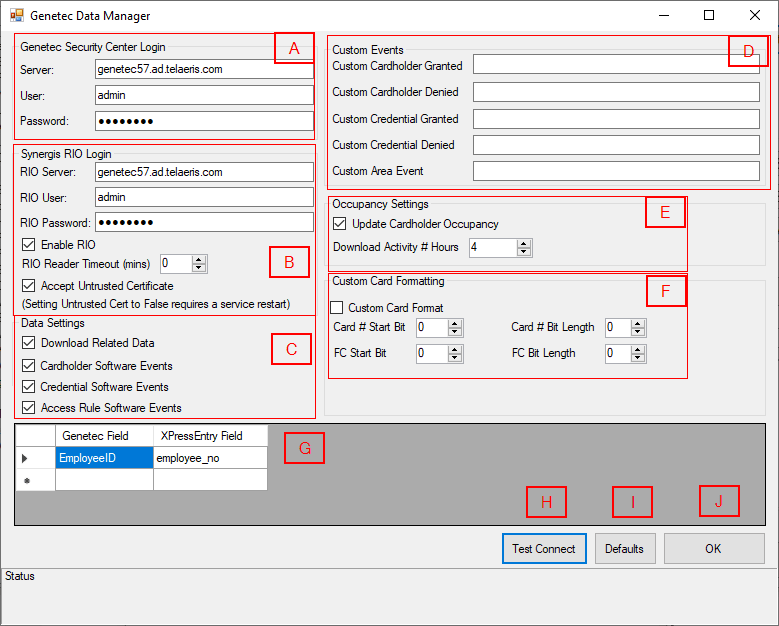
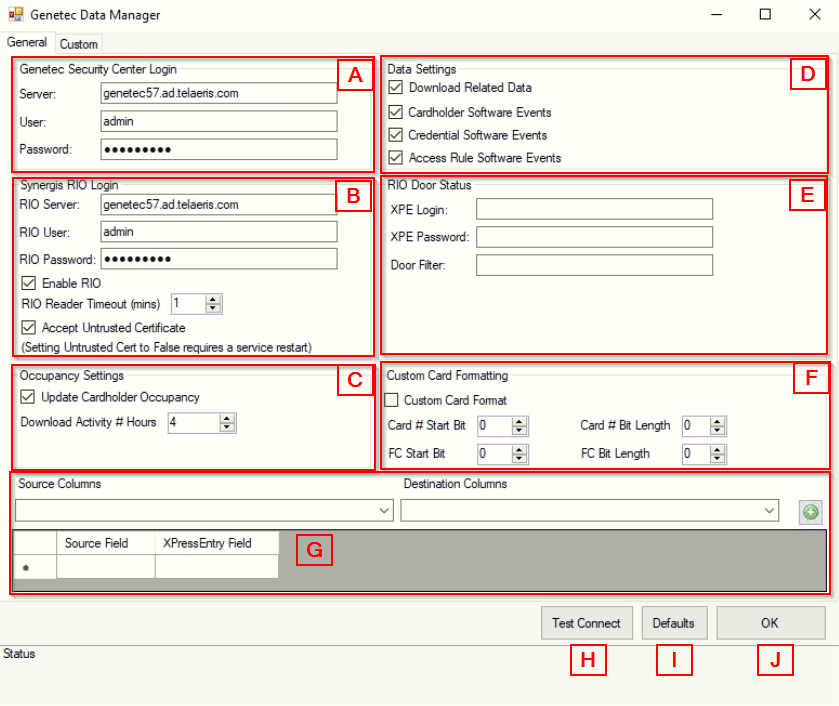
-
- Genetec Security Center Login – Input the Genetec Security Center Application Server and login details here
- Synergis RIO Login – Input the Synergis Appliance and Synergis RIO login here
- Occupancy Settings – Settings for keeping track of occupancy and activities from Genetec. Used for occupancy counts and mustering scenarios.
- Update Cardholder Occupancy – Enables occupancy syncing.
- Download Activities # Hours – When syncing, pull only activities from the inputted X # of hours.
- Data Settings – Choose the type of data to be transferred from Genetec. Software events are generated when changes are made to data from Genetec Security Desk or Config Tool.
- Download Related Data
- Cardholder Software Events – Pull Cardholder software events, including cardholder activity
- Credential Software Events – Pull Credential software events
- Access Rule Software Events – Pull Access Rule software events
- RIO Door Status – To enable RIO door reader status as online to the readers that are utilize with XPressEntry, we require a prefix door filter for all readers that will be RIO based readers. A RIO door will only be marked online if a handheld is connected to XPressEntry server, and Entry/Exit mode is currently utilizing the door. This is optional.
- XPE Login and XPE Password is a login for an XPressEntry admin. We require this to pull reader data from the local database for mapping purposes.
- The Door filter prefix matches the prefix used to create Genetec RIO based doors.
- Custom Card Formatting – Use if utilizing custom card formats in Genetec.
- Custom Card Format – Enables the use of custom card formats
- Card # Start Bit – Set the start bit for card
- Card # Bit Length – Set the bit length for card
- FC (Facility Code) Start Bit – Set the start bit for FC
- FC (Facility Code) # Bit Length – Set the bit length for FC
- Genetec Custom Fields – Associate Cardholder custom fields with a XPressEntry data field. Optional Data fields in XPressEntry include: employee_no, user_field_data_1 to user_field_data_10. Reach out to [email protected] for assistance on any other custom data fields.
- Test Connect – Test the Connection status with the inputted credentials to Genetec Security Center
- Defaults – Reset all data on the Settings form
- OK – OK to confirm settings.
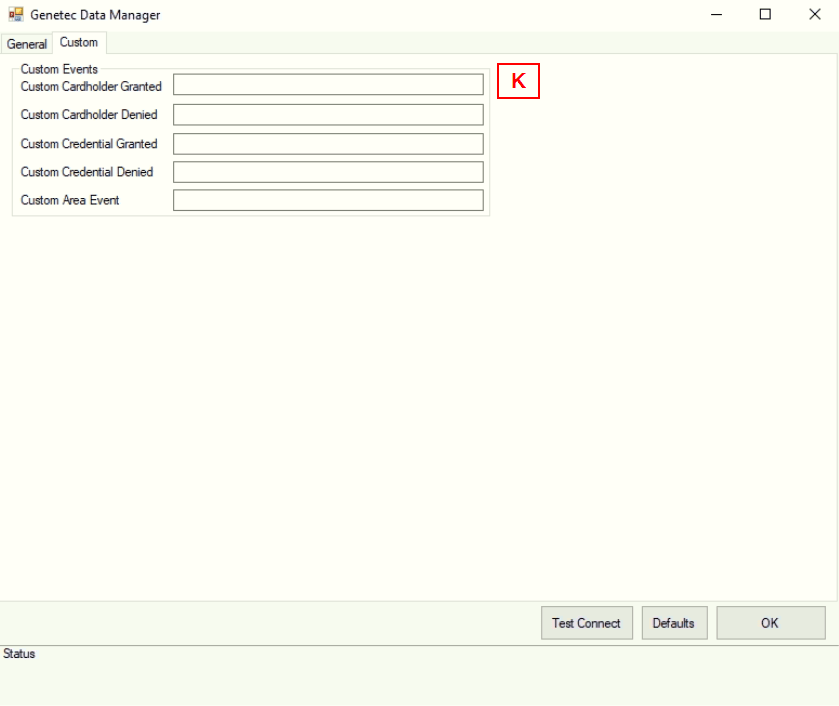
- Custom Events – Cardholder, credential, and area activities can be connected to a Genetec Custom event. The name of the custom event in Genetec must be inputted to the associated custom event action.
8.Setup XPressEntry Data
After setting up the data manager, run the initial Full Sync to pull data from Genetec. Once the Genetec System is set up and synchronizing, you will see all of this data represented in XPressEntry under the Add/Edit Info tab. Data which is imported from Genetec cannot be changed and is greyed out in XPressEntry without proper permissions.
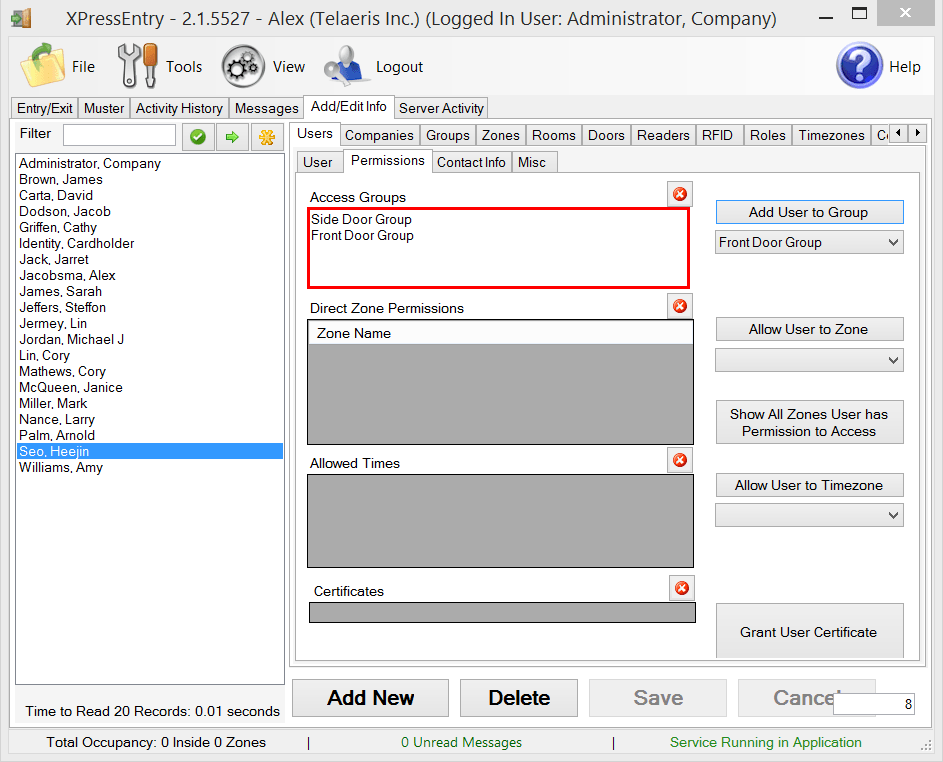
8.1.Users
Here is a sample of a properly synchronized user:
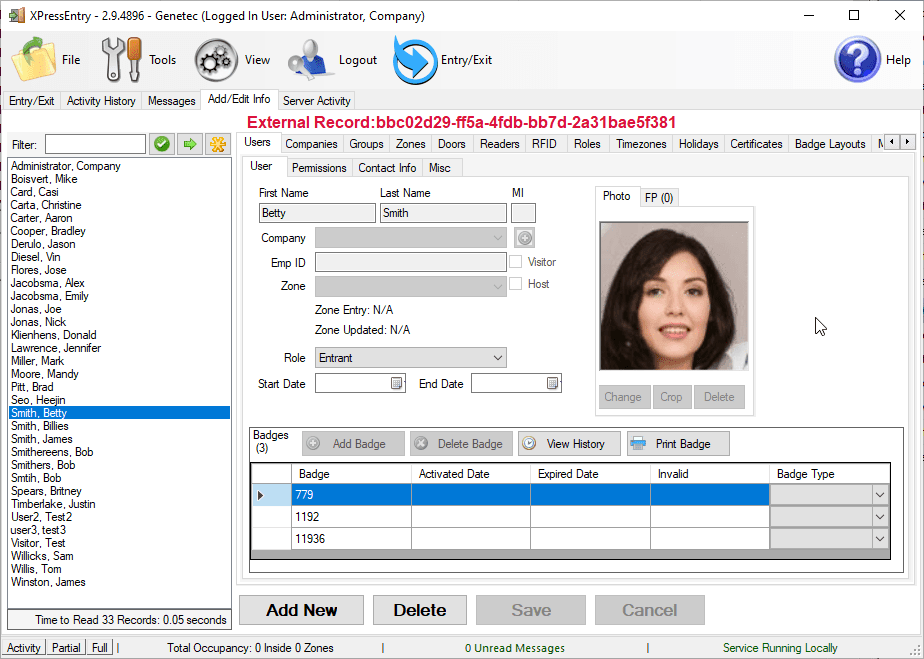
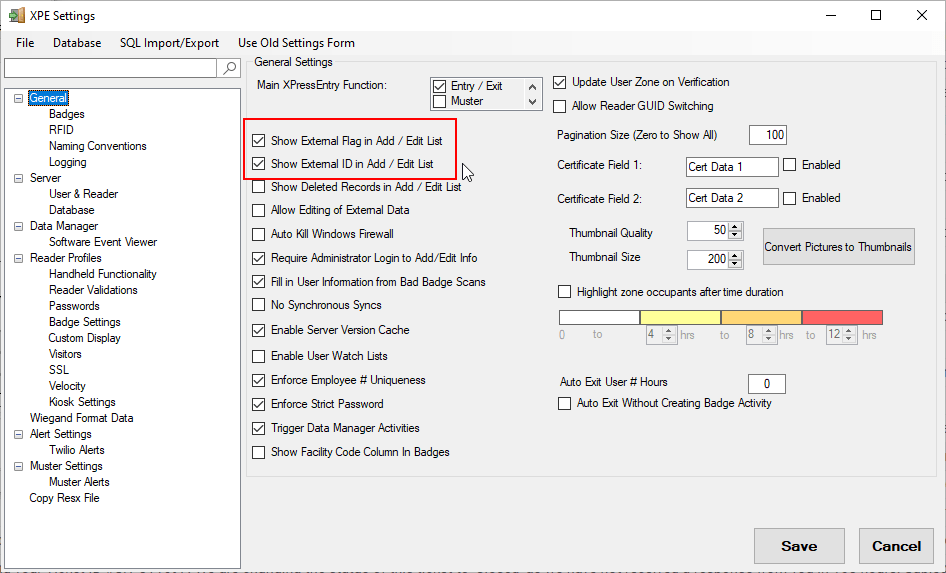
By default, all external data (data that has been synced from Genetec) will show “External Record” and an external record number. The external record and record number can be hidden.
If you wish to hide this, go to Tools -> Settings -> General tab, and check or uncheck “Show External Flag” and “Show External ID”. Show external flag will supersede the show external ID.
8.2.User Permissions
Users in XPressEntry have the same access rules in Genetec to each individual reader.
8.3.Doors
Entry/Exit permissions in XPressEntry are set by doors. Doors contain up to two readers, an entry and an exit reader. Door access is determined by the user’s access to the door’s external entry or exit reader. Doors should be set by the user for each Handheld Reader in XPressEntry.
The XPressEntry Integration with Genetec does required to have both a start and end zone assigned. If no zone is assigned, handheld activity will not populate to Genetec. For most situations, each door’s zones should be set to the default: outside and building. For proper occupancy tracking, Set the start and end zone from area’s populated within Genetec. The start zone is the area the user would be entering from, and the end zone is where the end user will end up. Entry reader will tie in the alpha side door reader in Genetec, which should be associated with the end zone area in XPressEntry.
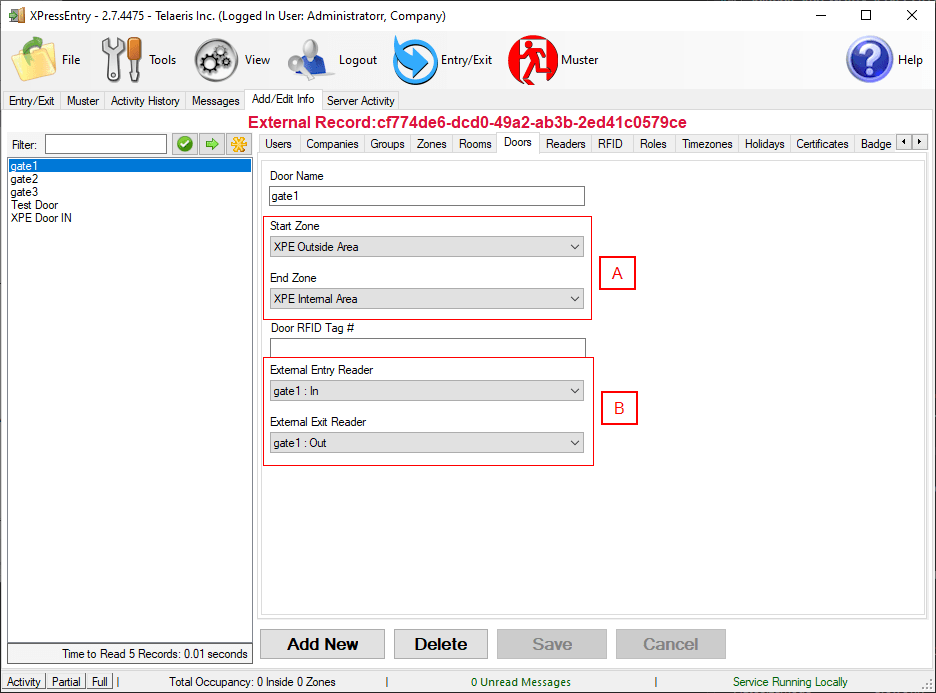
- Zones- For each door, set the start zone to Outside and the end zone to Building. This helps to determine directionality. If occupancy tracking is enabled, set the start and end zones to the desired zone
- External Readers- Attach the logical entry and exit readers that you created in Genetec to a door. The readers are named based off the door. Entry reader alpha side is named “gate1 : In” where the omega side is named “gate1 : Out.”
8.4.Readers
A handheld unit can logically represent any Synergis RIO door/reader combination created in Genetec. When the handheld is issued to an employee at a specific door, the employee must first set the door on the handheld. The XPressEntry Reader that the handheld represents is based on whether the handheld is in entry mode or exit mode.
For example, handheld A is stationed at door A. Door A has two readers associated with it: Reader A-Entry and Reader A-Exit created from Genetec. The employee holding the handheld sets the handheld’s door to Reader A. When the employee sees a cardholder walking towards the building, they set the handheld to Entry mode and scans the cardholder’s badge. The handheld in entry mode identifies itself as reader A-Entry and sends an activity to the server with access granted or access denied.
Later, there is heavy volume exiting Door B. Door B has two readers associated with it: Reader B-Entry and Reader B-Exit. The employee from door A is called to help and brings handheld A. He sets the door on his handheld to Door B and the mode to Exit. When he begins scanning people walking out of the door, the handheld identifies itself as Reader B-Exit and sends each scan as an activity to the server.
8.5.Activities
XPressEntry will synchronize activities to Genetec if that option has been set by Data Manager.
Entry/Exit activities will be sent to Genetec and can be monitored in Genetec Security Desk.