This document has been superseded and is no longer considered up to date.
Please Go here for updated information:
#
Prowatch Prerequisites #
First is to get your Prowatch system licensed for the “Web Data Transfer Utility”. It must be running 4.2 SP2 for this to work.
This will enable the XPressEntry and Prowatch systems to communicate properly and allow XPressEntry to push data back into Honeywell Prowatch.
Next you’ll need to install and configure the Web DTU service. For installation instructions, please contact [email protected].
Prowatch Readers #
For each physical handheld, we should set up two readers(IN/OUT) in Prowatch.
You can do that like this:
Add a Channel
Select PW-5000/PW6000
It comes with the correct templates for the hardware
Check “Installed” only initially. Select the TimeZone for now.
Once we’re done creating everything, uncheck the Installed checkbox
Select a port Type of Hardwired
Add a panel
Select the Channel we just created.
Type of panel is a PW5000/6000(doesn’t matter)
Once that’s done, add a logical device to it
Select the panel, select the type of logical device.
Use ACS-Door typical reader(that’s the template)
when you select that, it’ll add reader, door position switch, and arm
It’ll add the whole tree to the panel.
You’ll be able to add two logical devices per setup. That means we have to add a Door for each XPressEntry Handheld.
Remember to add the readers to the appropriate Clearance Codes.
XPressEntry Data Manager #
To setup the XPressEntry Data Manager for Prowatch Communications, you do the following.
Tools -> Settings -> General Tab
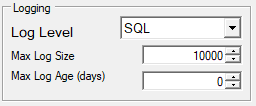
Change the log level to SQL:
Tools -> Settings -> Data Manager Tab
- Check Enable Data Manager
- Select PROWATCH DTU
- Press Save and Apply Settings
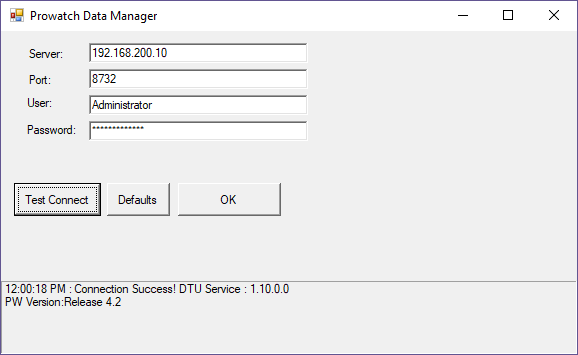
- Press Setup Data Manager
- Enter the IP and Web DTU User/Password.
- Press Test Connect to make sure it’ll work
- Press OK
- Press Save and Apply Settings
- Set the Activity/Partial/Full sync frequencies.
- Check both Activity Synchronizing boxes
- Press Save and Apply Settings
- Press Full Sync now

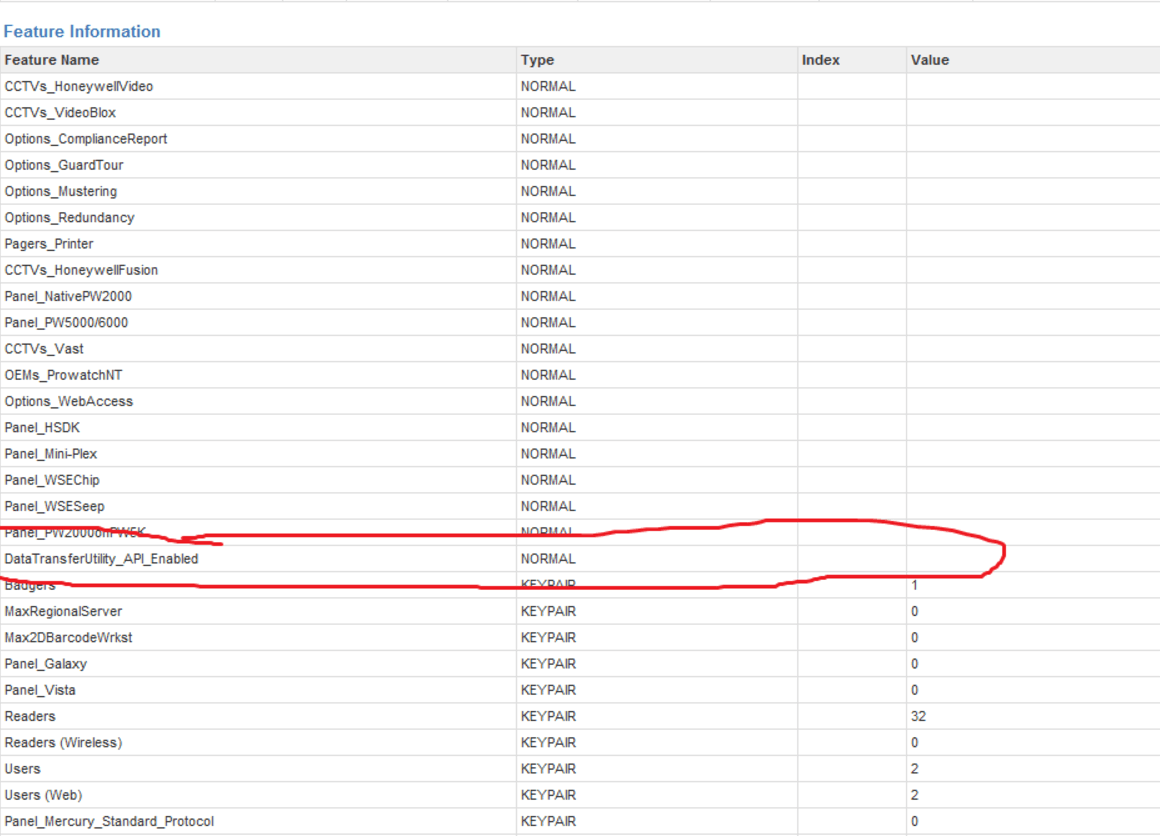
After the full sync is done, you should have all the Badges/Readers/etc info from Prowatch in XPressEntry
Since we don’t want to have SQL logging enabled forever, change it back to INFORMATION once all is working
Tools -> Settings -> General Tab
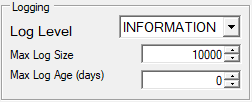
Change the log level to Information:
XPressEntry Reader Profile #
Next is to set up the XPressEntry Reader Profile.
If you want to use the Clearance information to authenticate Badges in Prowatch, you need to check the “Door Readers” checkbox.
I also strongly suggest “Enable Reader Live Stream” in the list on the bottom left
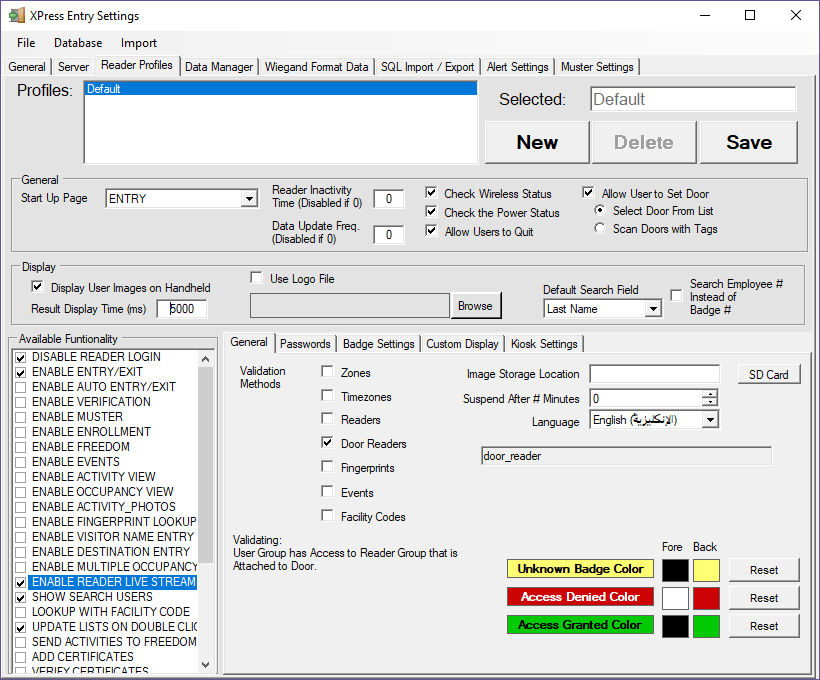
The rest of these features are explained in the manual
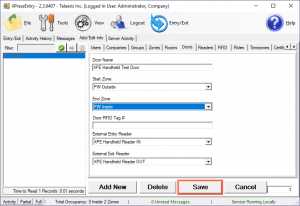
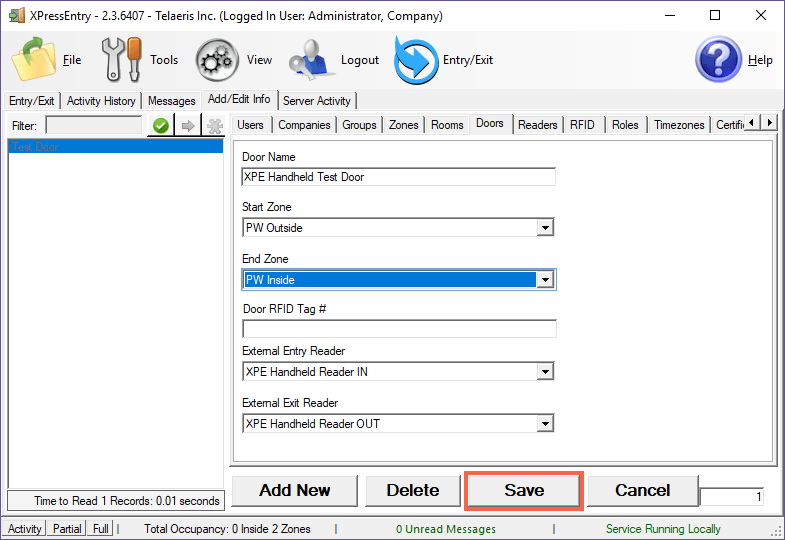
XPressEntry Doors #
The last step is to setup the Doors the handhelds will use to authenticate/send information along with.
It’s suggested to use one Door per handheld. This allows for the most accurate reporting of scans.
See below for this setup
 #
#
XPressEntry makes the following Prowatch API calls: #
IssueReaderEvent
GetAreaOccupants
GetCompanies
GetBadgeTypes
GetAreas
GetLogDevsByHWClass
or
GetLogicalDevicesAll
GetClearanceCodes
GetClearanceCodesLD
QueryBadgesPaging
GetBadgeBlob
or
GetBadgePhoto


