XPressEntry – Server Documentation

1.Purpose
This document is intended to give an overview of XPressEntry server.
2.Welcome
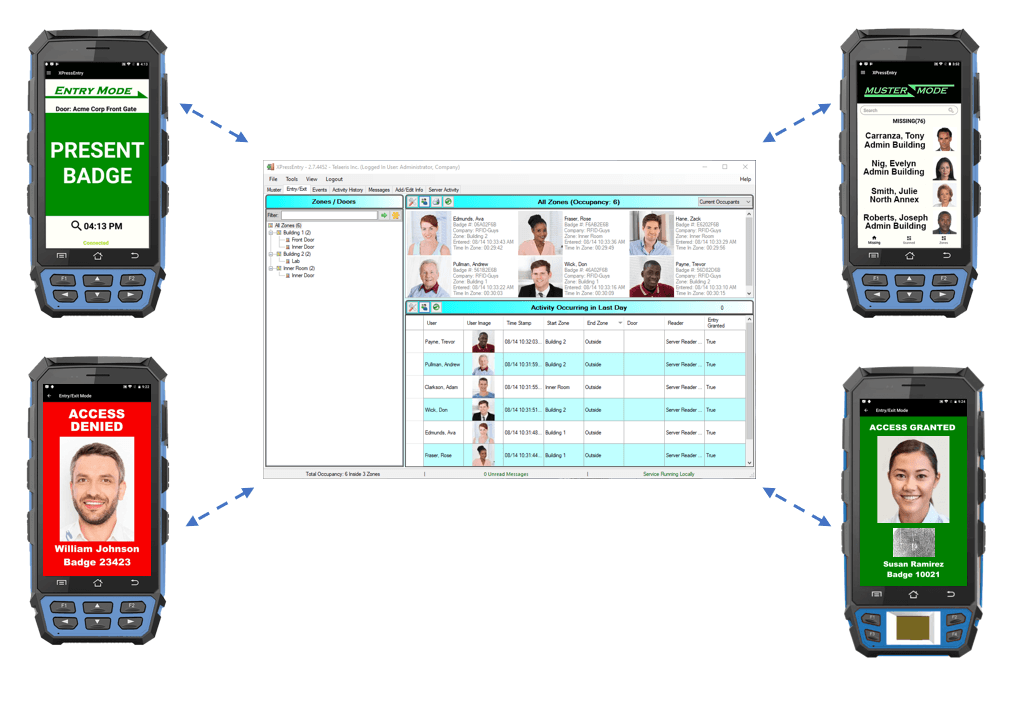
XPressEntry is a tool used for validating credentials of personnel entering facilities using handheld devices. It provides occupancy counts, entry/exit activity, access control groups, muster activity and reporting to help you monitor and secure your facilities.
2.1.Concept
The XPressEntry Server Operator can track when and where each person entered, how long they were in specific locations and can update system information and access control rules for controlled areas. A common use case follows: an employee approaches a door equipped with an XPressEntry Handheld Reader and presents their badge to the attendant to be scanned. If authorized, the software will display the name, time stamp and the picture of the entrant on the screen of the handheld. The entry is recorded in the XPressEntry Server, where the occupancy and activity for that zone is updated with the new information.
The XPressEntry System can be used for a wide variety of purposes, including:
- Entry / Exit Tracking
- Employee Validation
- Remote Parking
- Bus Validation
- Emergency Mustering
- Confined Space Management
- Visitor Management
- Event Management
- Ticketing
- Certificate Tracking
- Handheld Enrollment
XPressEntry may be used as a completely stand-alone system or may be set up to work in conjunction with any access control system, HR database, Club or Resort POS systems, and other database enabled system.
2.2.Software Installation
The XPressEntry Desktop Application is designed to work from a single computer system. XPressEntry has a Setup Wizard to guide the user through the installation process. XPressEntry operates on Microsoft Windows (Version 7 or greater) and Windows Server (Version 2008 R2 or better). Upon installation, the user will be prompted for agreement with the terms of the software license, the destination for the application on the computer’s hard drive, and the placement of a shortcut in the Start Menu for XPressEntry.
2.3.Printing Reports
XPressEntry generates printable reports which are formatted for standard US letter paper (8.5” x 11”). This will require the user to have a printer installed with its proper drivers, or reports may be saved as PDF files.
2.4.Images and Cameras
XPressEntry has the capability to store photos, which is useful for quickly verifying that an employee’s badge number matches their identity. XPressEntry can collect images in two ways: importing an existing image or capturing a new image using a camera connected to the XPressEntry Server workstation. XPressEntry works with most USB-connected cameras or web cameras supporting WIA (Windows Imaging Automation).
2.5.Badge Printing
XPressEntry has the capability to print employee badges on most commercial ID card printers. XPressEntry comes with a few stock badge designs. New badge formats may be created, designed, and imported into XPressEntry.
3.Getting Started: Program Setup
For detailed Setup instructions, please see the following guild- /documentation/xpressentry/installation-and-upgrade/
3.1.Initial XPressEntry Run
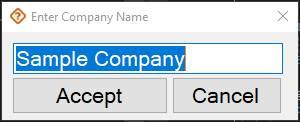
Once the database is selected and the service is running, the user will be required to create a company and an admin user account.
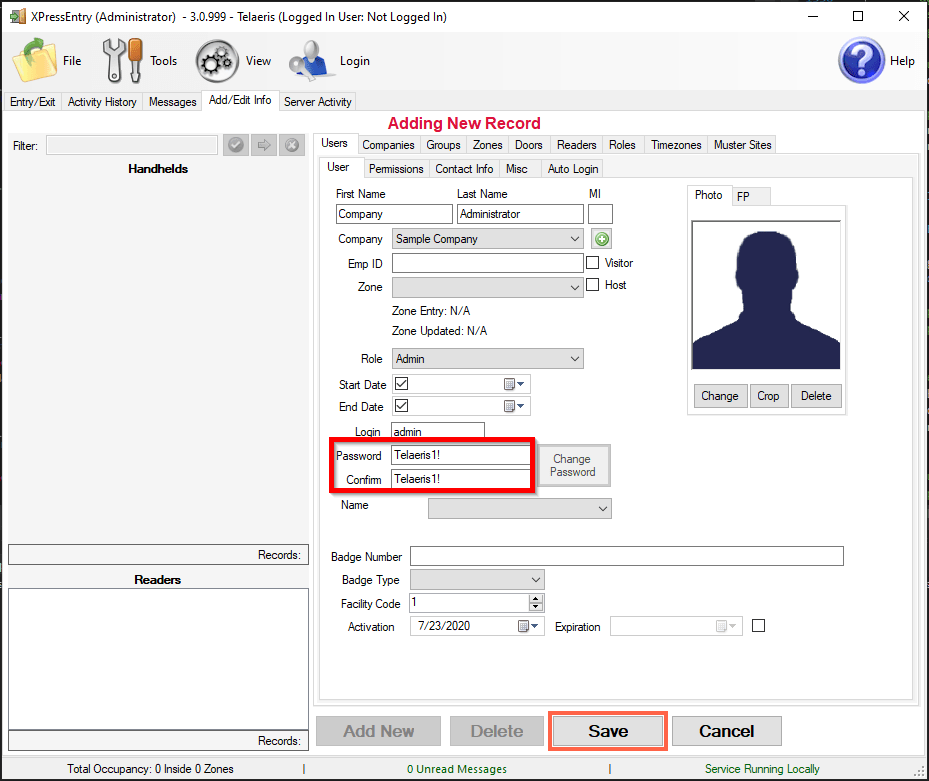
Default username- admin
Default password- Telaeris1!
Select Save at the bottom. Once you save, you will automatically be logged in.
3.2.Program Functionality Overview
Announcement Bar
Located at the bottom of the XPressEntry screen is the announcement bar.
![]()
- Total Occupancy/Mustering Status: The left side displays the total zone occupancy or the mustering state.
- Message: The middle displays when there are unread messages in the inbox.
- Server Status: The right side displays the service status and where it is running.
Menu Bar
The User Filter ![]() text field: Filters users based on personnel name and badge number. Select the
text field: Filters users based on personnel name and badge number. Select the ![]() button to filter and the
button to filter and the ![]() button to stop filtering.
button to stop filtering.
![]() Settings
Settings
![]() Display of Hidden Images
Display of Hidden Images
![]() Mark Evacuation Complete
Mark Evacuation Complete
![]() Print Current Report
Print Current Report
![]() Cancel Entire Muster and Leave People Where They Are
Cancel Entire Muster and Leave People Where They Are
![]() Refresh
Refresh
![]() Reset Filtered Users to Where They Previously Were
Reset Filtered Users to Where They Previously Were
4.Main Program Tab Sections
4.1.Overview
4.1.1.XPressEntry Tabs
The XPressEntry application has seven available tabs. These tabs are located across the top left-hand side of the screen. The tabs are:
- Entry/Exit
- Muster
- Events
- Activity History
- Messages
- Add/Edit Info
- Server Activity

4.1.2.XPressEntry Menu Bar
There are several important XPressEntry features accessible through the top menu bar, see the sections below:
- File
- Tools
- View
- Login/ Logout
- Help

4.2.Entry/Exit
The Entry/Exit tab view displays the occupancy and entry/exit activity. The Entry/Exit panel is divided into three sections:
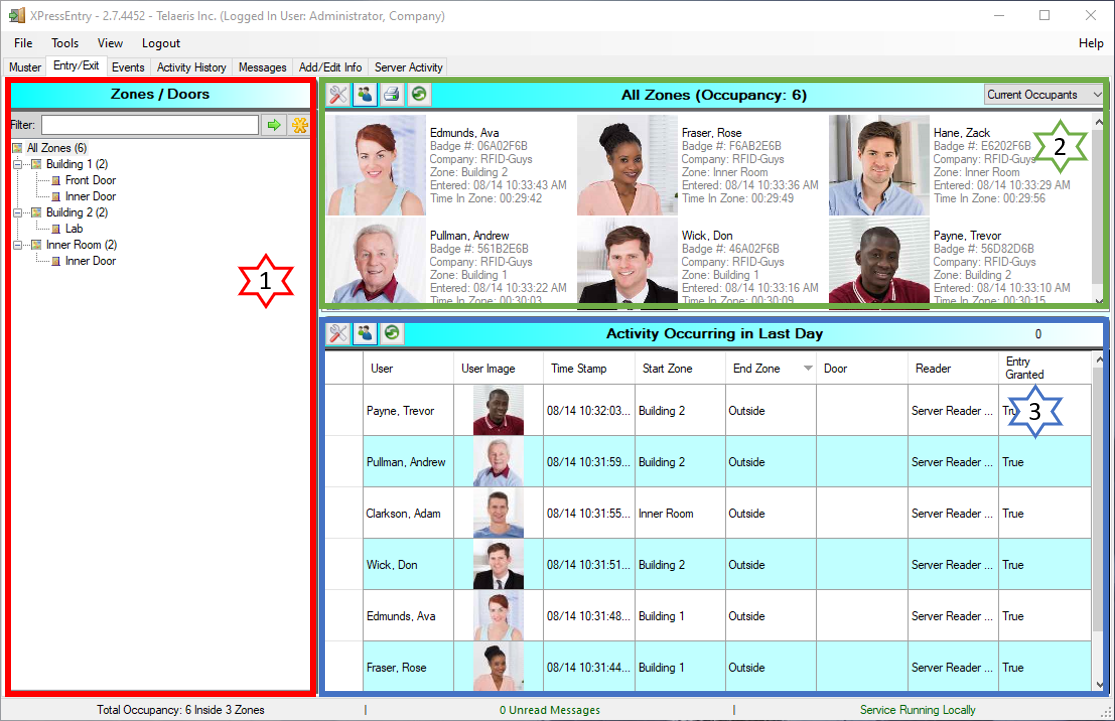
- Zone/Door Tree Viewer
- Occupancy/Activity Viewer
- Activity Viewer
- Max # of Records shown: Select the maximum number of records to show in the corresponding panel
- Show activity records no older than: Select the date range (5 min – 7 days) to display.
- Display Images: Choose whether to display images or not.
The top-left Zone/Door tree gives the user a quick summary of all the Zones, Doors, and Readers in the system. The numbers in parentheses to the right of the zones display the current occupancy total for that zone.
Selecting a zone/door will display the latest activity for that zone/door in the Occupancy/Activity viewer (top-right). Every employee not shown in this view is assumed to be in the “Outside” zone, aka, not in the facility.
This frame displays the occupants/activity of the zone that is selected under the Zone/Door tree view. At the top of the Occupancy/Activity frame is a blue bar with the name of the selected zone and the occupancy in parentheses. At the top right of this frame is a drop-down combo box, where you can switch between viewing the occupancy or the activity for the selected zone.
The bottom-right Activity panel shows the list of activities that have occurred within all zones. To change the date ranges simply select the![]() settings button located in the menu bar.
settings button located in the menu bar.
The Occupancy/Activity and Activity frames both have a ![]() setting button, which enables the user to:
setting button, which enables the user to:
The top-right Occupancy/Activity viewer and the bottom-right Activity viewer frames can be configured independently from each other.
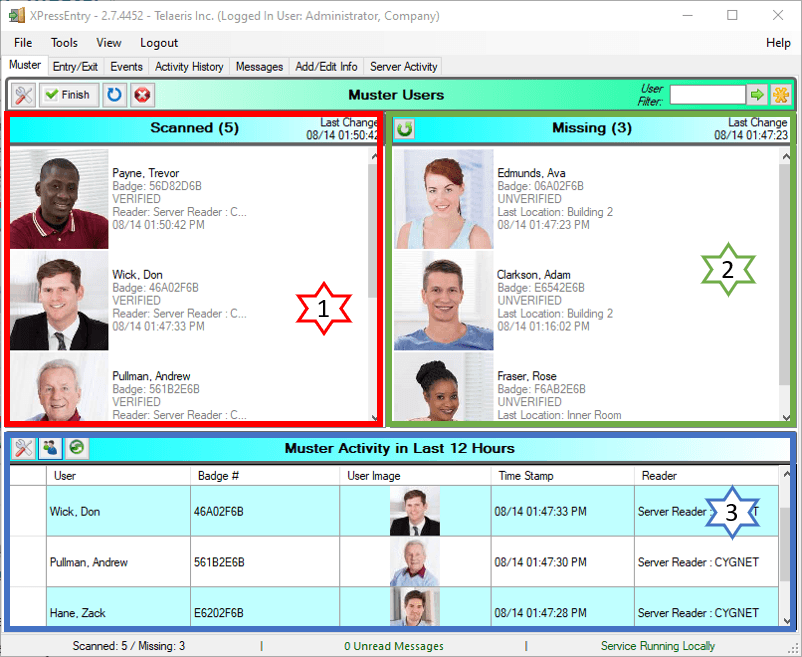
4.3.Muster
The Muster* tab view displays all mustering activity and is divided into three sections:
- The Scanned viewer (top-left)
- The Missing viwer (top-right)
- The Muster Activity (bottom)
*The Muster tab will be visible only when the mustering check box (Tools→Settings→General→Main XPressEntry Function) has been selected.
The ![]() button shows the following options:
button shows the following options:
- Max # of Records Shown: Amount of records to be shown.
- Show Images: Displays employee images, if available.
- Filter Muster by Zone: Will create a muster event for the selected zone(s).
- Muster on “Enter” In User Filter: Automatically muster a filtered user when selecting “Enter”.
- Manual Muster Point: Select the muster point if manually mustering personnel from server.
- Scanned Viewer: The top-left Scanned viewer displays a summary of all personnel who have been scanned and are accounted for in the system.
- Missing Viewer: The top-right Missing viewer displays a summary of all personnel who have not been accounted for in the system.
- Muster Activity: The bottom section, Muster Activity viewer, displays a list of muster activities that have occurred within the selected time frame. To change the date ranges simply select the
 button located in the menu bar.
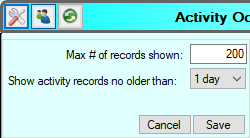
The Muster Activity viewer ![]() settings button enables the user to:
settings button enables the user to:
- Max # of Records shown: Select the maximum number of records to show in the corresponding panel.
- Show activity records no older then: Select the date range (5 min – 7 days) to display.
4.4.HealthCheck
The HealthCheck* tab view displays all recorded HealthCheck records from the handheld device.
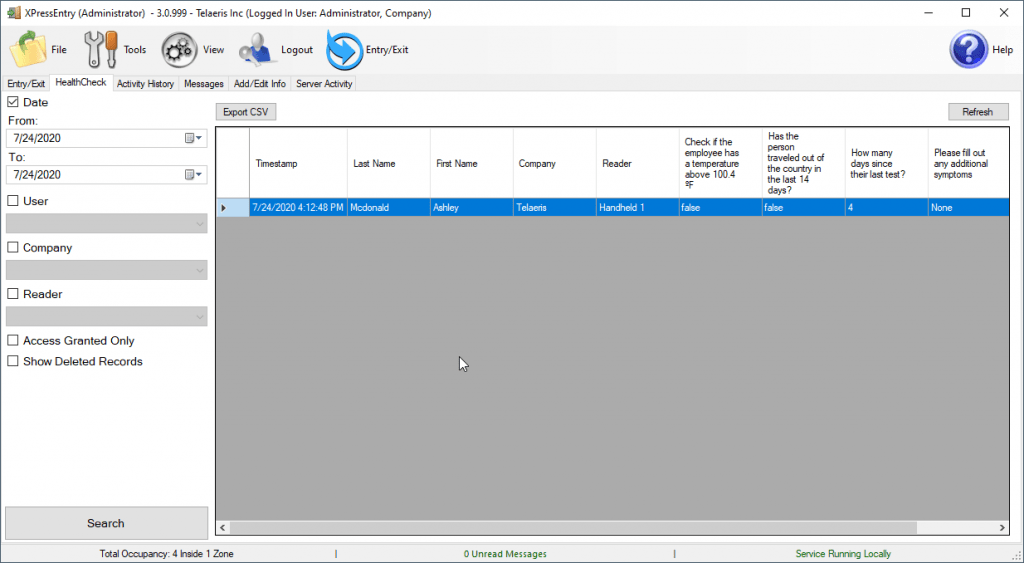
*The HealthCheck tab will be visible only when the HealthCheck check box (Tools→Settings→General→Main XPressEntry Function) has been selected.
You are able to filter records based on date, specific user, company, or reader used. You may additionally sort by Access Granted Only, and show deleted records for any user, company, or reader that is deleted from the system.
To export the shown list, click Export CSV button to save the file.
4.5.Activity History
The Activity History tab allows the user to review and filter through entry/exit activity.
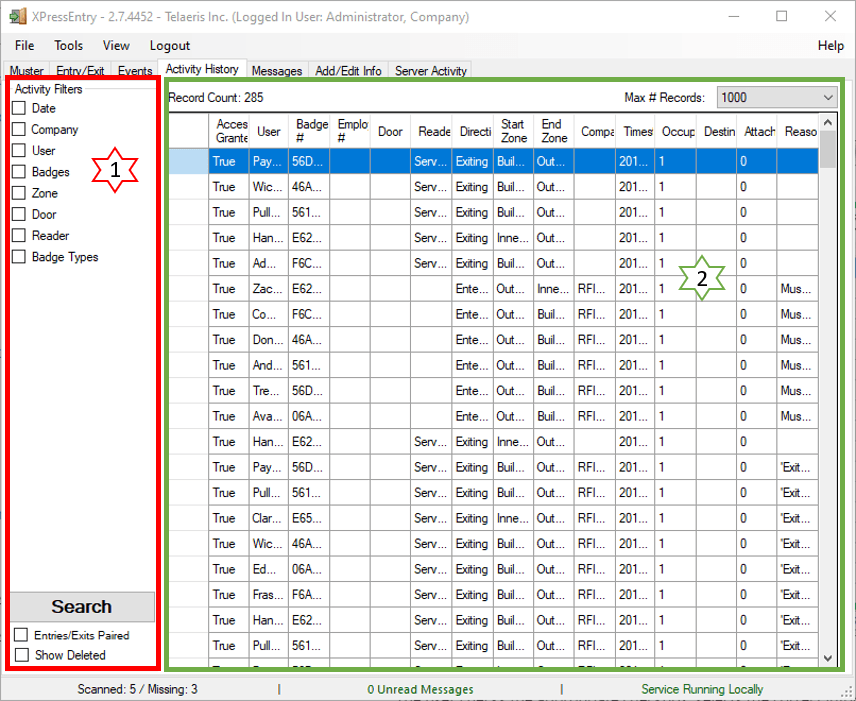
- Activity Filters
The user checks the appropriate checkbox, selects the correct information and clicks the button. The Activity History grid will then display only the activity that meets the filter criteria. If the user desires to have the Activity History tab displays all activity, they must uncheck all checkboxes and click button.
 - Filter Results
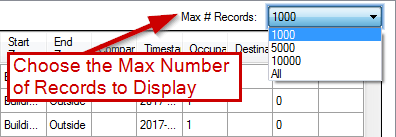
Results of the filtering are shown. The top right combo box labeled Max # Records allows the user to select and change the number of activities displayed.
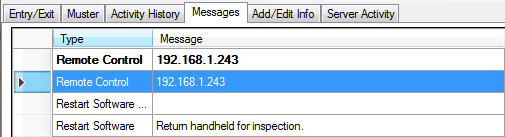
4.6.Messages
The Messages tab displays all message communications to and from the handheld Readers. Messages highlighted in blue indicate that the message was sent from the Server to the Reader and those in white are messages from the Readers to the Server.
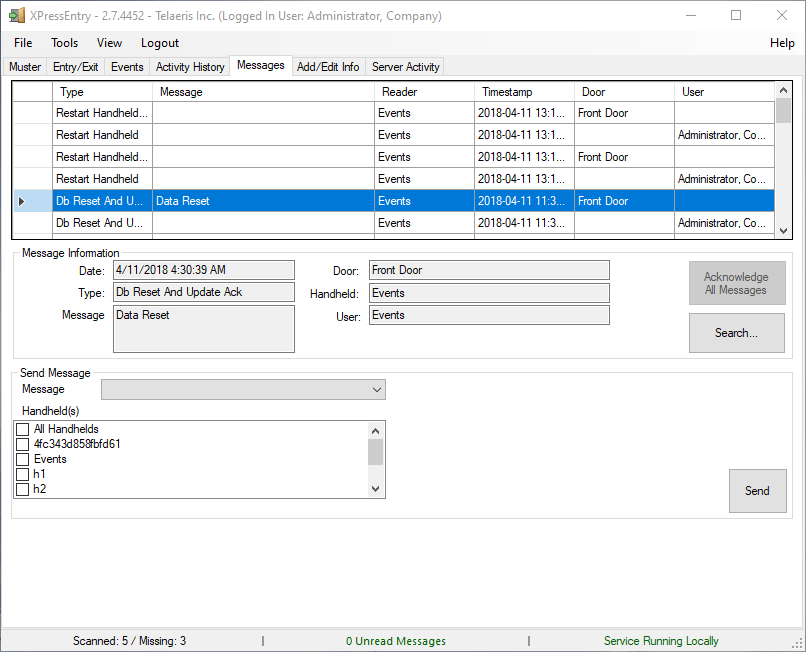
Read a Message
To read a message the user selects a message from the list and the full text will appear in the pane below the list of messages. Unread messages will appear in bold text in the list. Bold text messages will change to a normal font after they are clicked. Right-clicking on a message will bring up a menu, where you can mark the message as unacknowledged for future reference or delete it.
Send a Message
To send a message, the user enters text in the form fields at the bottom of the Messages screen in the Send Message section and selects the ![]() button.
button.
4.7.Add/Edit Sub-Tabs
Once the user selects the Add/Edit Info tab, additional sub-tabs will appear. Users must be logged in as administrators to access these tabs (unless option is changed in Server Settings). The Add/Edit sub-tabs are:
- Users
- Zones
- Readers
- Time zones
- Companies
- Rooms
- RFID
- Certificates
- Groups
- Doors
- Roles
All of the sub-tabs have a similar layout and have three sections. The functionality for these sections is the same. The rest of the sections will provide more details for each particular screen.
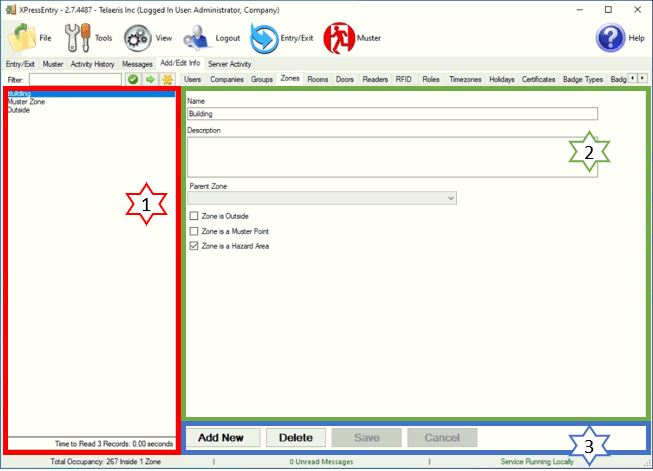
- Existing Information
- Selected Information
- Add New / Save
The left side of the screen lists items that are currently entered in the XPressEntry system. Select an item to view detail, or use the Filter tool.
Details about a particular item are shown here. For each category, select the appropriate textbox, dropdown list or checkbox to enter/edit details for that item.
To add a new item to the XPressEntry system, select the ADD NEW button, enter in the user information and select the SAVE button.
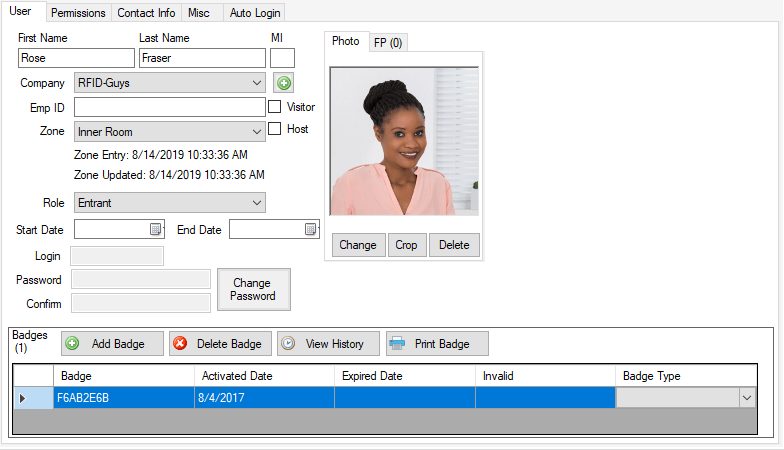
4.7.1.Users
The Users page provides information about each badge in the XPressEntry system. From the Users page, employee’s Company, Permissions, Contact Info and User Defined Field can be edited.
4.7.2.Companies
The Company Sub-tab will allow the user to create/modify company contact information.
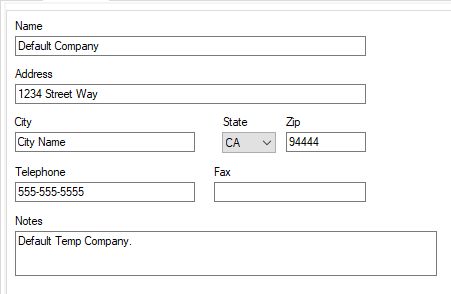
- Name: The Company’s name.
- Address: The Company’s address.
- Telephone: The Company’s telephone number.
- Fax: The Company’s fax number.
- Notes: Additional comments or notes.
4.7.3.Groups
A Group is a list of users who all have the same access privileges. The Groups Sub-tab will allow the user to create/modify groups, identify zone access and attach required/requested certificates.
To add Users to a Group, select the zones they are allowed to access. Then select a User from the drop-down menu or filter box and click Add.
- Name: The group name.
- Zones: The zones the group is allowed to access.
- Users: The users assigned to the group.
- Certificates: A list of certificates the group is required /requested to comply with.
- Remove: Remove a user from the group by selecting the user and clicking
 button.
 - Add: Add a user to the group by selecting a user from the dropdown list and clicking the
 button.
 - Filter: Filter the user list, the names will appear in the Add dropdown list.
4.7.4.Zones
A Zone is a specific area in a secure facility. Zones are necessary for setting up Groups. The Zones Sub-tab will allow the user to create/modify zones within the facility.
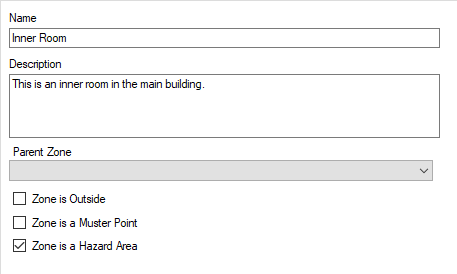
- Name: Name the zone.
- Description: The description of the current zone.
- Zone is Outside: The zone is located outside.
- Zone is a Muster Point: The zone is a Mustering point.
- Zone is a Hazard Area: The zone is in a Hazard area.
- Parent Zone: Main zone which consists of other zones.
4.7.5.Rooms
- Name: Name of the room.
- Zone: The Zone that the room is being assigned under.
- Notes: Notes regarding the Room.
4.7.6.Doors
The Doors Sub-tab will allow the user to name, define start/end zones and set the Door RFID tag # (if applicable) for each specific door.
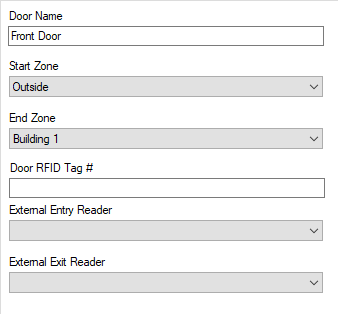
- Door Name: The door’s name.
- Start Zones: The start zone for that door.
- End Zone: The end zone for that door.
- Door RFID Tag #: If applicable, the RFID tag data for the current doorway.
- External Entry Reader: Reader that is used for Entry.
- External Exit Reader: Reader that is used for Exit.
4.7.7.Readers
The Readers Sub-tab will allow the user to create/modify handheld reader information.
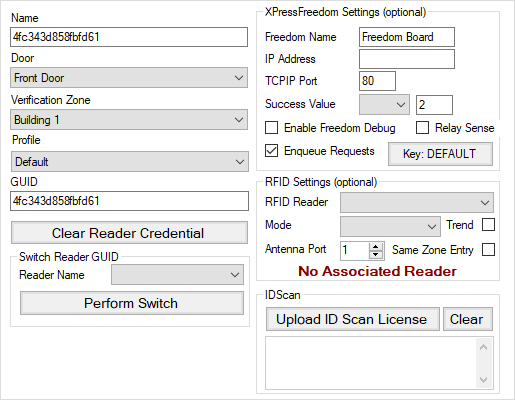
- Name: The handheld reader’s name.
- Door: The door the reader is controlling enter/exit access.
- Verification Zone: During a muster event, will muster from the selected zone.
- Verification Group: During a muster event, will muster from the selected group.
- Profile: Select the Reader’s profile, created in the settings, Reader Profile.
- GUID: The Reader’s unique identifier.
- Clear Credentials from All Readers: When credentials are used for readers, this will force the reader to get a new credential.
- XPressFreedom Settings:
- Freedom Name: Name of XPressFreedom Board
- IP Address: IP Address of XPressFreedom Board
- TCPIP Port:
- Success Value:
- Enable Freedom Debug: Used during setup of XPressFreedom board when the Wiegand format might not be known exactly
- Relay Sense: Checking off this box will enable Relay Sense
- Enqueue Requests: Checking off this box enables Enqueue Requests
- RFID Settings:
- RFID Reader: The RFID reader associated with the reader
- Mode: Entry/Exit/Muster/Verification
- Antenna Port: The port on the RFID reader that the reader represents
- Trend: Specifies if the RFID reader evaluated locations base on a trend
- Same Zone Entry: Whether or not the reader will create multiple activities for the same user moving into the same zone twice in a row
4.7.8.RFID
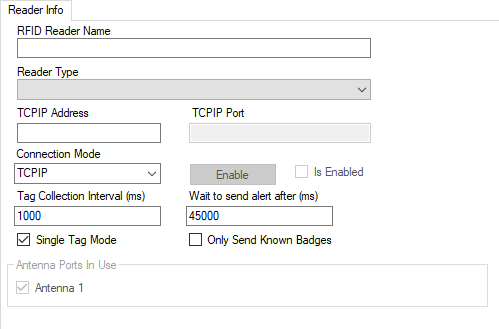
- RFID Reader Name: Name used to represent RFID reader
- Reader Type: Type of RFID Hardware
- TCPIP Address or COM Port: Hardware IP address or COM port, depending on Connection Mode
- TCPIP Port: TCPIP Connection mode only
- Connection Mode: Mode to connect to reader by
- Tag Collection Interval: Number of milliseconds between collecting tags
- Only Send Known Badges: Whether or not the system does a user lookup on the tag scan before pushing scan to the front end
- Collect All Tag Scans: Whether the system collects repeat scans or just the latest scan (Typically used with reader “Trend” processing)
- Convert Tag Scans to Decimal: Used when converting Hex Scan Data to Decimal
- Antenna Ports in Use: The Antenna ports used by the reader
- Disabled/Enabled Button: Connects software to the RFID reader. When set up is finished, enable the reader to begin scanning RFID tags
4.7.9.Roles
The Roles Sub-tab will allow the user to create/modify roles.
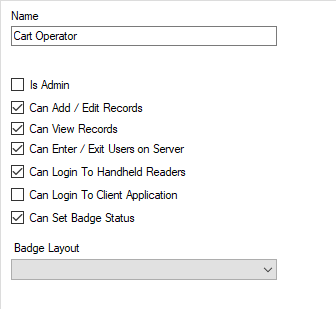
- Name: Role title
- Is Admin: Select if the role has administrator privileges
- Can Add/Edit Records: Select if the role has add/edit record privileges
- Can Enter/Exit Users on Server: Select if the role has server enter/exit privileges
- Can Login to Handheld Readers: Select if the role has handheld login privileges
- Can Login to Client Application: Select if the role has client application login privileges
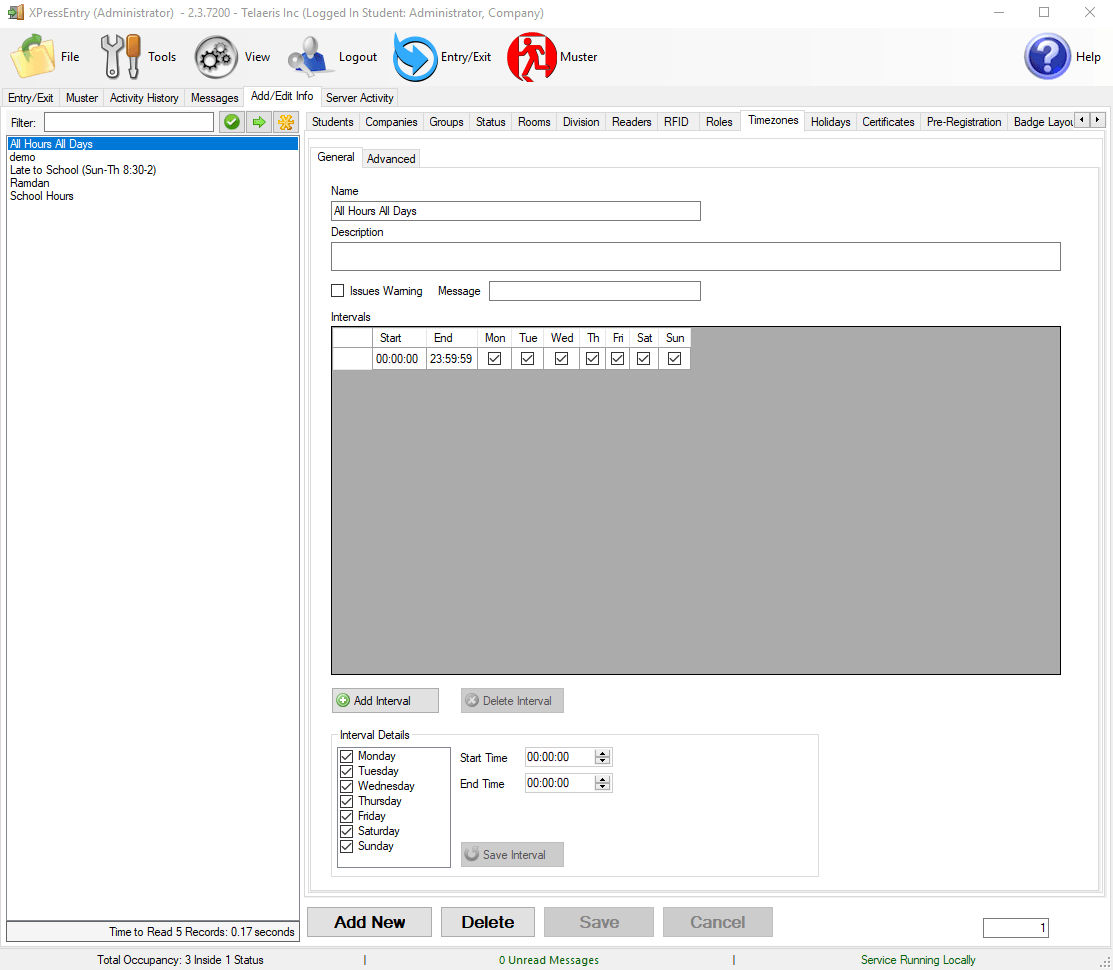
4.7.10.Timezones
Time zones can be used to assign time intervals for a group to have access to a certain zone or reader. Time zones allow access restricted to specific days, time period or date range.
- Name: Name of the Time zone
- Description: Description of the time zone
- Issues Warning: Determines whether a warning has to be issued or not. A warning message would be displayed in yellow color on the handheld while in entry mode
- Message: Warning message to be shown in handheld reader
- Intervals: The start time, end time and days for which the timezone could be applied. Multiple intervals can be added to one timezone
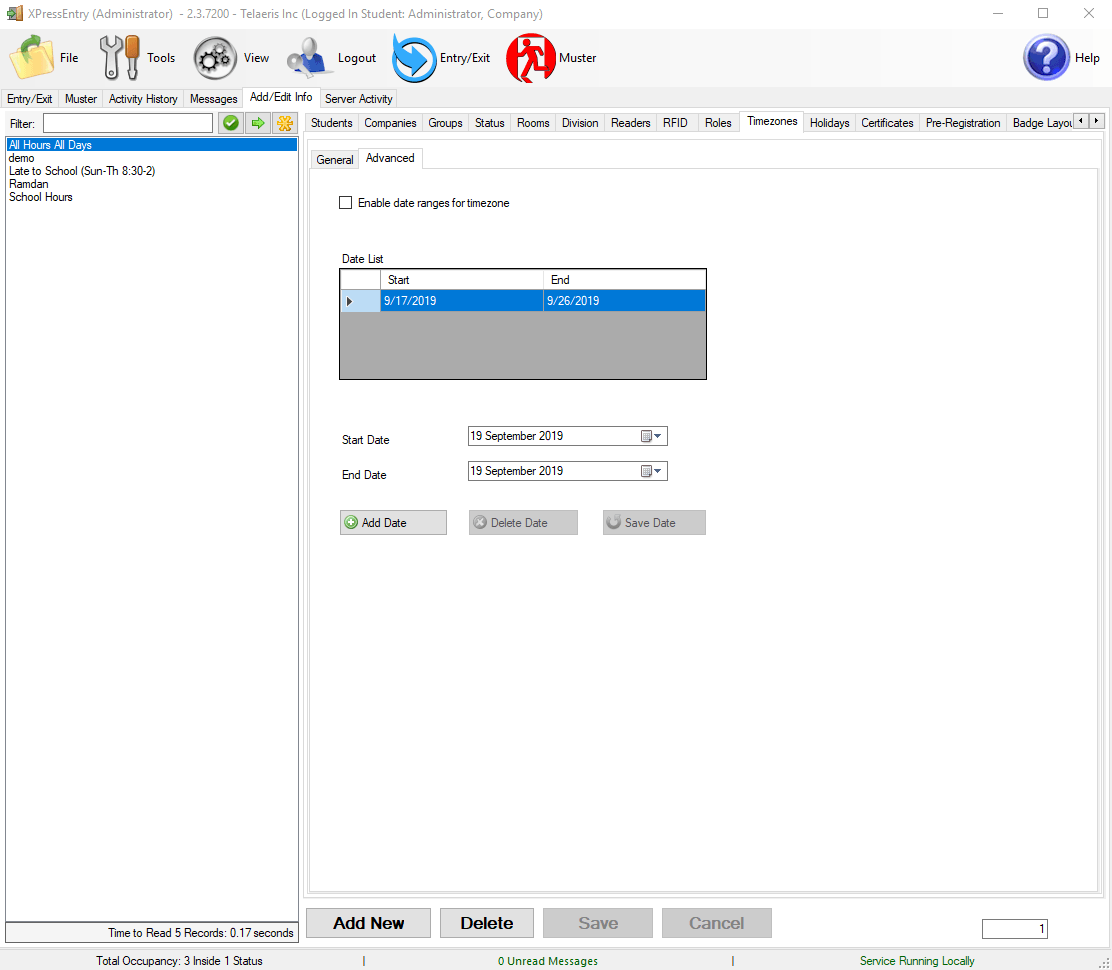
4.7.10.1.Adding Dates to Time Zones
Check enable date ranges for time zone, multiple dates can be added to a time zone. If a date range is added to a time zone, the time zone would be applicable for only that date range.
4.7.10.2.Adding Time Zones to Readers/Groups
Timezone should be applied separately when assigning readers to groups to get that working.
Multiple timezones could be added with the same reader for a group.

4.7.10.3.Adding Time Zone for a User
We could also apply a timezone specifically for a user from user->permissions.

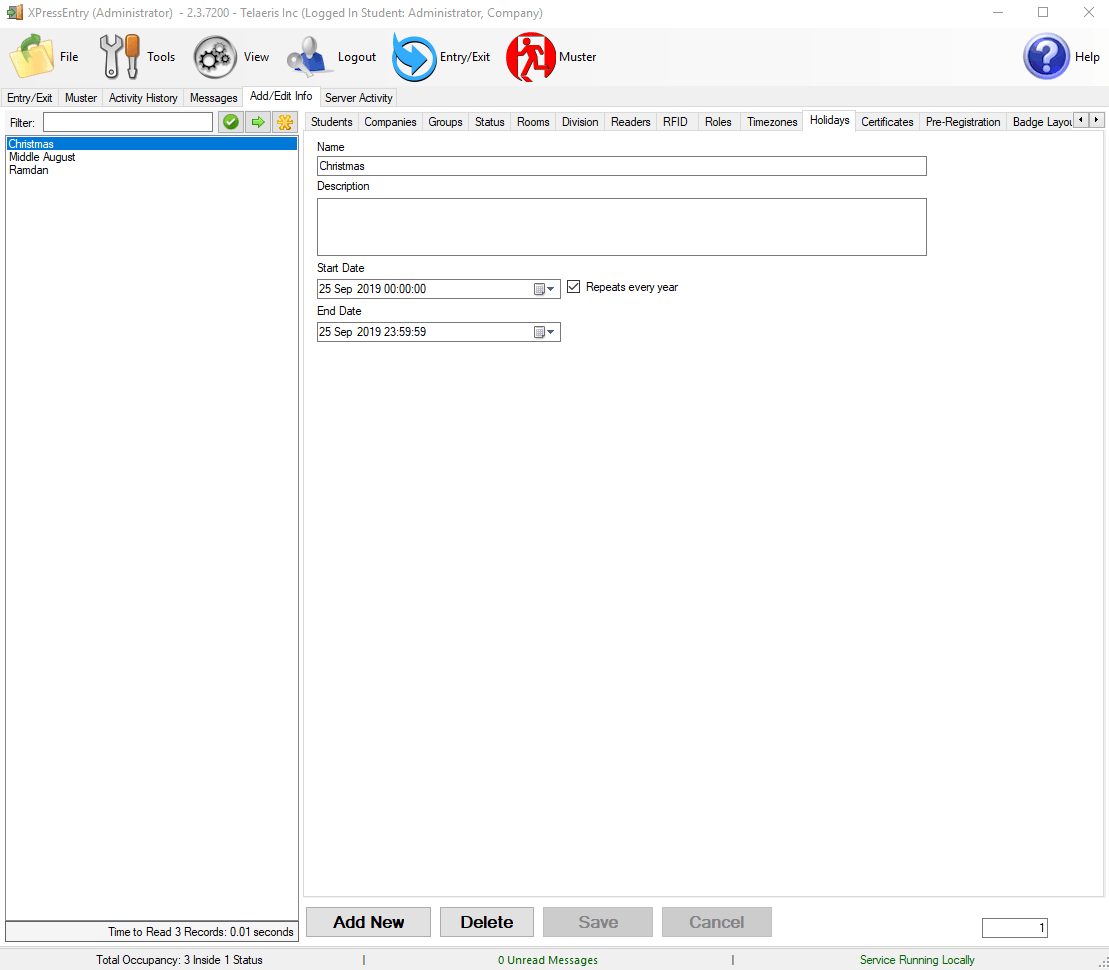
4.7.11.Setting up Holidays
When a day is set as a holiday, no access is given for users on that day. If checkbox “Repeat Yearly” is checked, that day would be validated as a holiday every year.
Time fields are also taken into account while checking for holidays, so that there would be an option to make part of the day as a holiday (like half-day holidays).
4.7.11.1.Adding Holidays to Groups
Holidays are applied to groups. A timezone can also be applied for a holiday while adding the holiday to a group, so user can enter/exit the premises in the time specified even if it is a holiday.
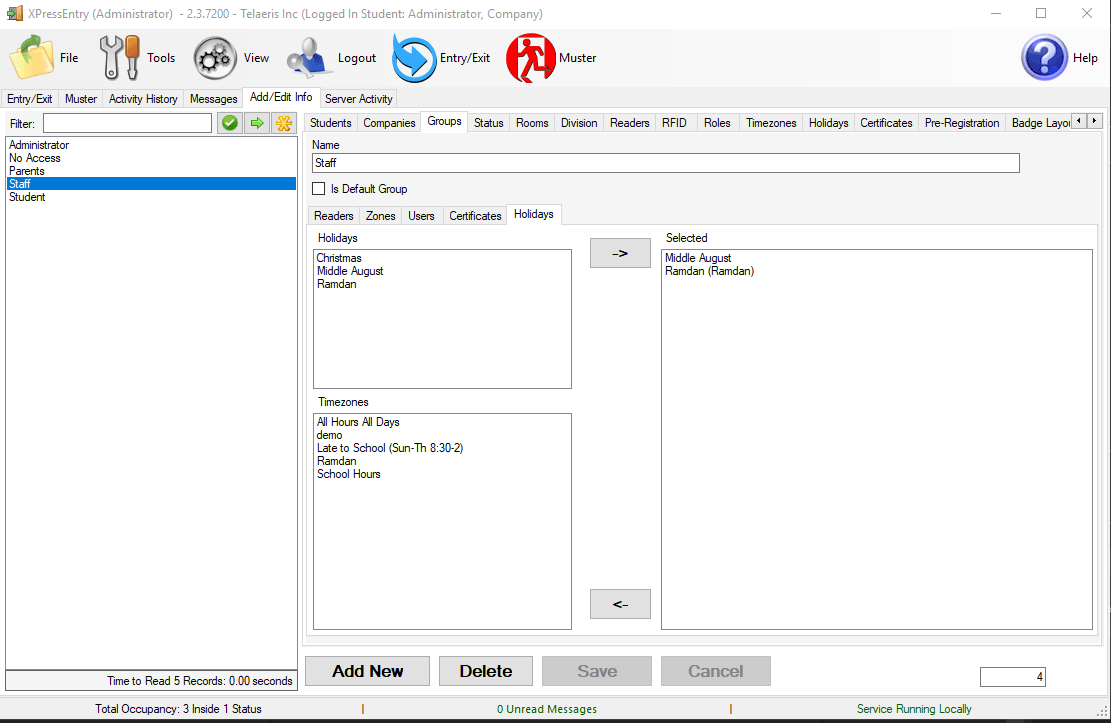
Make sure holidays and time zones are checked in Tools -> Settings -> Reader Profiles to get it working.

4.7.12.Certificates
The Certificates Sub-tab enables the user to create/modify certificates. Certificates is used for assigning certificates to Groups for employee trainings. This optional tool can be used to ensure that certain groups have completed or hold the required certificates.
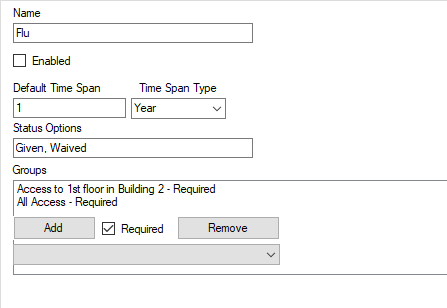
- Time Span: The Default Time Span & Time Span Type together generates the time span of a certificate.
- Default Time Span: The numerical value.
- Time Span Type: The time unit.
- Status Options: A comma separated list of options for a certificate – e.g. Waived, Taken, Deferred might be a status option for a Flu Vaccination entered in Certificates.
- Groups: A list of groups to comply with the certification.
- Add: Click to add a group selected from the drop-down box located below the button.
- Required: Check this box if the certificate is required for the specified group.
- Remove: Highlight a group then select this button to remove it from the group list.
The Certificates Data 1&2* Sub-tab(s) enables the user to add additional features to certificates. This optional tool ties additional data to certificates which can be selected as a dropdown list from the handhelds– e.g. can tie a manufacture or batch # to a flu vaccination (certificate).
*The Certificates Data1&2* Sub-tab(s) will be visible only when Certificates Field 1&2 checkboxes are marked (Tools→Settings→General→ Certificated Field 1&2 has been selected) and the name of the Certificates Fields subtab can be modified by the user.
4.8.Server Activity
The Server Activity tab displays the status of the server and all communications between the connected handheld Readers.
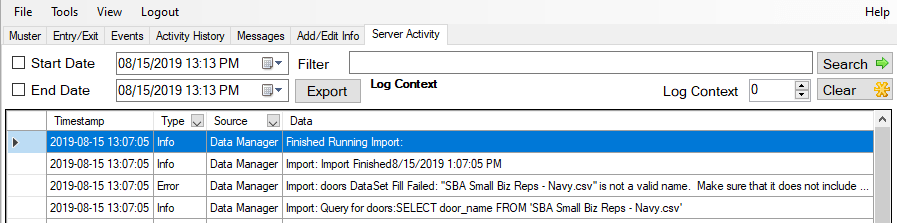
Located at the bottom of this tab are two buttons:
- Type: Clicking on the dropbown arrow will give you options to filter data by All, info, or error.
- Start & End Date: Defines start and end date of Server Activity.
- Export: Export activity.
- Filter: Filters the search.
- Clear: Clears the server activity list.
5.Database Management
To change the database, go to Tools>Settings>General>Database>Change Database.
This will open the XPressEntry Database Tool.
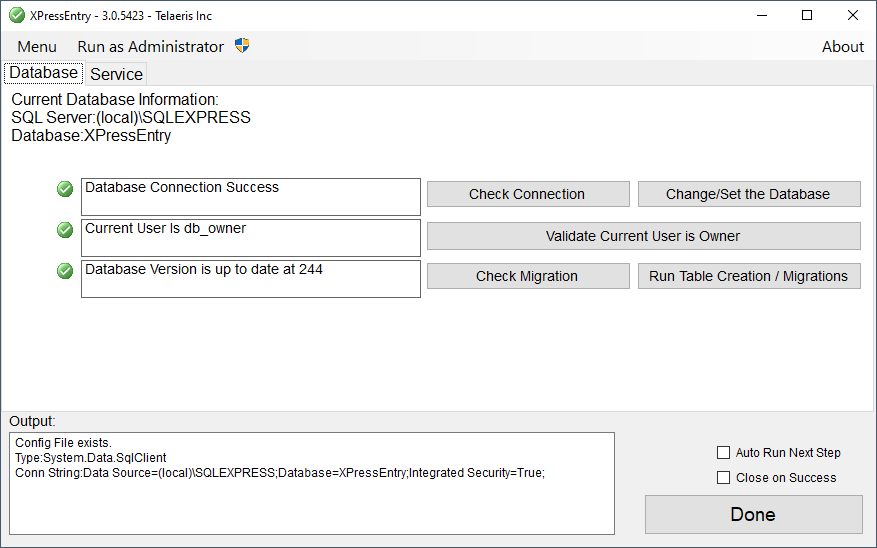
Select your updated database by pressing “Change/Set the Database”.
For more information on how to use this tool, see here: /documentation/xpressentry/installation-and-upgrade/
6.1.Settings
The Settings option is located under the Tools menu. Simply select the Tools menu, scroll down to the Settings option or press Ctrl+S. If the user is not already logged in as an Administrator, XPressEntry will prompt the user for their Administrator User Name and Password. A Settings window will appear with tab settings for both the Server and the Reader Profile.
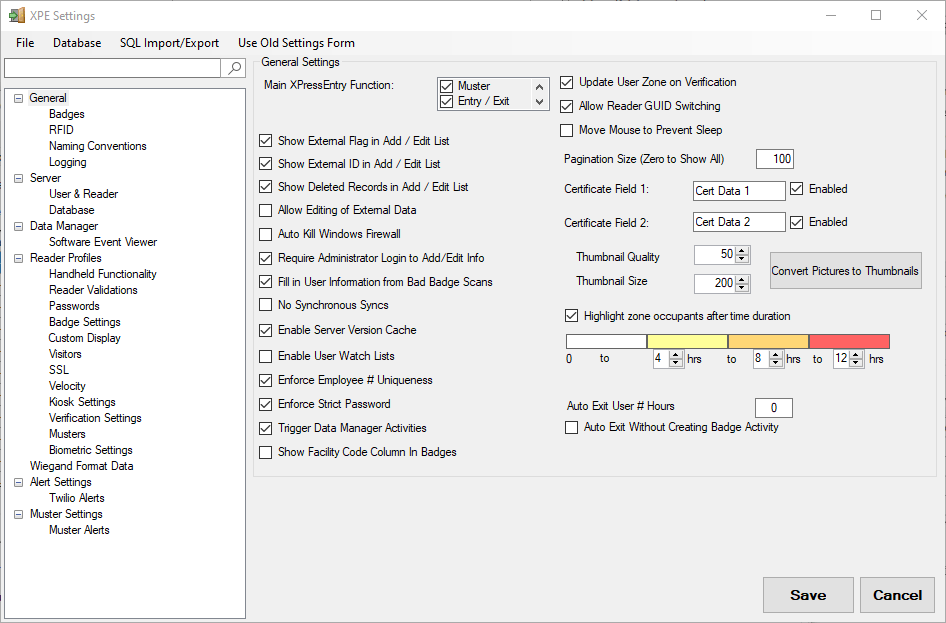
6.1.1.General Tab
Main XPressEntry Functions- Modes that will display on the Server App’s Main form. Each of these sections can be dragged to a different position which changes the older they are displayed in.
- Entry/Exit
- Muster
- Events
- HealthCheck
Require Administrator Login to Add/Edit Info- Enables admin access to only Add/Edit
Fill in User Information from Bad Badge Scans- Instructs the XPressEntry Service to look up the user/badge information if the handheld did not provide it.
Enable Server Version Cache- Caches download version of each handheld for more efficient handheld syncing
Enforce Employee # Uniqueness: Will give you an alert when an already existing Employee # tries to be used again.
Enforce Strict Password: If Checked, XPressEntry will enforce the use of a password that contains 1 Capital, 1 Number, and 1 Special Character
Pagination Size (Zero to Show All): Split scroll view to pages.
Certificate Field 1 & 2: Sets the way these sub-tabs are referred to throughout the Server. Enabling the fields will create two additional sub-tabs in the Add/ Exit Info tab.
Highlight zone occupants after time duration: Highlights users who have been in a zone for a specific amount of time
Auto Exit User # Hours: Auto Exits all users who have been on site for more than X hours
Auto Exit Without Creating Badge Activity: No Activity is created, but users are moved outside
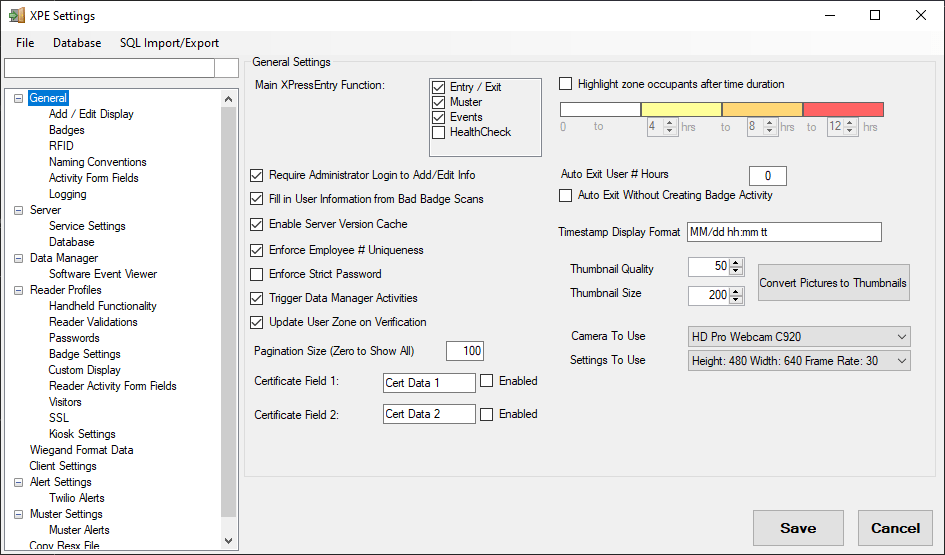
Timestamp Display Format: Format Timestamp will display in on the Entry/Exit and Muster Tabs.
Thumbnail Quality: Quality of the encoding
Thumbnail Size: Size of Thumbnail
Camera To Use: Camera for the Server application to use. This searches all cameras connected to the server computer
Settings To Use: Setting options of the selected Camera
6.1.1.1.Add / Edit Display
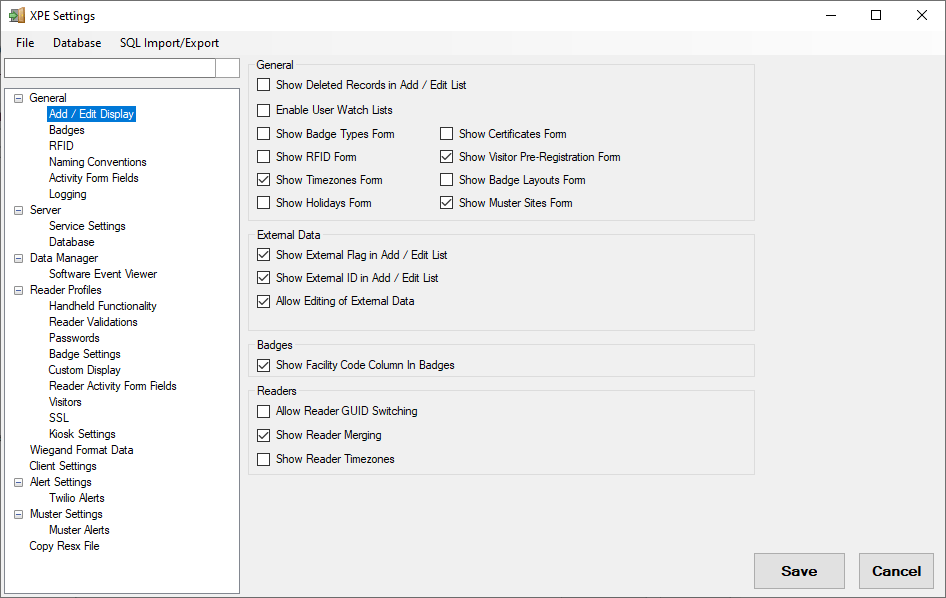
General
Show Deleted Records in Add / Edit List- Makes all deleted records visible. Also gives the ability to restore deleted records
Enable User Watch Lists- Enables watch list functionality under Users, as well as displays Watch List Tab
Show Badge Types Form- Enables Badge Types tab
Show RFID Form- Enables RFID tab under add/edit
Show Timezones Form- Enables Timezones tab under add/edit
Show Holidays Form- Enables Holidays tab under add/edit
Show Certificates Form- Enables Certificates tab under add/edit
Show Visitor Pre-Registration Form- Enables Visitor Pre-Registration tab under add/edit
Show Badge Layouts Form- Enables Badge Layouts tab under add/edit
Show Muster Sites Form- Enables Muster Sites tab under add/edit
External Data
Show External Flag in Add / Edit List- Displays Red Label on all external records
Show External ID in Add / Edit List- Disables External ID on all external records
Allow Editing of External Data- Allows user to edit External Records. This does not update the records in the back end access control system
Badges
Show Facility Code Column In Badges- Displays the facility code of each badge in the badges grid
Readers
Allow Reader GUID Switching- Enables button in the readers tab to switch handheld GUID with another reader record (CAUTION. Only do this with instruction from Telaeris)
Show Reader Merging- Enables button in the readers tab to Merge a handheld record with an XPressEntry reader record
Show Reader Timezones- Enables dropdown box in the readers tab to specify a timezone
6.1.1.2.Badges

Badge Type
Default Badge Type- All new badges created will use this badge type
Auto Generate New Badge
- Off- Badges are not auto generated
- Auto Increment- Badges increment by 1 with each new badge created
- Auto Generate Decimal- A random new badge number is generated between the minimum and the maximum
- Auto Generate Hex- A random new HEX badge number is generated between the minimum and the maximum (Future)
Print Visitor Badges On Checking- Automatically queues print job on visitor entry. Printer must be set to door.
Auto Print Enrolled Badges- Automatically prints badge once enrolled.
Bitmap Print Resolution- DPI print resolution
Add/Edit Badge Printers- Opens form to configure default printers
Misc
Enable Interpret Raw Badges Thread- Deprecated
Seconds between Interpret- Deprecated
Show BDF1 in Add/Edit- Display Badge Field Data 1 column in the Badges grid
Show BDF2 in Add/Edit- Display Badge Field Data 2 column in the Badges grid
Show BDF3 in Add/Edit- Display Badge Field Data 3 column in the Badges grid
Clear All User Locations- Clears the location of all users in the system. Use with caution.
6.1.1.3.RFID
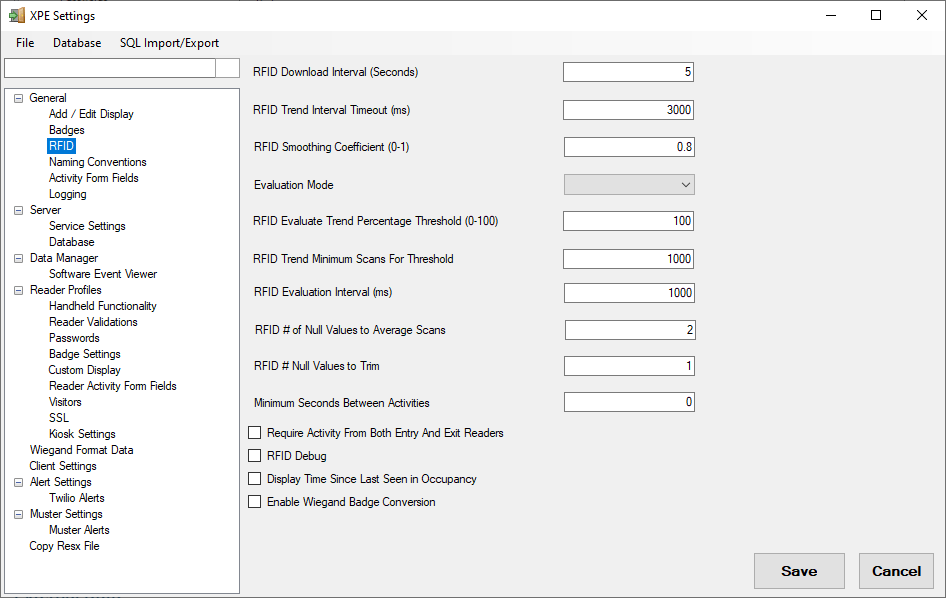
RFID Download Interval (Seconds)- How often the RFID Manager pulls data from the RFID reader
RFID Trend Interval Timeout (ms)- Wait time until no tags are seen
RFID Smoothing Coefficient (0-1)- Helps smooth out the graph so that one large value won’t throw off data
Evaluation Mode- Different methods to evaluate the direction the user is going
- Smooth
- Center of Mass
- High Sequence- Highest sequence number is where the user exits
RFID Evaluate Trend Percentage Threshold (0-100)- Located near the reader, the minimum percentage of scan requirement for a scan to be considered as a scan for a specific reader
RFID Trend Minimum Scan for Threshold- Number of scans required to be evaluated for trend percentage threshold
RFID Evaluation Interval (ms)- Value of increment as assessment with RFID Scans
RFID # of Null Values to Average Scans- Used for Active tags
RFID # Null Values to Trim- Last number of values to trim
Minimum Seconds between Activities- Prevents duplicate activities within a certain amount of time.
Require Activity from Both Entry and Exit Readers- Need to be scanned from both sides to create an activity
RFID Debug- Logs all RFID scan input that is plugged into the RFID processing algorithm
Display Time Since Last Seen in Occupancy- Displays last time seen by an RFID reader rather than time entered
Enable Wiegand Badge Conversion- Process RFID Scan through Wiegand processor to identify the user who was scanned
6.1.1.4.Naming Conventions
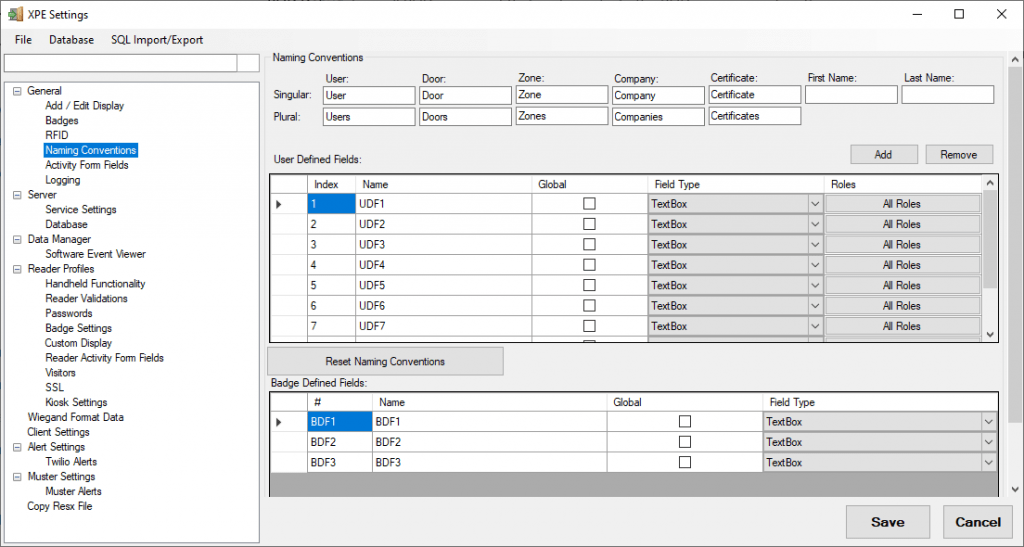
Naming Conventions
Sets how names are referred to throughout the server. The following are available
- User
- Door
- Zone
- Company
- Certificate
- First Name
- Last Name
User Defined Fields
XPressEntry allows you to define any number of data fields that are attached to users. To add a new User Defined field, select Add.
- Index- The display order that the UDF. This can be changed by dragging rows.
- Name- The name of the field can be changed by double clicking the Name cell. This is the name that will display.
- Global- If Global is selected, this UDF value will display with each user on the Entry/Exit and Muster Tabs.
- Field Type- The type of UDF Field. Current Options are Textbox, checkbox, and datetime.
- Roles- User Roles that utilize this UDF field. Clicking the button in the roles column will pop up a window to select 1 or multiple roles that utilize this UDF
Roles Selection
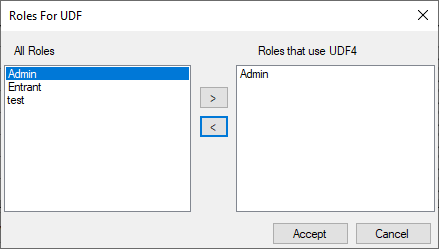
To select 1 or more roles to use for a UDF, select and move the required roles to the list on the right. If no roles are selected, the UDF will be utilized by all roles.
Badge Defined Fields
As opposed to User Defined Fields, Badge defined fields are static. XPressEntry provides 3 badge defined fields that are available for use. Badge defined fields can be viewed in the badges grid of each user under Add/Edit info. To view Badge Defined Fields, navigate to the Add / Edit Display settings section and enable the required Badge Field Data Columns (Section 6.1.1.1. of the documentation). Each badge field can be renamed.
6.1.1.5.Activity Form Fields
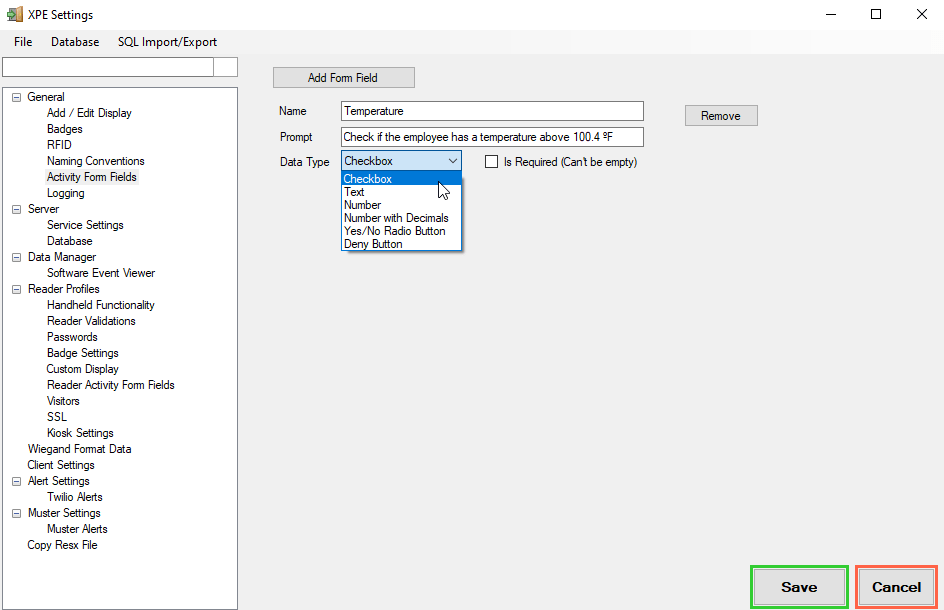
Activity Form Fields is utilized to add a questionnaire form after a badge scan. This can be enabled for use with Entry/Exit mode, or with standalone HealthCheck mode.
- Click Add Form Field, and fill out the Name of the question. The name must be unique.
- Fill out the prompt that will be displayed on the device.
- Select the data type. You can choose what type of question would be asked. Checkbox, text form input, number or number with decimals only, or a yes/no radio button. You can also add a manual deny button. To add additional questions, click Add Form Field. When done, click Save.

6.1.1.6.Logging
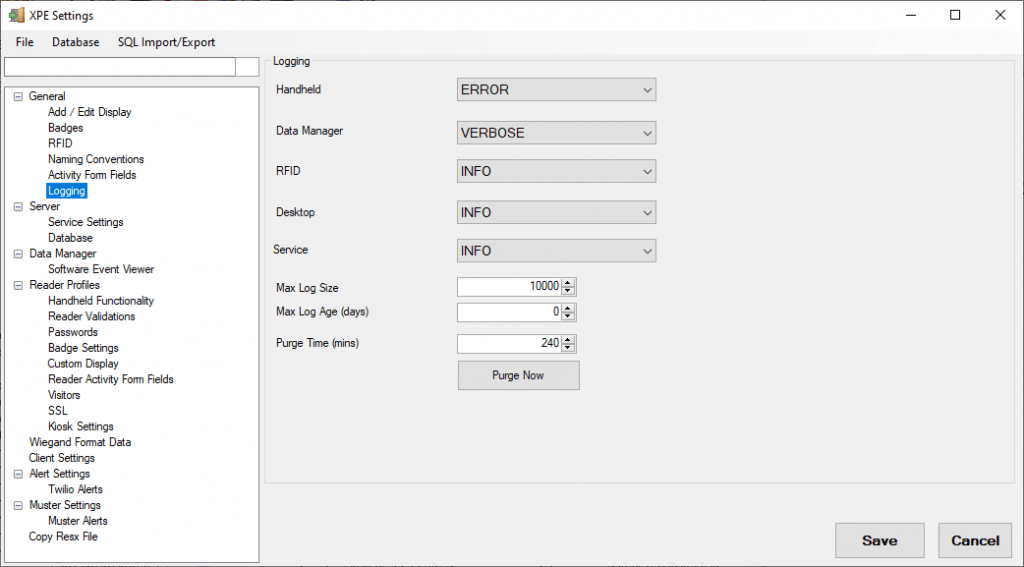
Logging
- Handheld- Log Level for handheld server events
- Data Manager- Log Level for Data Manager Integration events
- RFID- Log Level for RFID server events
- Desktop- Log Level for Desktop events
- Service- Log Level for Service events
Max Log Size- XPressEntry will delete all logs older than the last X number of logs
Max Log Age (days)- XPressEntry will delete all logs older than X (days)
Purge Time (mins)- Time in minutes between XPressEntry deleting it’s logs
Purge Now- Enforces XPressEntry to purge old logs now
6.1.2.Server Tab

Server Settings
Service Type- Where the XPressEntry service and processes is running
- Local in Application- Deprecated
- Local Windows Service- Service Running on this machine
- Remote API Service- Service Running on a remote machine
Port- Http Port handhelds communicate over (Default 30000)
When using the Windows or Remote API Service, you will also need to fill out the following fields.
- Service Host Name
- Service Username
- Service Password
- Validate Identity
- Certificate Identity
User Sync Limit: How many users are synced at one time. Creates batches to query data.
User Fields NOT to Synchronize: Option to list fields that you don’t want to synchronize.
Send Users without Badge Handhelds: Checking this option will send all badge scans, whether the user holds a badge or not.
Global Reader Settings
- Use Credentials for all Readers: Forces all Readers to prompt for a badge number and password from the Reader operator before the Reader can be used.
- Reset Synchronized Data: Resets synchronized data.
Reader Default Data
- Default Handheld File Not Set
- Build Default Data Now: Used for large databases. When handheld connects, it will download the zipped file that had been created previously. This speeds up the syncing process
- Clear Default Data: Clears default data and handheld connects with database the normal way
Rest
Allows users to access our service outside of XPressEntry
- Enable
- HTTP Port:
- SSL Port
- Enable Authentication
- Enable Help/ Service Discovery

6.1.2.1.Securing Handheld Communication
When XPressEntry handhelds are operating over the LAN (WIFI or Ethernet on the local network), securing handheld data over ssl (tls) is often not required. However, it is important to secure this communication when the handheld is on a public network, such as a cellular network or a remote network. This section describes how to secure the communication from handheld to server using SSL.
The SSL port on the XPressEntry server machine should be bound to a valid, signed certificate. To do this, the certificate should first be added to the store on this server. Then, the certificate can be bound to the port from within the XPressEntry settings. The end user is responsible for procuring the certificate from a certificate authority or generating one internally.
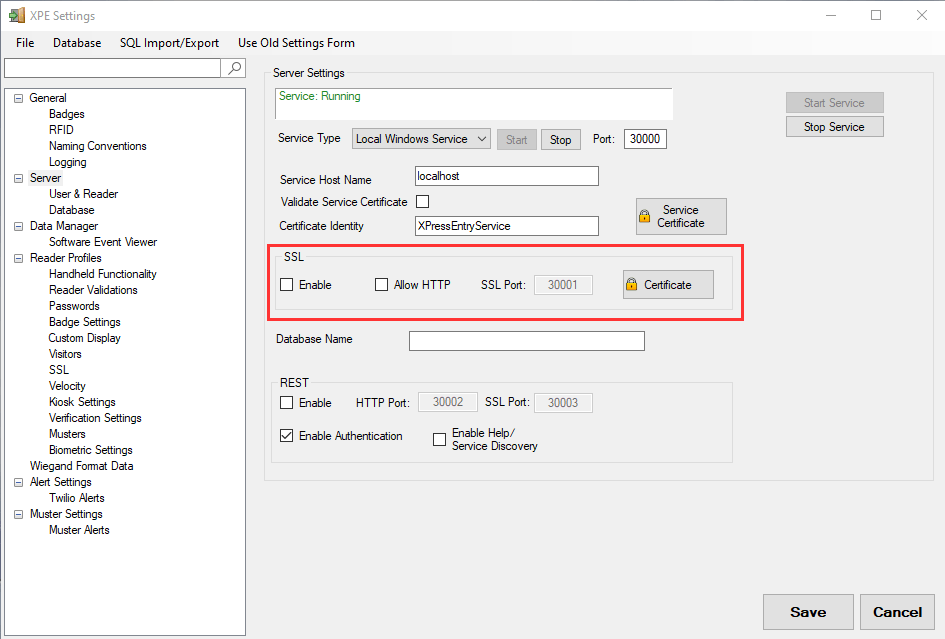
In the XPressEntry settings, navigate to the server tab. Select “Enable” in the SSL box. Then select “Certificate”. “Allow HTTP” should be disabled as soon as SSL is communicating properly.
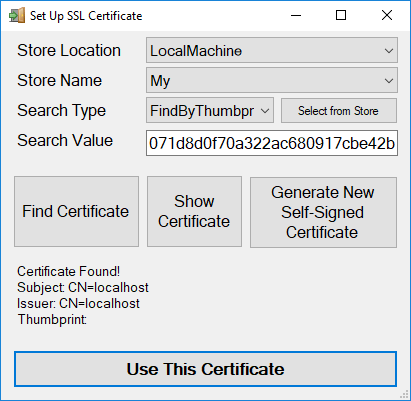
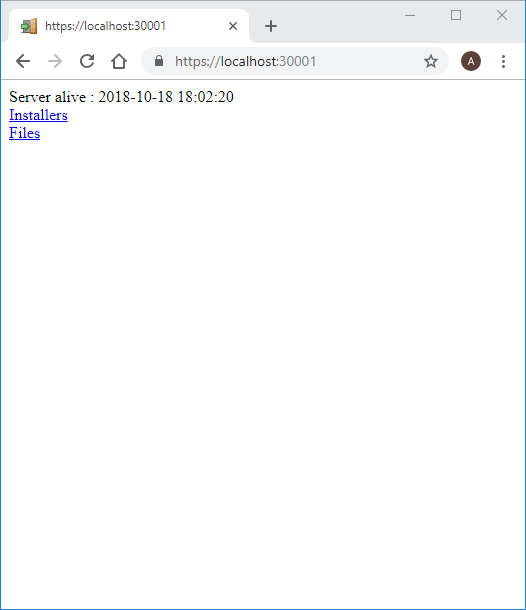
Select “Select From Store” and select the your signed certificate. Then select “Use This Certificate”. Note- The example shows the use of a Self Signed Certificate, which is generally not secure. A signed certificate from a certificate authority should be used. Once the certificate is bound to the port, RESTART THE SERVICE. After the service is restarted, browse to the computer address to test the connection.
Ex. https://*Server Name*:30001
On the handheld , select the “Use HTTPS” checkbox to switch from using HTTP to HTTPS to connect to the XPressEntry server.
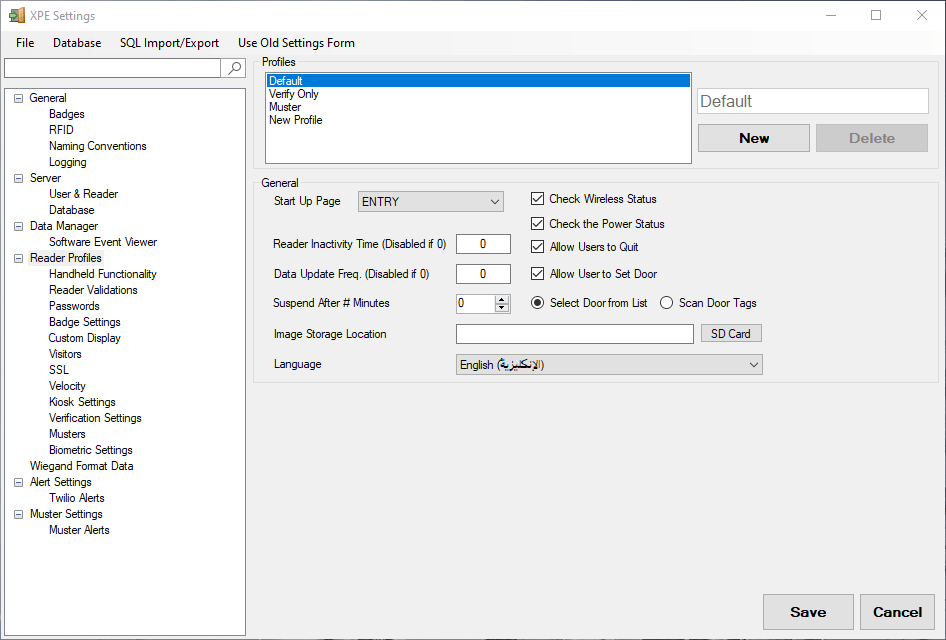
6.1.3.Reader Profiles Tab
The XPressEntry Reader Profile tab will allow the user to edit options for the handheld Readers.
Below are the following options and their effects:
Selected Profile
- Selected Profile: A list of all current profiles in the XPressEntry system. Simply select a profile from the list and the page will populate with that specific profile settings.
- New Profiles: The user is capable of adding new profiles by selecting the NEW button. A New Profile will appear under Selected Profile Name it appropriately, enter in information under the General, Display, Enter/Exit Settings and the Available Functionality fields for the Reader Profile, and click the SAVE button.
- Delete Profiles: If you want to delete a Reader Profile simply highlight the profile and click on the DELETE button.
General
The general settings section for the handheld readers XPressEntry application is below.
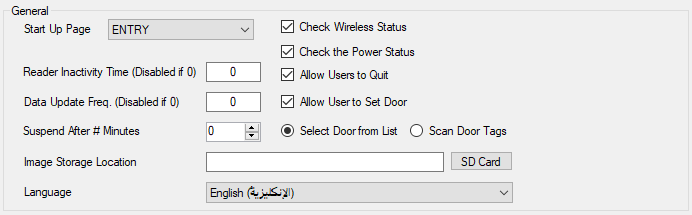
- Start Up Page: Specifies the mode that the handheld Reader will start in.
- Setup Password: Located under the Passwords Tab. Enter a setup password. The handheld operator will have to enter this password to enter the settings screen on the handheld.
- Reader Inactivity Time: Sets the time period in minutes after which the Reader will unbind from the assigned door. An operator must then rescan a door tag in order to assign the Reader to that door again. To disable enter ‘0’.
- Data Update Freq.: Sets the time period in minutes after which the handheld Reader will query the server to update data. To disable enter ‘0’.
- Check Wireless Status: Turns on wireless polling, which shows the connection strength that the handheld has with the network. This option will flash a message if the handheld is not connected to the network.
- Check the Power Status: If checked, and the power level is below critical, then a warning message will appear on the handheld alerting the user to plug in or turn off the Reader. If it gets too low, the program will log the handheld operator out and auto-shutdown. Be aware that if this option is not checked and the battery gets too low, there will be no warning, the server will not receive an operator logout message, and the handheld will just shut down without properly exiting the program. Recommended state is checked.
- Allow Users to Quit: Enables the operator to quit the XPressEntry handheld program.
- Allow User to Set Door: If checked the user is forced to set the door the Reader is assigned to. If unchecked, the Reader will be auto-assigned to a door based on the default set for that Reader in the Readers tab under the Add/Edit Info section.
- Select Door from List: Forces the Reader operator to select the door it is assigned to from a list downloaded from the Server.
- Scan Door Tags: Forces the Reader operator to scan an RFID tag stationed at a door in order to assign it to that door.
Display
- Display User Images on Handheld: If checked, will display the images on handheld.
- Result Display Time (ms): Amount of time the functionality result displays.
- Use Logo File: Allows the user to specify which logo graphic will be displayed at the top of the XPressEntry Reader software on the handheld.
- Default Search Field: Sets the Default Search Field to one of the following.
- Last Name
- First Name
- Badge Number
- Employee Number
Search Employee # Instead of Badge #: Searches employee information by Employee # rather than Badge #

Available Functionality
-
- Disable Reader Login: Disables the reader’s mandatory application login.
- Enable Entry/Exit: Enables entry/exit functionality for the handheld.
- Enable Auto Entry/Exit: Enables auto entry/exit.
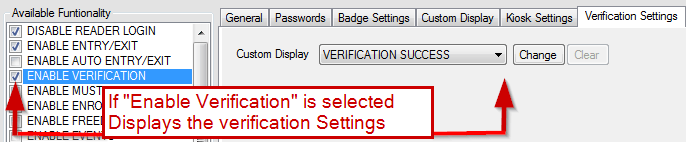
- Enable Verification: Enables verification functionality on the handheld. If selected the program will display a verification settings tab.
-
- Verification Settings
- Custom Display: Allows users to create custom displays for the Verification mode on the handheld. Select from the three pre-loaded displays: Verification Success, Verification User Not Found, Verification User Not Allowed and select the “Change” or “Clear” button to modify.
- Verification Settings
- Enable Muster: Enables Muster functionality on the handheld.
- Enable Events: Enables Events functionality on the handheld.
- Enable Activity View: Enables activity functionality on the handheld.
- Enable Occupancy View: Enables Occupancy functionality on the handheld.
- Enable Activity Photos: Enables Activity Photos functionality on the handheld.
- Enable Fingerprint Lookup: Enables Fingerprint Lookup functionality.
- Enable Visitor Name Entry: Enables Visitor Name Entry functionality.
- Enable Multiple Occupancy: Enables Multiple Occupancy functionality.
- Enable Reader Live Stream: Enables Reader Live Stream functionality.
- Show Search Users: Enables Show Search Users functionality.
- Lookup with Facility Code: Enables user lookup with facility code.
- Update Lists on Double Click: Enables user to update lists on double click.
- Send Activities to Freedom: Enables user to send activities to Freedom from handheld.
- Add Certificates: Enables the Reader to add certificates for additional security.
- Verify Certificates: Enables verification of certificates from the handheld.
- Muster Only: Forces the handheld to only offer muster functionality.
- Add Certificates Only: Forces handheld to be only in “Add Certificates” Mode.
- Hide Taskbar: Hides the handheld taskbar when the XPressEntry is running.
- Allow User Hide Taskbar: Allows the user to hide the taskbar.
- Use Big Keyboard: Allows a larger onscreen keyboard to be used.
- Enable Anti-Passback: Disallows entry if a user is already in an area.
- Use Barcode: Allows the Reader to scan using barcode technology – requires optional hardware to support barcode reading.
- Smartcard Enabled: Enables smartcard reading functionality.
- Periodic Handheld Update: When checked, the handheld will poll the server for any updates to the user database.
- Encrypt HH Database: Encrypts the XPressEntry handheld database for additional security. This can slow down operation of XPressEntry on the handheld.
- Encrypt W/ Password: Encrypts handheld with password.
- Enable Form Field on Entry: On Entry Granted, Activity Form Field will be prompted for HealthCheck or questionnaire.
- Enable Form Field on Exit: On Exit Granted, Activity Form Field will be prompted for HealthCheck or questionnaire.
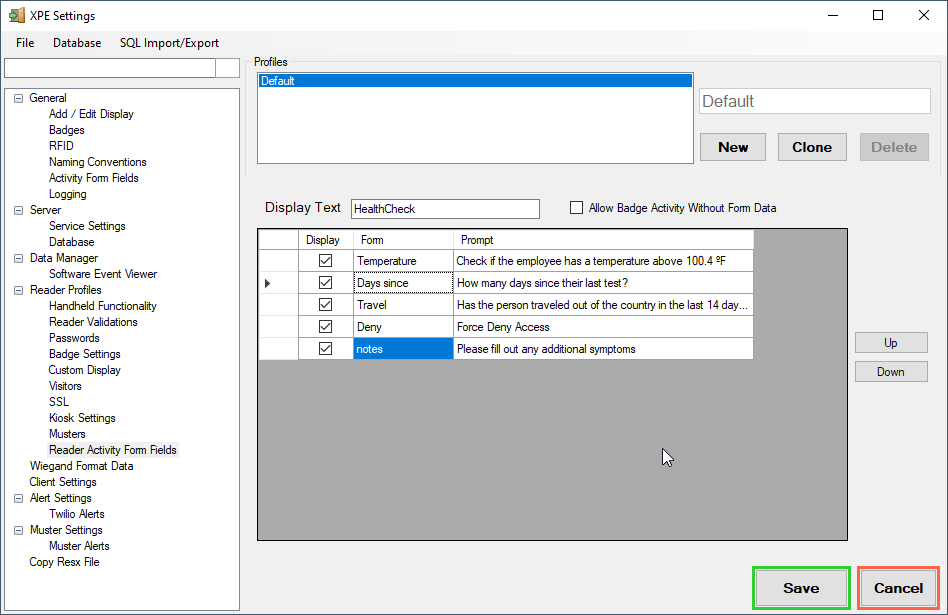
6.1.3.1.Reader Activity Form Fields
Assign which Activity Form Field prompts from the General section will be assigned to the reader profile.
- Display Text allows you to change the title displayed when entering Activity Form Field.
- Allow Badge Activity Without Form Data allows submitting the Entry or Exit activity without filling out the form field data.
- You can check which prompts will show up on the handheld device. To change the order of prompts displayed on the device, highlight the row, and click Up or Down button.
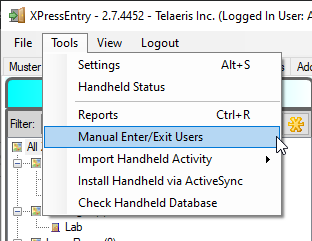
6.2.Manual Enter Exit
The Manual Enter Exit option is located under the Tools menu. Simply select the Tools menu, scroll down to the Manual Enter Exit option. If the user is not already logged in as an Administrator, XPressEntry will prompt the user for their Administrator User Name and Password. Once the user has selected the Manual Enter Exit option an Entry/Exit Users window will appear. This window will offer three tabs Entry Mode, Exit Mode and Muster Mode. The Entry, Exit and Muster Modes have the same page layout.
Enter/Exit & Muster Mode
The modes will simply prompt the user to manually enter in the employees/contractors Name or badge # or any part of the name/badge #.
- Process: Processes the employee.
- Auto: Automatically processes employee.
- Employee Selection: Lists possible employees.
- Door: Select the proper manway.
- Time: Can select the proper time, either current or past.
The user simply selects the appropriate employee/contractor, the doorway and the time. Once all information is correct, simply click the ![]() button and the Enter, Exit or Muster activity will be processed.
button and the Enter, Exit or Muster activity will be processed.
6.3.Reports
XPressEntry provides built-in reports to aid in tracking personnel and compiling occupancy times for payroll and safety reasons. The Reports option is located under the Tools menu, Tools→Reports or press Ctrl+R on the keyboard. Once the user has selected the
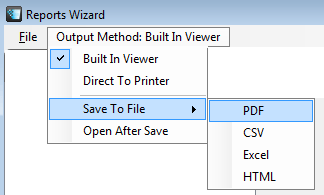
Output Method
The report output method can be changed and/or modified by selecting the Output Method: Built in Viewer in the Reports Wizard’s toolbar.
- Built in Viewer: Sends the report to the built-in viewer.
- Direct to Printer: Sends the report directly to printer.
- Save to File:
- PDF: Report saved using PDF
- CSV: Report saved using CSV
- Excel: Report saved using Excel
- HTML: Report saved using HTML
- Open After Save: Opens the report after saving.
6.3.1.Summary of Available Reports
Here are the reports available from the Reports Wizard:
| Report Category: | Reports | Description |
|---|---|---|
| User information | Time Spent Inside Zone by User | Displays the time spent in each selected zone for one or more users. Shows the zone, the entered and exited times, and the total time spent in that zone. The Report Options allow for filtering based on zones, users and date range. |
| Time Spent Inside Zone by User | Displays the users id number as a barcode filtered by one or more companies entered in the XPressEntry system. Lists the users, the barcodes and the companies. The Report Options allow for filtering based on users and companies. | |
| Users Barcodes by Role | Displays the user’s barcodes by one or more roles within the XPressEntry system. Lists the users, barcodes and role. The Report Options allow for filtering based on users, roles and companies. | |
| Users Barcodes by Role Large | Displays the user’s barcodes by roles within the XPressEntry system. Lists the users, barcodes and roles. The Report Options allow for filtering based on users and companies. | |
| Muster | Current Muster Activity | Displays the current muster activity including the scanned and missing employees. Lists the user, badge number, timestamp and Reader. |
| Past Muster | Displays the past muster activity including the scanned and missing employees. Lists the user, badge number, timestamp and Reader. The Report Options allow for filtering based on past musters. | |
| Current Information | Door Assignments | Lists every door for the selected zone, showing the name of the door, the zones it connects to (start and end zones), the Reader currently active at that door, the operator assigned, the operator’s company, and the time when the operator logged into that door. The Report Options allow for filtering based on zones. |
| Occupancy Snapshot by Company | Displays a list of users inside selected zones grouped by company. Includes the users’ badge number, name, current location, and the date/time entered. The Report Options allow for filtering based on zones and companies. | |
| Occupancy Snapshot by Zone | Displays a list of users inside selected zones grouped by zone. Includes the users’ badge number, name, current location, and the date/time entered. Occupancy totals are listed after every zone. The Report Options allow for filtering based on zones and companies. | |
| Occupancy Snapshot by User | Displays a list of users inside selected zones grouped by user. Includes the users’ badge number, name, current location, and the date/time entered. The Report Options allow for filtering based on zones and companies. | |
| Door Activity | Badge Activity | Displays a list of users’ entries/exits through selected doors. The Report Options allow for filtering based on doors, users, companies and date range. |
| Badge Activity by Company | Displays a list of users’ entries/exits, grouped by company, through selected doors. The Report Options allow for filtering based on doors, users, companies and date range. | |
| Badge Activity by User | Displays a list of users’ entries/exits, grouped by users, through selected doors. The Report Options allow for filtering based on doors, users, companies and date range. | |
| Past Occupancy Snapshot | Listed by User | Displays a list of users located within selected zones during a specified date/time. Includes the users’ badge number, name, current location, and the date/time entered. The Report Options allows for filtering based on zones, companies and a date/time. |
| Grouped by Zones | Displays a list of users, grouped by zone, located within selected zones during a specified date/time. Includes the users’ badge number, name, current location, and the date/time entered. The Report Options allows for filtering based on zones, companies and a date/time. | |
| Grouped by Companies | Displays a list of users, grouped by company, located within selected zones during a specified date/time. Includes the users’ badge number, name, current location, and the date/time entered. The Report Options allows for filtering based on zones, companies and a date/time. | |
| Certificate Activitiy | Certificate Daily Report | Displays a list of daily certificate activity. Includes employee ID, badge number, name and time stamp. The Report Options allows for filtering based on date range. |
| New Certificate Daily Report | Displays a list of new daily certificate activity. Includes the users badge number, name, group, and time stamp. The Report Options allows for filtering based on date range. | |
| Verification | User Verification | Displays a list of user verification. Includes the users badge number, name, zone, companies and time stamp. The Report Options allows for filtering based on users, zones, companies and date range. |
| Company Information | Badge Activity by Company | Displays a list of zones users visited, the times entered/exited and total time spent in each. This report groups the users by company. The Report Options allow for filtering based on zones, companies and date range. |
| Muster | Current Muster | Displays the current muster activity including the scanned and missing employees. Lists the user, badge number, timestamp and Reader. |
| Current Muster by Company | Displays the current muster activity including the scanned and missing employees, sorted by companies. Lists the user, badge number, timestamp and Reader. | |
| Past Muster | Displays the past muster activity including the scanned and missing employees. Lists the user, badge number, timestamp and Reader. The Report Options allow for filtering based on past musters. | |
| User Information | Time spent Inside Zone by User | Displays the time spent in each selected zone for one or more users. Shows the zone, the entered and exited times, and the total time spent in that zone. The Report Options allow for filtering based on zones, users and date range. |
| Exit Activities Without Entries | Shows activities where a user exits the system without recording an entry. | |
| Time Spent Inside Zone by User, Location | Displays the time spent in each selected zone for one or more users sorted by location. Shows the zone, the entered and exited times, and the total time spent in that zone. The Report Options allow for filtering based on zones, users and date range. | |
| Door Activity | Badge Activity by Door | Displays a list of users’ entries/exits, grouped by company, through selected doors. |
| Badge Activity by Company | Displays a list of users’ entries/exits, grouped by company, through selected doors. The Report Options allow for filtering based on doors, users, companies and date range. | |
| Badge Activity by User | Displays a list of users’ entries/exits, grouped by users, through selected doors. The Report Options allow for filtering based on doors, users, companies and date range. | |
| Employee Activity by Door | Displays a list of users’ entries/exits sorted by doors. The Report Options allow for filtering based on doors, users, companies and date range. | |
| Employee Activity by Company | Displays a list of users’ entries/exits sorted by companies. The Report Options allow for filtering based on doors, users, companies and date range. | |
| Employee Activity by User | Displays a list of users’ entries/exits sorted by user name. The Report Options allow for filtering based on doors, users, companies and date range. | |
| Current Information | Door Assignments | Lists every door for the selected zone, showing the name of the door, the zones it connects to (start and end zones), the Reader currently active at that door, the operator assigned, the operator’s company, and the time when the operator logged into that door. The Report Options allow for filtering based on zones. |
| Current Occupancy by Company | Displays a list of users inside selected zones grouped by company. Includes the users’ badge number, name, current location, and the date/time entered. The Report Options allow for filtering based on zones and companies. | |
| Current Occupancy by Zone | Displays a list of users inside selected zones grouped by zone. Includes the users’ badge number, name, current location, and the date/time entered. Occupancy totals are listed after every zone. The Report Options allow for filtering based on zones and companies. | |
| Current Occupancy by User | Displays a list of users inside selected zones grouped by user. Includes the users’ badge number, name, current location, and the date/time entered. The Report Options allow for filtering based on zones and companies. | |
| Past Occupancy Snapshot | Past Snapshot by Company | Displays a list of users, grouped by company, located within selected zones during a specified date/time. Includes the users’ badge number, name, current location, and the date/time entered. The Report Options allows for filtering based on zones, companies and a date/time. |
| Past Snapshot by Zone | Displays a list of users, grouped by zone, located within selected zones during a specified date/time. Includes the users’ badge number, name, current location, and the date/time entered. The Report Options allows for filtering based on zones, companies and a date/time. | |
| Past Snapshot by User | Displays a list of users located within selected zones during a specified date/time. Includes the users’ badge number, name, current location, and the date/time entered. The Report Options allows for filtering based on zones, companies and a date/time. | |
| Verification | User Verification | Displays a list of user verification. Includes the users badge number, name, zone, companies and time stamp. The Report Options allows for filtering based on users, zones, companies and date range. |
| User Verification / Employee # | Same as above, with employee number replacing badge number. | |
| User Barcodes | User Barcodes by Company | Displays a list of users with the badge numbers shown as a barcode, filtered by companies. |
| User Barcodes by Role | Displays a list of users with the badge numbers shown as a barcode, filtered by roles. | |
| User Barcodes with Images | Displays a list of users with their images with the badge numbers shown as a barcode. | |
| Company Information | Company Badge Activity | Displays a list of zones users visited, the times entered/exited and total time spent in each. This report groups the users by company. The Report Options allow for filtering based on zones |
| Reader Activities | Reader Activities | Displays a list of reader activities. |
| Offline Readers | Displays a list of readers that are not communicating with the server. |
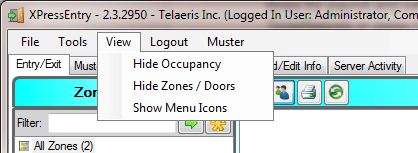
7.View
The View menu consists of three options:
- Hide Occupancy: Selecting this option will hide the Occupancy/Activity viewer section on the Enter/Exit page.
- Hide Zones/Doors: Selecting this option will hide the Zones/Doors viewer section on the Enter/Exit page.
- Show Menu Icons: Selecting this option will display the menu icons.
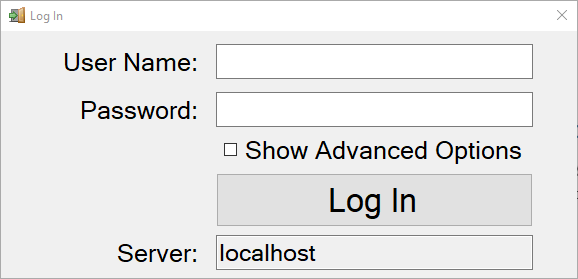
8.Login
To log in, select the Login menu option located on the above XPressEntry toolbar. A window will pop up prompting for a User Name and Password.
9.Help
XPressEntry comes with its own built-in Help menu. The User Guide is available in an electronic help file, designed to make it easy to find answers. A PDF version is also available for printing. If more assistance is required in using or troubleshooting XPressEntry, refer to the section Technical Support for information on contacting technical support.
User Guide
XPressEntry allows users to easily refer to the User Guide through the help menu. Simply go to the Help menu and select Help Contents to open up the XPressEntry help.
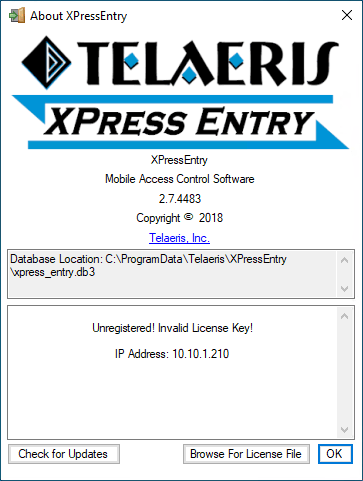
About
To learn which version of XPressEntry is installed, or the registration status of this copy of XPressEntry, select About from the Help menu. The About dialog will also list the full location of the current database, which is also found at the bottom of the main window.
Knowing which version of XPressEntry is installed is useful when contacting technical support.
Password or Login Forgotten
Contact [email protected] for assistance with resetting passwords.
10.Handheld Device
For instructions on how to set up and use the handheld device, please refer to the following links.
XPID100
11.Glossary
Activity – An action involving a particular user or Reader
Administrator – A type of XPressEntry user who has total access over how XPressEntry operates. Administrators can create and edit information as well as change settings. Some features of XPressEntry can only be performed by someone logged in as an administrator. Other features can be performed by both operators and administrators. Administrators are required to have a login ID and password.
Badge – The generic term for a piece of employee identification. It has the employee’s name, company, and badge number, and sometimes other information, such as an employee photo. The badge # may be encoded with a bar code, or be digitally stored on a proximity/smart card.
Badge number – A unique number assigned to an employee as a means of identification in XPressEntry. It can match a company’s existing employee identification scheme, such as use for access control proximity cards. It contains only numerical digits. Badge numbers cannot overlap with stock numbers. This may also be referred to as an employee number.
Entrant – A type of XPressEntry user whose entry and exit activities will be tracked into and out of zones. They can be an employee of the company where XPressEntry is used, or a contractor or subcontractor. Entrants need a badge #, which can be part of their ID badge.
Employee Number – Another term for badge number.
Field – A single category in a database (i.e. Last name or badge number). Each record is made up of multiple fields describing this record. When a database is displayed in a table format, the fields are arranged in columns.
Operator – The type of XPressEntry user whose job it is to run the XPressEntry server, monitor occupancies, activities, and error conditions. While an administrator has access to all of XPressEntry’s functions, an operator has access to the most commonly used functions of XPressEntry, essential to viewing the current operational status.
Record – A single entry in the database corresponding to one user, door, Reader, etc.
A record is made up of several fields. A user record will contain information such as a badge number, first name, middle initial, last name and company. When a database is displayed in a table format, records are arranged in rows.
User – A person who is working with the XPressEntry system.
12.Technical Support
If you need assistance with XPressEntry, Telaeris provides several ways for customers around the world to receive technical support. Telaeris also welcomes input on improving XPressEntry – if there is a function that would add value to your company’s mobile access control system, Telaeris can incorporate those features into the next version of the application. Telaeris can also provide customized features just for your company, including custom report formats.
On the Internet
Visit our website at www.telaeris.com for answers to frequently asked questions about XPressEntry, upgrades, tips and techniques, and information about other Telaeris products.
E-mail
Send an e-mail to our technical support department at [email protected].
Fax
Send a fax to our technical support department at (858) 627-9702.
Telephone
Call our technical support department at (858) 627-9700. Technical Support hours are Monday through Friday from 9:00 AM to 5:00 PM, Pacific Time.
Before contacting us
Before contacting our technical support department, please make sure that your hardware meets the minimum system requirements and all your hardware and peripherals are properly connected and set up according to their manufacturer’s instructions. Please have the following information ready:
- Product version (find this by selecting “About” from the Options menu).
- Operating system and version
- Description of hardware configuration
- Exact error message, if any
- Steps to duplicate the problem