XPressEntry – Open Options Documentation

1.Purpose
This document is intended to instruct users on how to synchronize Telaeris’ XPressEntry system with Open Option’s DNA Fusion access control system. In doing so, XPressEntry creates a mobile platform for performing personnel entry/exit, verification, emergency evacuations.
2.Prerequisites
Before beginning the integration, the installer should obtain a license for the Flex API from their Open Options provider. Optionally, the installer should obtain a certificate from a certificate authority if they plan on implementing the API over SSL.
This document also assumes the installer has some familiarity with DNA Fusion
3.Flex API Setup
It is assumed that Flex API is installed and configured to look at the DNA Fusion Database.
3.1.Create a Flex API Key
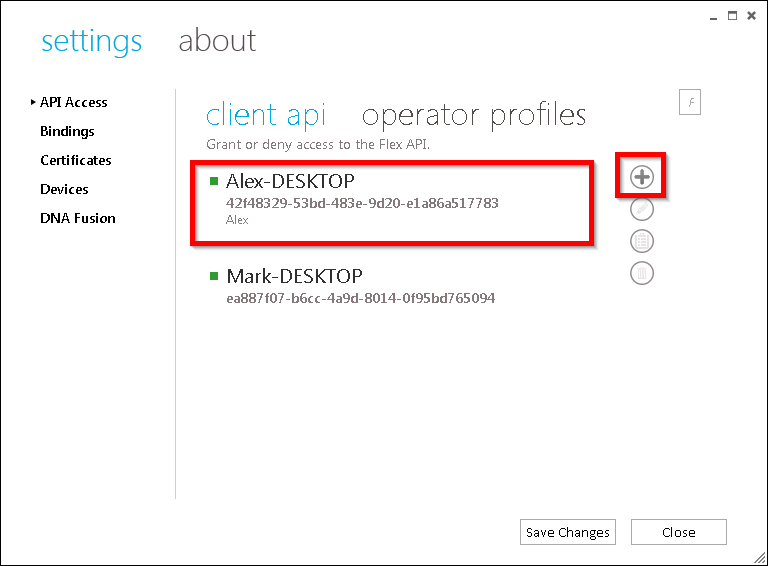
Create a Flex API Key for the use of the XPressEntry server.
- Select the + shown in the square above.
- Provide a name and description for the entry.
- Copy the API Key to be used in XPressEntry Setup
Additionally, check your bindings for http or https. The port set in bindings will be required by XPressEntry Setup. If the binding that you require does not exist, create one.
4.Configuring DNA Fusion
4.1.Handhelds
To properly link XPressEntry handhelds to DNA Fusion, placeholder reader records should be added to DNA Fusion. These placeholder records may be disabled and are only used to logically represent the work that the handhelds perform.
Telaeris handhelds can be added to existing Sites, Channels, and Controllers. For the sake of this documentation, we will walk through the process of adding a handheld, beginning with a new Channel.
4.2.Hardware Channel
Begin by opening the “Hardware Browser” in DNA Fusion. Right click on the site where your handhelds will be deployed. Select “Add Channel”.
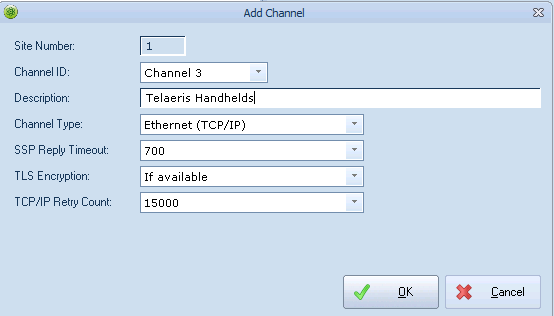
Give the channel a description that represents it is used for logical Telaeris Handhelds. All other settings are not required as this channel will only represent logical devices.
4.3.Hardware Controller
Next, add a controller to the logical channel by right clicking on the channel and selecting Add SSP.
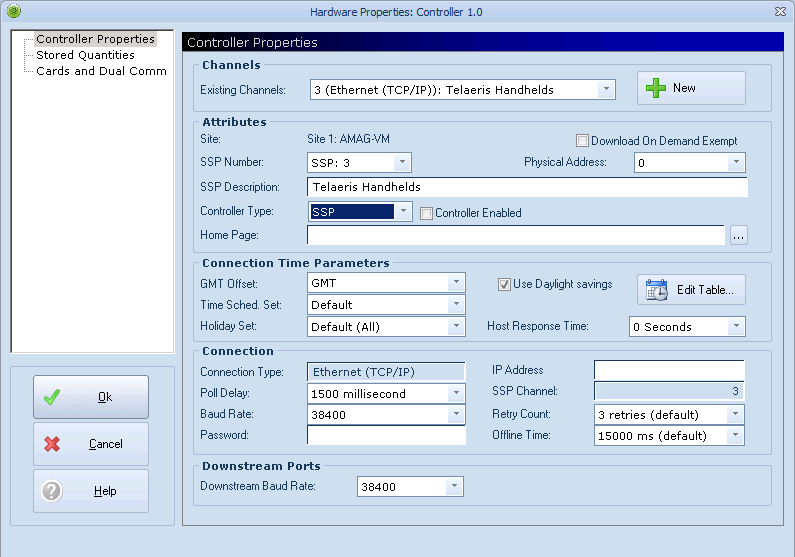
Give the controller a description and set the controller to disabled because there is no physical controller. This controller will be used to add logical handhelds in the system only.
Once the controller has been added, Access Areas and Readers can be added to the system. Readers are created through doors in DNA Fusion.
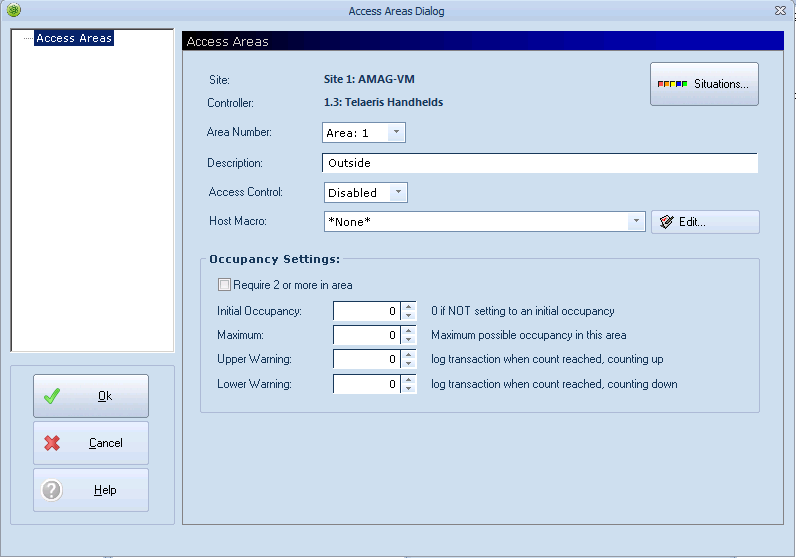
4.4.Access Areas
Before configuring readers, the installer should configure the areas each door will lead to.
Right click on the “Access Areas” option under the controller. If access areas are not present in the hardware tree, it can be enabled by navigating to DNA>Administrative> Properties. Select Hardware Tree Behavior and check the box for Access Control Areas.
Next, add zones for each logical area the handhelds will move people between.
4.5.Readers
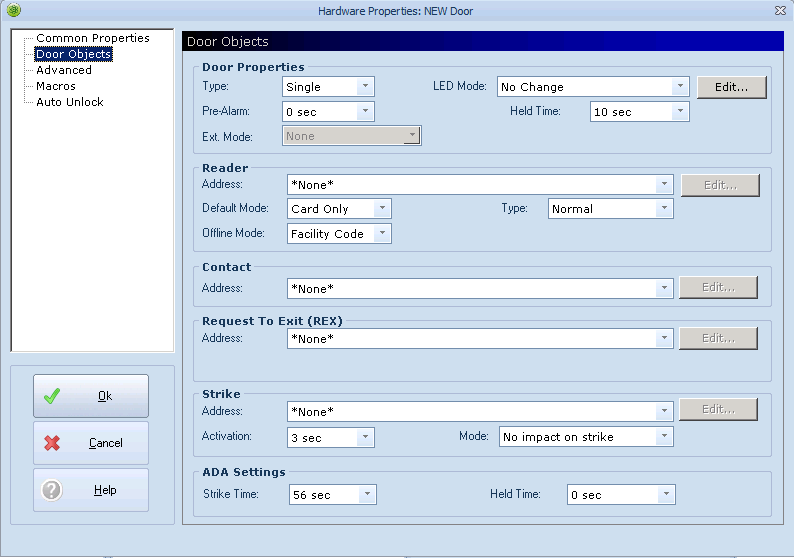
Under “Door Objects”, configure the type of door this will be. If the handhelds will be used to track personnel In AND Out of an area, change the “Type” drop down to “In and Out”. For Entry or Exit only use, select Single.
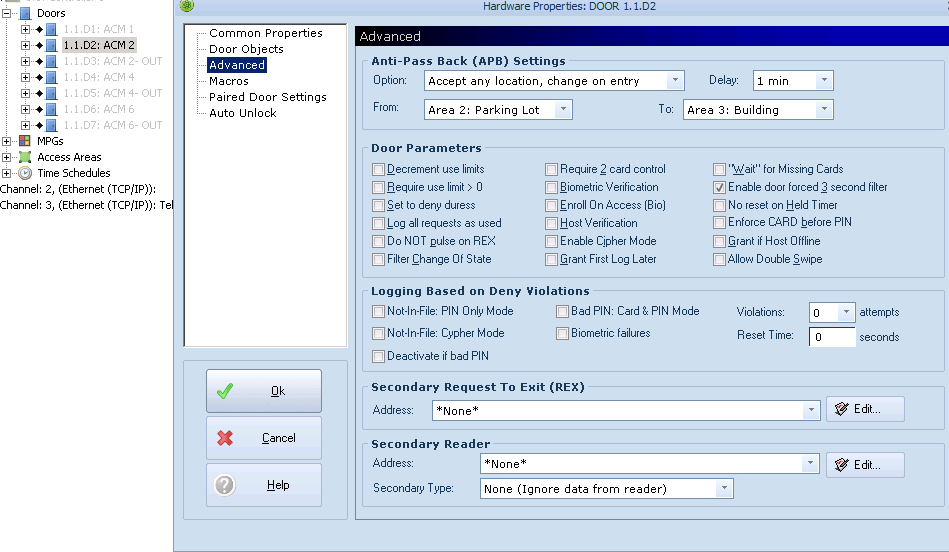
*Important Note- if a reader is used as an “Exit” reader. It must contain “OUT” in the name in order for it to map to an exit reader in XPressEntry.
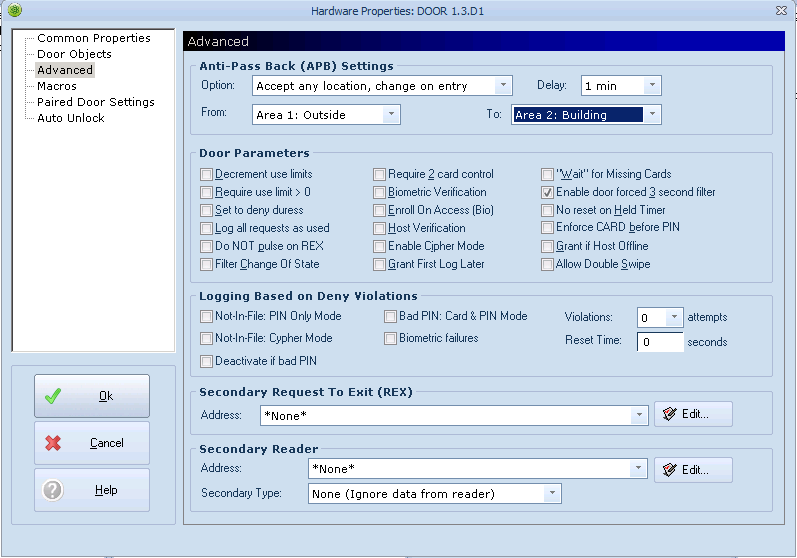
If you have configured access areas, navigate to the advanced tab under the door. Select the access areas in the “From” and “To” dropdowns as shown below.
4.6.Other Fields
In addition to Areas and Readers, the following fields are pulled by XPressEntry.
Cardholders
Badges
Pictures
Groups
Access Levels (Legacy)
Access Groups (Global)
Readers>Groups and Levels
Users>Groups and Levels
Additionally, XPressEntry pushes Access events back into DNA Fusion.
5.Enable Synchronization
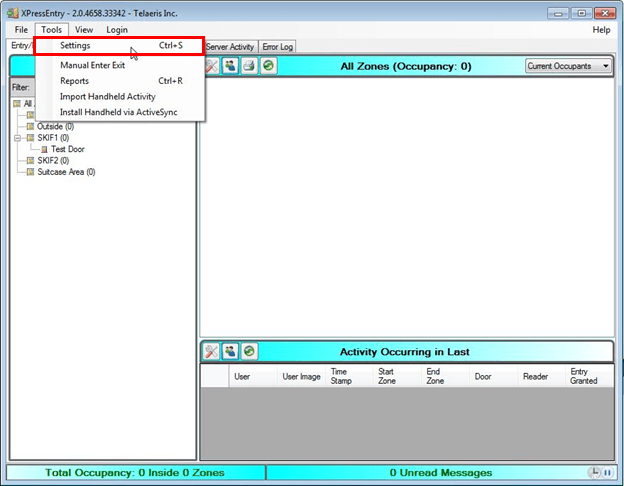
XPressEntry uses a module called “Data Manager” to access the Flex API.
From the main page of XPressEntry, go to XPressEntry / Settings (CTRL+S)
5.1.General tab
From the Settings page, select the General Tab
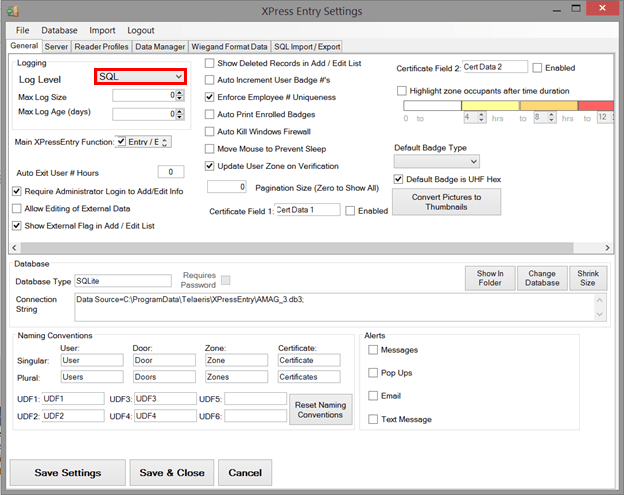
When setting up a Data Manager, it is important to set “Log Level” to “SQL”. This will allow you to see all logged entries when you sync. Select “Save Settings” after making this change. After setup is complete and the data synchronization is correct, it is suggested that you set “Log Level” to “Critical”. This will only log any errors that may appear.
5.2.Reader Profile Tab
The Reader Profile Tab is where you configure the functionality of the handhelds. Please see the XPressEntry manual for further detail about the reader profiles tab.
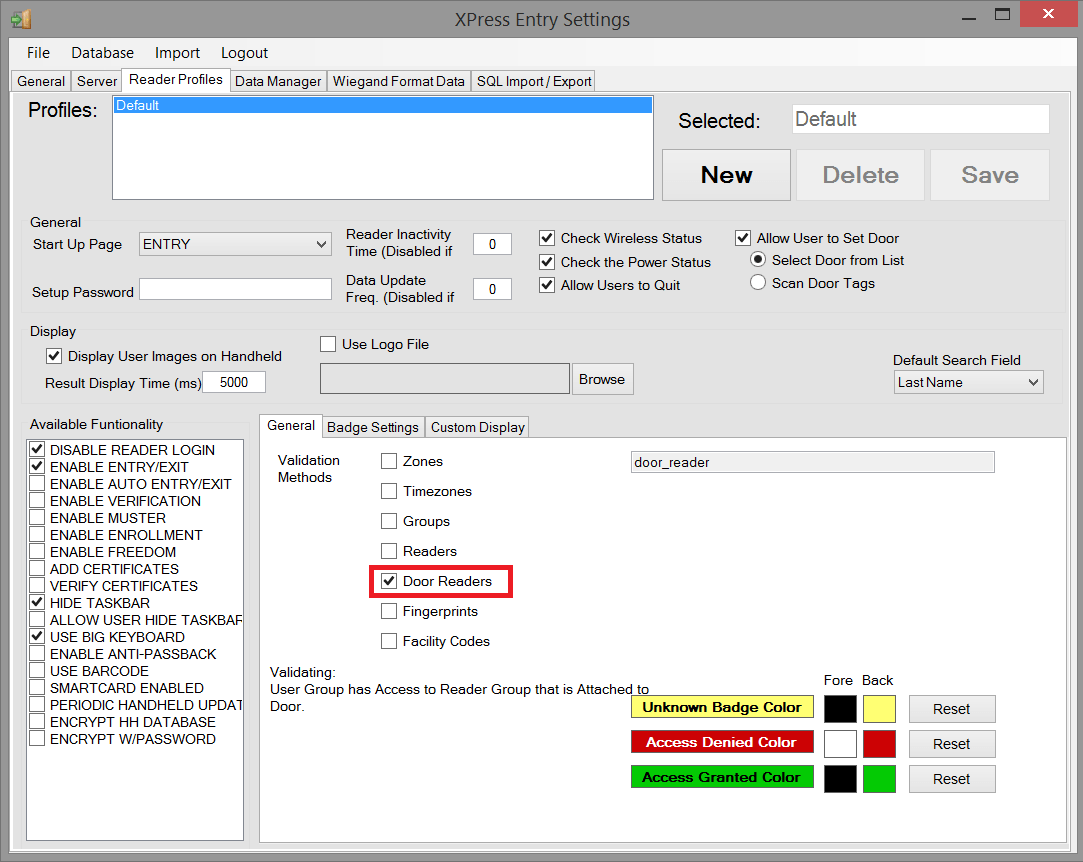
The only important DNA Fusion related change to make on this tab is to set “Door Readers” as the only box that is checked under “Validation Methods”. Select “Save” at the top right when finished.
5.3.Data Manager Tab
From the Settings page select the Data Manager Tab
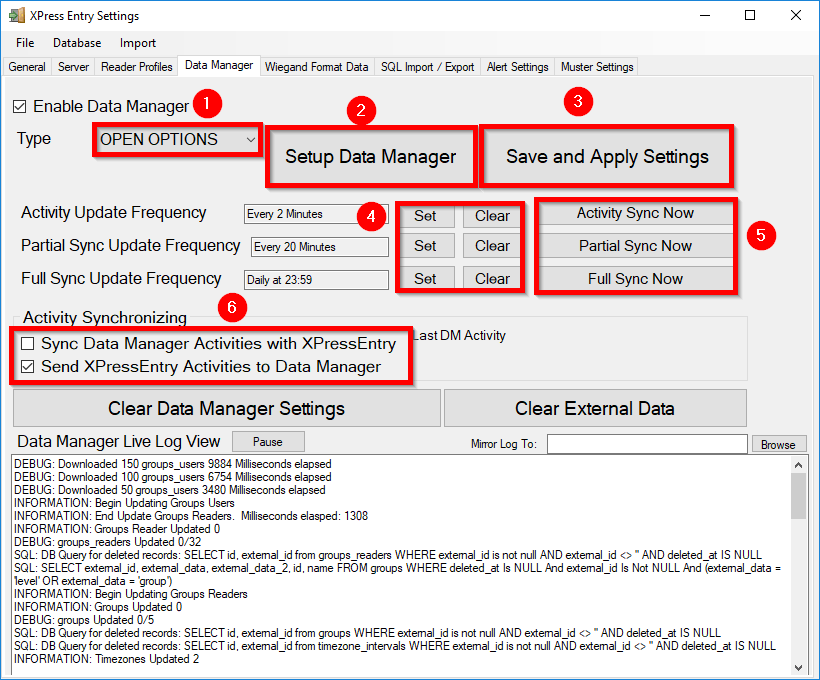
- Type- This is the integration type. Select Open Options.
- Setup Data Manager- Sends you to the setup form for Open Option’s data manager.
- Save and Apply Settings- Saves all settings from the setup form, update frequencies, and activity Synchronization options.
- Update Frequency options- Sets and clears the intervals in which the data manager updates XPressEntry.
- Immediate sync functions- Runs an immediate update.
- Activity Synchronization options- Used to send XPressEntry handheld activities to Symmetry.
Set the Update Frequency to as often as you want the system to update. Note that only one update can run at a time.
There are three different types of Sync that you can set intervals for.
- Full Sync Update- This sync will grab all relevant records from DNA Fusion and update them in XPressEntry. If there is a large number of users in DNA Fusion, this sync option can take some time. It is suggested that large systems use a full sync once a day.
- Partial Sync Update- This sync will retrieve records that were updated since the last sync. This is valuable for quick updates throughout the day into the XPressEntry system.
- This sync will add or update any table in XPressEntry.
- This sync will not delete a user from XPressEntry who was deleted in DNA Fusion.
- Activity Sync Update- Use this sync to send XPressEntry Events to DNA Fusion. These events will show up as DNA Fusion Events. The “Activity Synchronizing” section contains two options.
- Sync Data Manager Activities with XPressEntry- This setting is not used with this integration. Last scan locations are automatically pulled from the badge record./li>
- Sync XPressEntry Activities to Data Manager – If you want the activities from the XPressEntry Handhelds to show up in DNA Fusion, you should check this option.
All of these options can be changed at any time. Changing any option will take effect upon selecting “Save and Apply Settings”.
5.4.Open Options Setup Page
Press the “Setup Data Manager” button to get the Open Options specific setup screen.
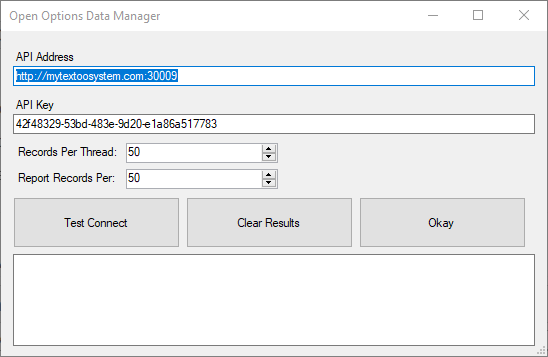
- API Address- This is the server address of the API. Make sure the url prefix and bindings are specified.
- API Key- This is the key that was created in the Flex API Setup.
- Records Per Thread and Report Records Per-
- Downloading pictures is a process that must be done one at a time. Because of this, it can take substantial time to complete. Because of this, we can utilize multiple threads to work on this simultaneously.
- Records per Thread: XPressEntry will create enough threads so that each thread is responsible for this many pictures. If DNA Fusion has 1000 users and Records per Thread is set to 100, 10 threads will be created. Be cautious not to create too many threads, as it may impact performance if 100s of threads are created.
- Report Records Per: Determines how often the front end is notified about the progress of the picture, groups users, and groups readers downloads
Press “Test Connect” to verify connection to the Flex API. If successful, select “Okay” to exit the setup form. Select “Save And Apply Settings”. Next, select “Full Sync Now” to test your setting changes. The log view at the bottom will display the result of the sync, according to the log level set in the “General” tab.
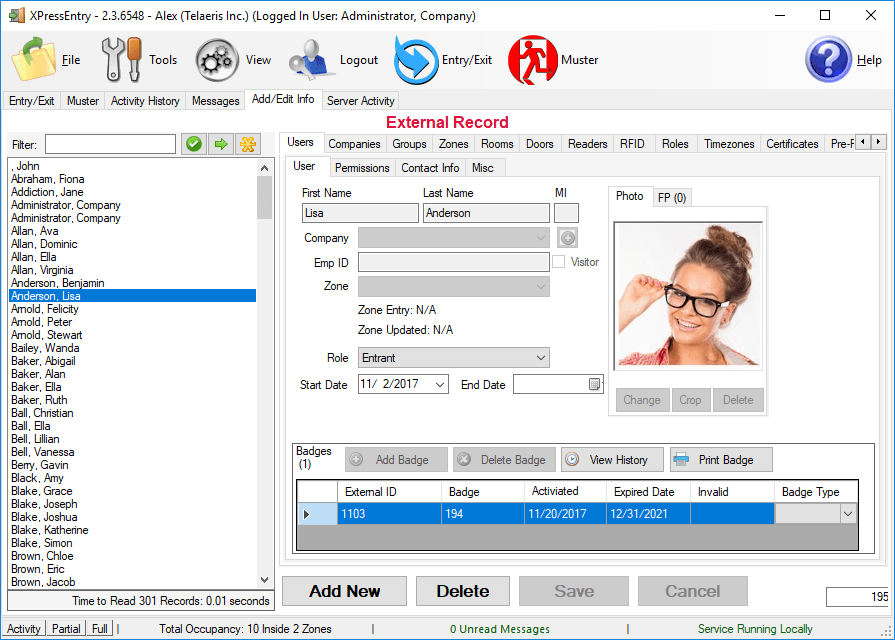
6.Setup XPressEntry Data
Once XPressEntry is set up and synchronizing, you will see DNA Fusion data represented in XPressEntry under the Add/Edit Info tab. Data which is imported from Fusion cannot be changed from within XPressEntry and is greyed out.
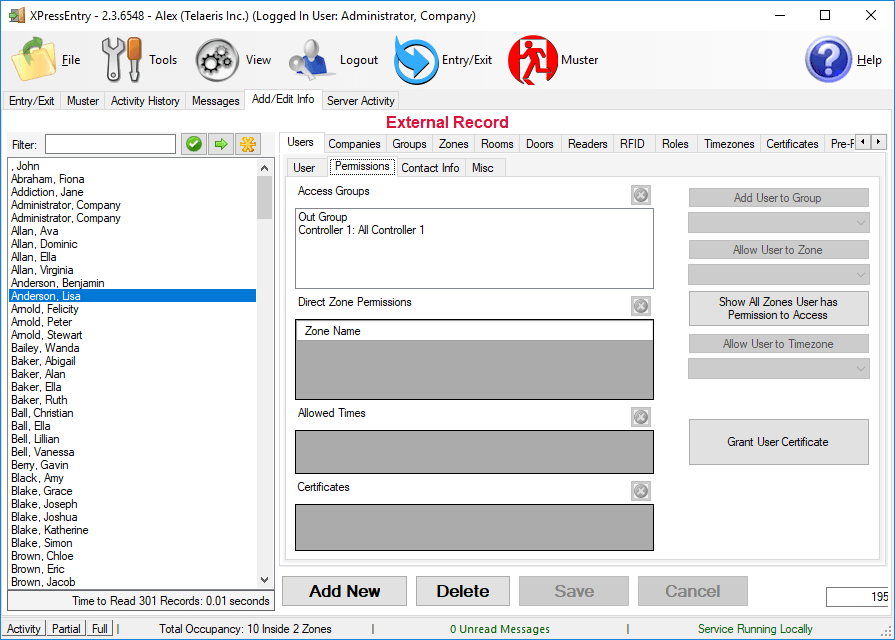
6.1.Users
Here is a sample of a properly synchronized user:
6.2.User Permissions
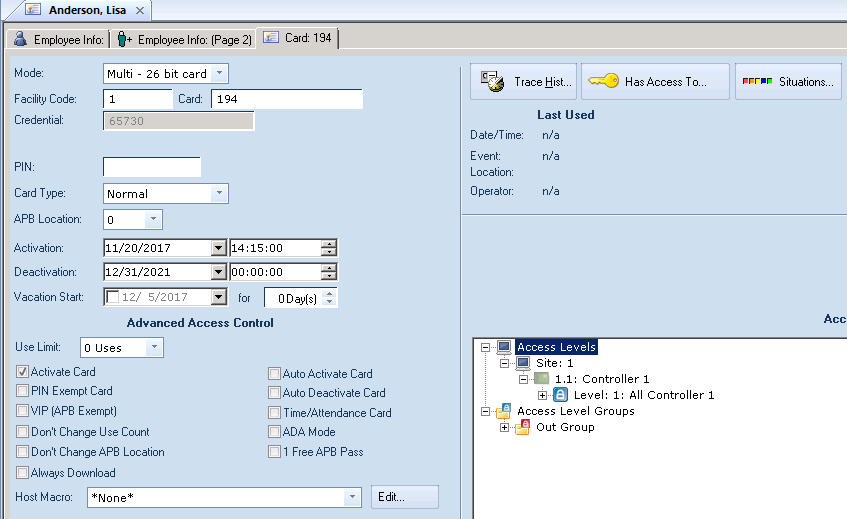
Users in XPressEntry have the same access to the Access Groups and Access Levels as they do in DNA Fusion. The example below shows one DNA Access Level and one DNA Access Group that Lisa has access to.
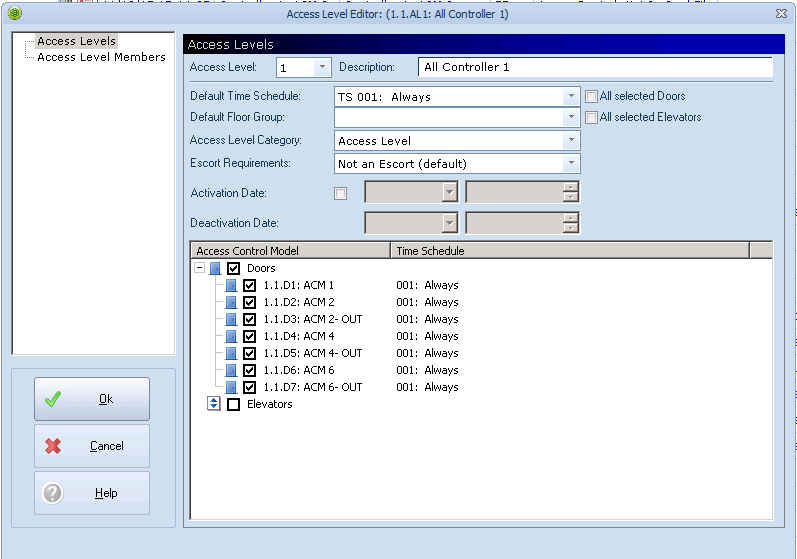
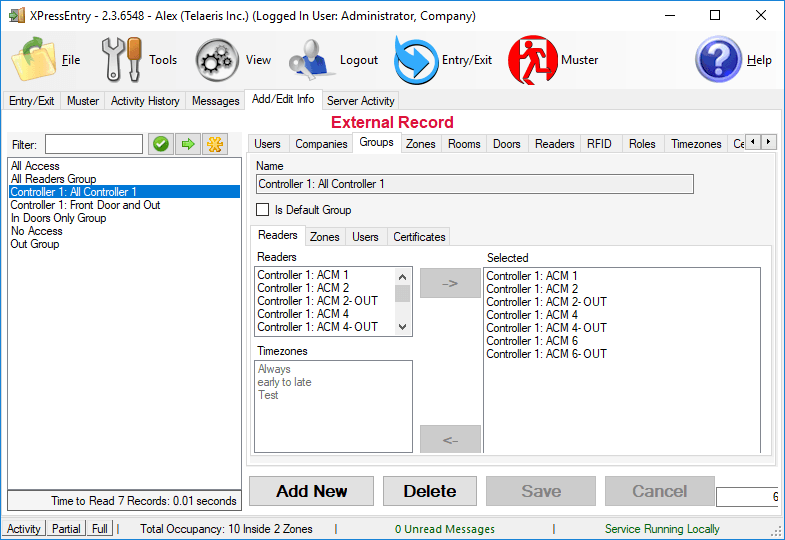
6.3.Reader Groups
Each Access Level and Access group is pulled from Fusion to XPressEntry, as well as the readers associated with it. The example below shows the mapping.
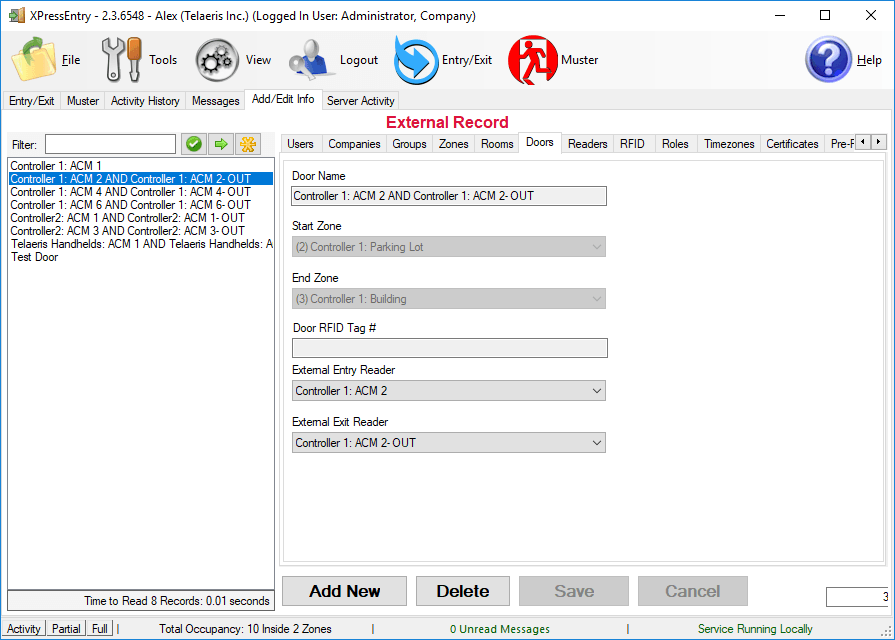
6.4.Doors
Entry/Exit permissions in XPressEntry are set by doors. A door contains one or two readers for exit and entry. If access areas are configured in Fusion, they should also be configured in XPressEntry. The example below shows a door that has been pulled from DNA Fusion.
6.5.Readers
In XPressEntry’s Open Options integration, it is not necessary to associate any reader in the system with a handheld. Instead, handhelds should be set to a door. It will then use the external exit and entry readers to verify access through the door.
A handheld unit can logically represent any reader in the building. For example, imagine that you have handheld A stationed at door A. Door A has two readers associated with it: Reader A-Entry and Reader A-Exit. The employee holding the handheld sets the handheld’s door to Door A. When the employee sees a cardholder walking towards the building, he sets the handheld to Entry mode and scans the cardholder’s badge. The handheld in entry mode identifies itself as reader A-Entry and sends an activity to the server.
Later, there is heavy volume exiting Door B. Door B has two readers associated with it: Reader B-Entry and Reader B-Exit. The employee from door A is called to help and brings handheld A. He sets the door on his handheld to Door B and the mode to Exit. When he begins scanning people walking out of the door, the handheld identifies itself as Reader B-Exit and sends each scan as an activity to the server.
6.6.Activities
XPressEntry will synchronize activities to DNA Fusion if that option has been set by Data Manager.
Entry/Exit activities will be sent to the Events Manager in DNA Fusion. The user’s badge will be linked to the event record. There will also be, information about the access event.
- Where the badge was scanned (ex. Back Door Entry Reader)
- Who was scanned
- Time the scan occurred
- Event Index of the scan
- 72 for Access Granted
- 73 for Access Denied (level)
- 55 for Access Denied, Not in Card File