XPressEntry – Maxxess Documentation

1.Purpose
This document is intended to instruct users on how to synchronize an XPressEntry system with a Maxxess eFusion System.
2.Installation Pre-requisites
- Maxxess eFusion version 6.3+
- eFusion Web API License
- eFusion ExternalOfflineReader License
- XPressEntry 3.2 or above
3.License Requirement
- XPressEntry License with Maxxess Feature Enabled
6.Setup eFusion Data and Settings
Enable ExternalOfflineReader
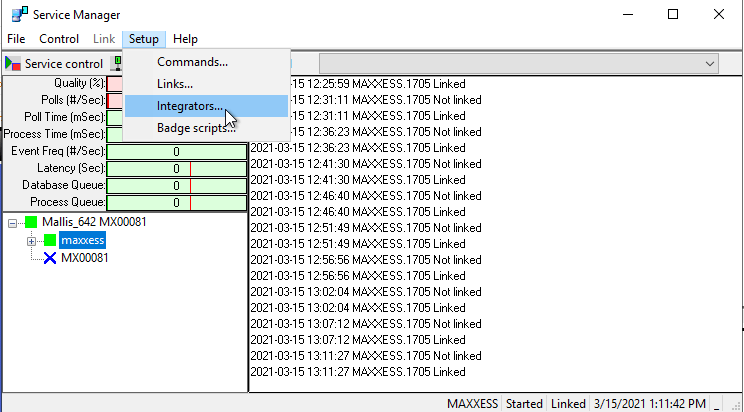
Go to eFusion Service Manager. Click Setup -> Integrators
Figure 1-Service Manager Integrators
Click New and change the Integrator type to ExternalReaderOffline. Click Save. If you do not see this, please reach out to your Maxxess rep or integrator.
Figure 2-ExternalReaderOffline
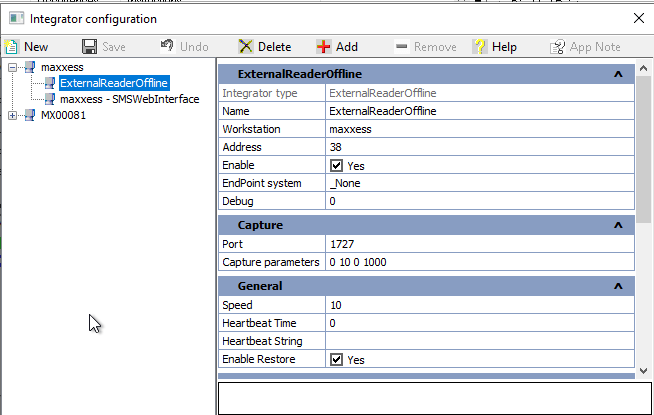
Note: Make sure the Debug value is set to 0, or events may not be sent to Maxxess Transaction logs.
Operator
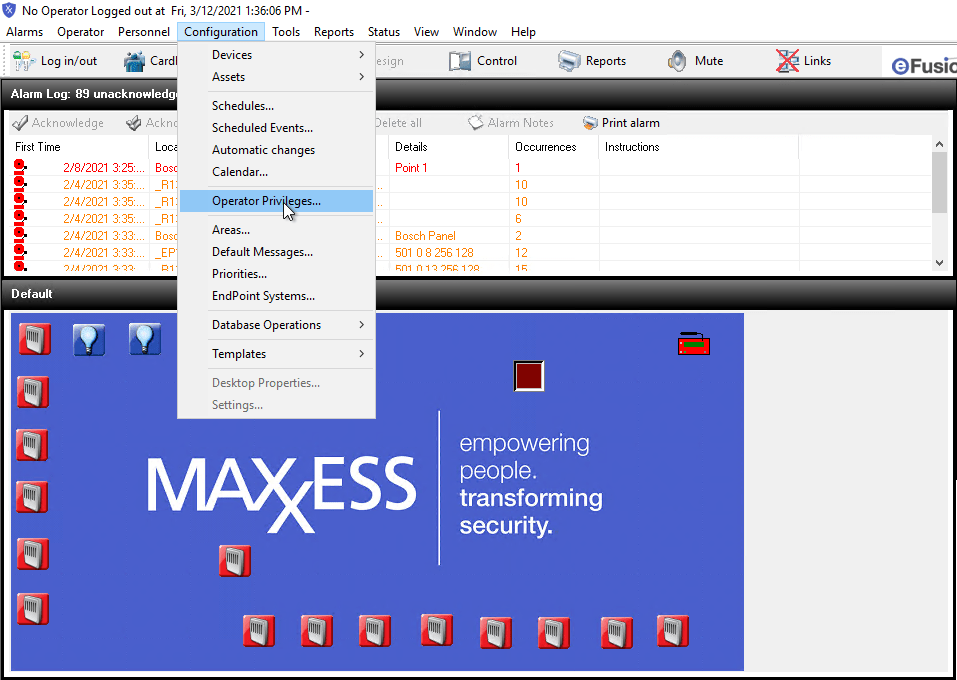
First, set up an operator that will be used for the XPressEntry synchronization. This operator can be an existing operator, or a specific account used as a service account specially for XPressEntry. From the eFusion menu at the top, select Configuration -> Operator Privileges
Figure 3-eFusion Operator Privileges
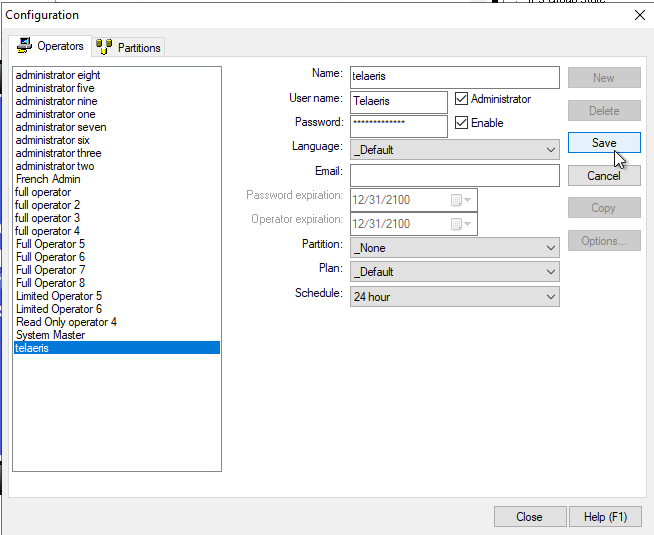
If adding a new operator, select New. Add a Name, user name, and password. Select Administrator checkbox. Click Save.
Figure 4-Operator Configuration
Area Controller
Select Area Controllers under Configuration -> Devices -> Area Controllers
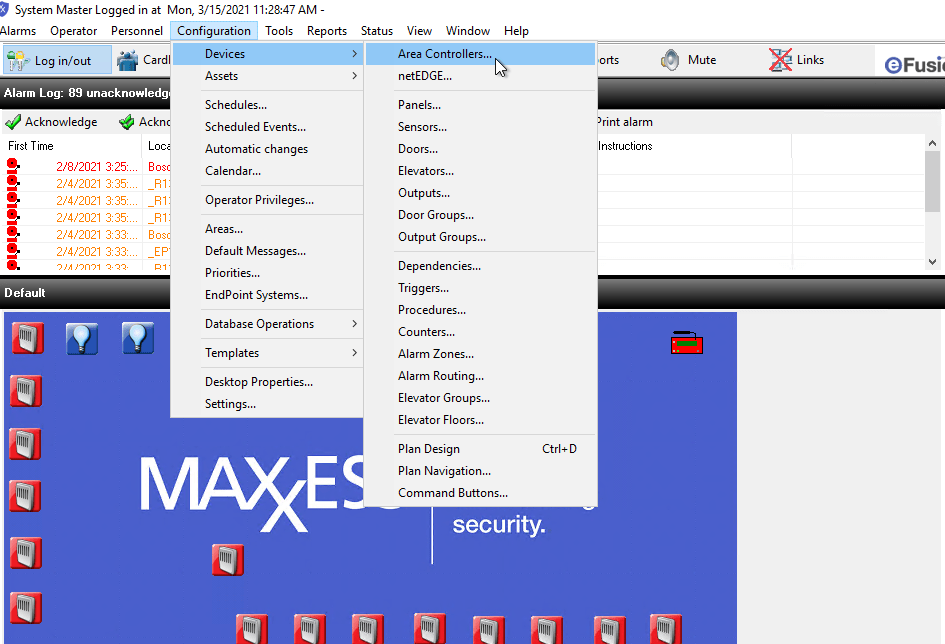
Add a new Area Controller. You may name it XPressEntry or anything to identify the controller’s association to the XPressEntry system. Set the Type to “Telaeris.” Click Save.
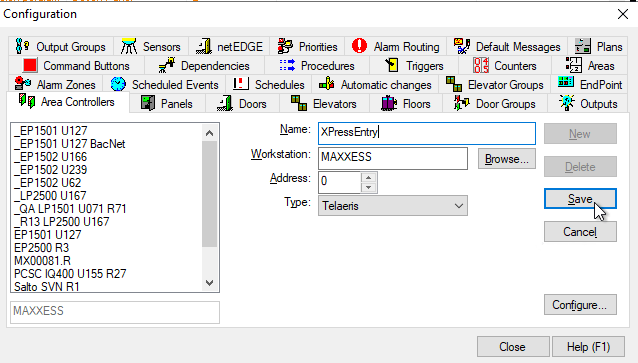
Panels
Create a new Panel. Name the Panel. Set the Type to “Telaeris Panel.” Telaeris Panel allows the creation of up to 50 entry and exit readers. Select Enable. If you would like to create the max number of readers, select “Add Point.” If not, make sure to unselect the checkbox. Click Save.
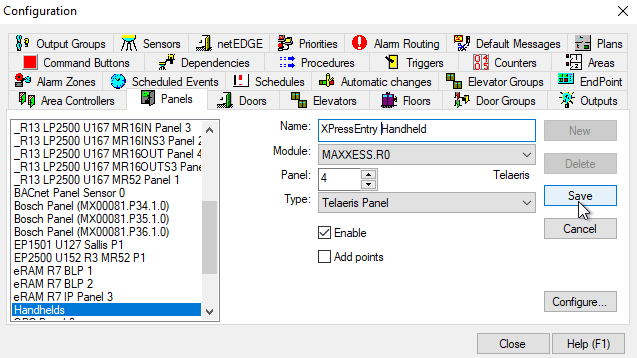
Doors
Create doors in eFusion. You can create as many doors as needed. One for Entry and one for Exit is common per door. Add a name, select the XpressEntry Panel. Click Save.
Access Levels
Add the new doors to the access level required.

7.Enable XPressEntry Synchronization
XPressEntry uses a module called “Data Manager” to synchronize eFusion data.
From the main page of XPressEntry, go to XPressEntry / Settings (CTRL+S)
Figure 6-XPressEntry

Data Manager Tab
From the Settings page select the Data Manager Tab
Figure 9- Data Manager
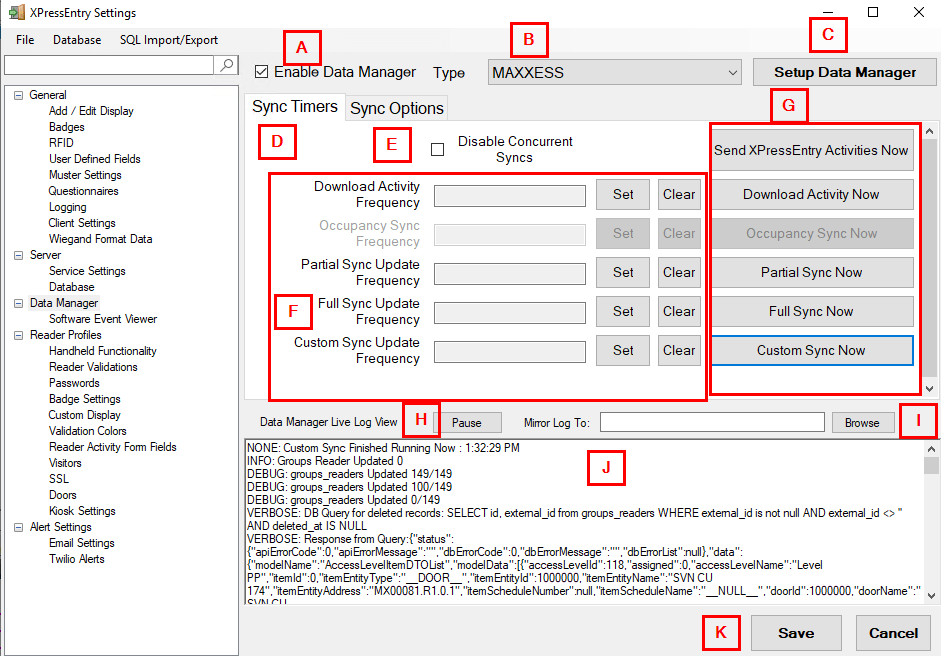
- Enable Data Manager – This must be checked to enable the Maxxess eFusion Synchronization
- Type – Select Maxxess as the Data Manager type
- Setup Data Manager – Opens the eFusion Data Manager Settings
- Sync Timers – Tab controls synchronization timers
- Disable Concurrent Syncs – If checked, this will disable allowing multiple syncs to run concurrently.
- Update Frequency – Set the update frequency for each sync
- Download Activity – Pull eFusion activities
- Partial Sync Update – Pulls all data excluding cardholder data, including readers, areas, access levels.
- Full Sync Update – Pulls all data from eFusion. Depending on the size of the eFusion system, this sync can take a while. Recommended to sync overnight, once a night.
- Custom Sync Update – A custom set of syncs can be added to run on a separate timer.
- Sync Now buttons – Used to manually sync data. Not required for normal use. Clicking on the specific button will activate the associated sync.
- Pause/Unpause – Can pause or unpause the logs as it populates.
- Mirror Log – Outputs a secondary log file at the chosen location
- Log – Displays all Data Manager Logs
- Save/Cancel – After any changes, press Save to apply changes to any sync. If settings are not saved, the next sync will NOT use the new changes.
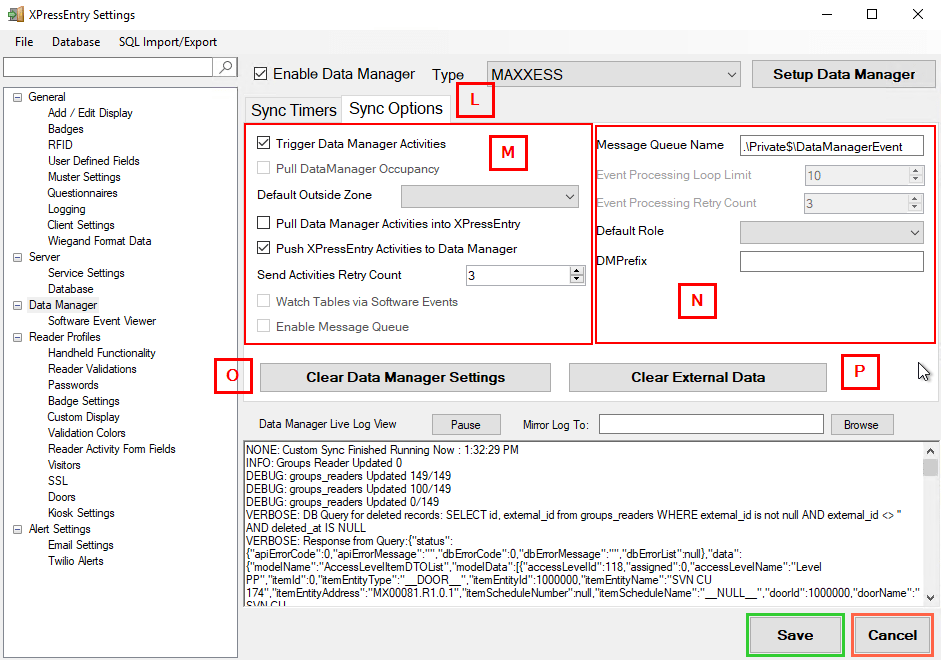
- Sync Options – Tab controls synchronization options with eFusion
- Sync Push/Pull options
- Trigger Data Manager Activities – Automatically send activities to eFusion after a handheld scan synchronizes to the XPressEntry server. Allows for automatic activity pushes.
- Default Outside Zone – When syncing occupancy, we if the cardholder zone is not in an area, assign a default outside area to place the cardholder.
- Pull Data Manager Activities into XPressEntry – Pull data from eFusion. Mainly used for occupancy tracking.
- Push XPressEntry Activities to Data Manager – Allow sending handheld or server activities back to eFusion as an event.
- Clear Data Manager Settings – Clears All settings on this form.
- Clear External Data – Clears all data that was synced from eFusion, including cardholders, badges, reader etc.
eFusion Data Manager Setup Page
Press the “Setup Data Manager” button to get the eFusion specific setup screen.
Figure 10- eFusion Setup
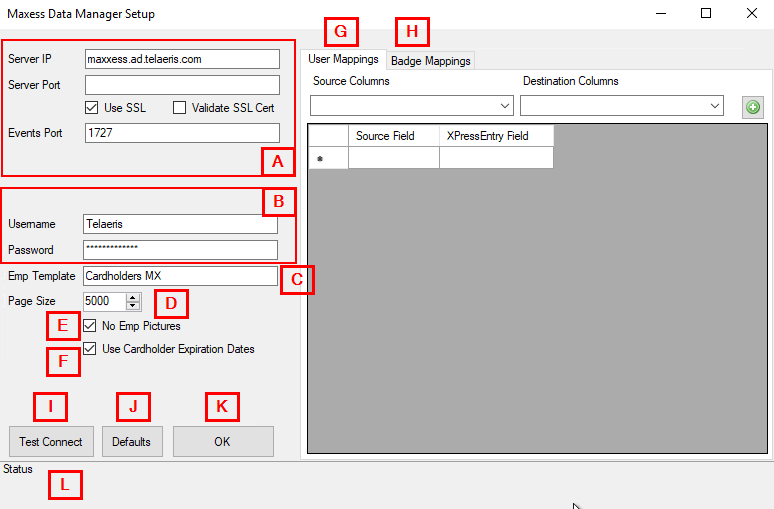
- eFusion Server Settings
- Server IP – IP or Hostname of the eFusion server
- Server Port – Port of the eFusion server, if required. Leaving this blank i
- Use SSL – SSL Encryption for eFusion and XPressEntry communication. This is recommended to be checked.
- Validate SSL Cert – Only check if there is a signed certificate in use with the eFusion System
- eFusion Login – Login info for eFusion Operator.
- Emp Template – Add the cardholder template type. Cardholders MX is the common template used.
- Page Size – Set the page size per API query. This may depend on system specs and networking resources. Recommended Page Size is 1000.
- No Emp Pictures – This will disable the picture sync of cardholders from eFusion
- Use Cardholder Expiration Dates – This will set the XPressEntry badges to expired if a cardholder has an expiration date in eFusion
- User Mappings – User Mappings allows UDF fields from the Cardholder in Maxxess to be synced over to XPressEntry cardholder fields and User Defined Fields (UDFs).
- Set your Source Column value (UDF Value from eFusion) to the Destination Column (Field in XPressEntry).
- Click the Plus Icon to Add it to the list below.
- Badge Mappings – Badge Mappings allows custom badge fields from the Badge in Maxxess to be synced over to XPressEntry badge fields and Badge Defined Fields (BDFs).
- Set your Source Column value (BDF Value from eFusion) to the Destination Column (Field in XPressEntry).
- Click the Plus Icon to Add it to the list below.
- Test Connect – Test connection to the eFusion System. Connection Success will be displayed if a connection is established.
- Defaults – Reset all setting to the default
- OK – closes the Data Manager Settings
8.XPressEntry Data
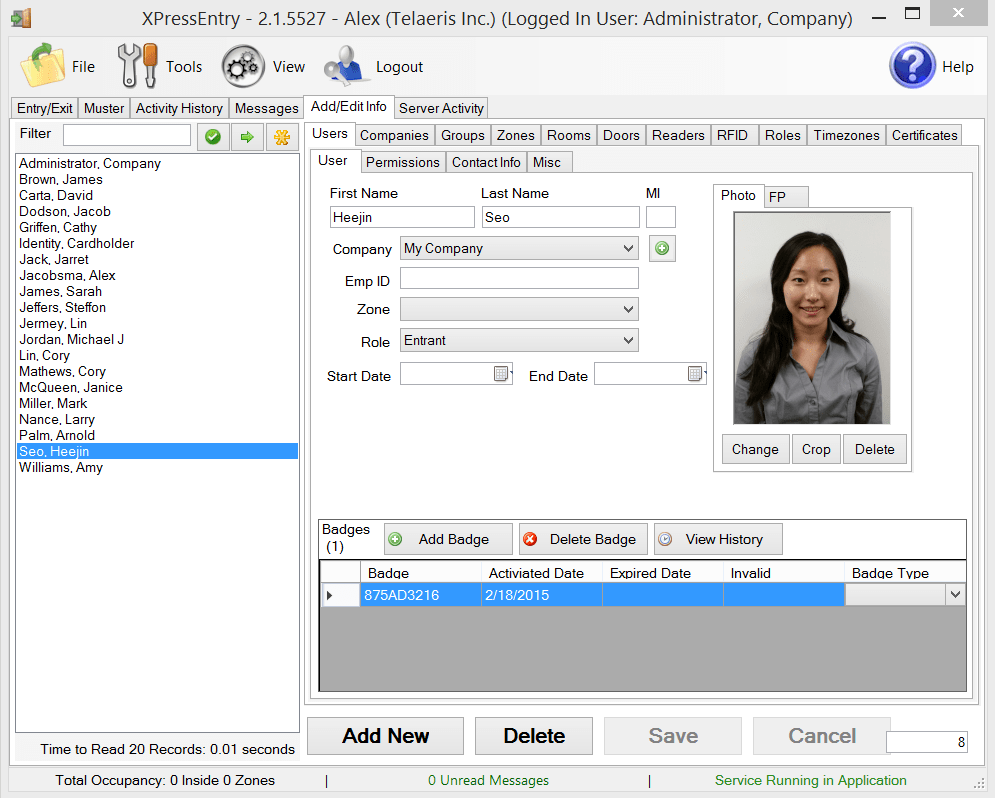
After setting up the data manager, run the initial Full Sync to pull data from eFusion. Once the eFusion System is set up and synchronizing, you will see all of this data represented in XPressEntry under the Add/Edit Info tab. Data which is imported from eFusion cannot be changed and is greyed out in XPressEntry without proper permissions.
Users
Here is a sample of a properly synchronized user:
Figure 12- Users
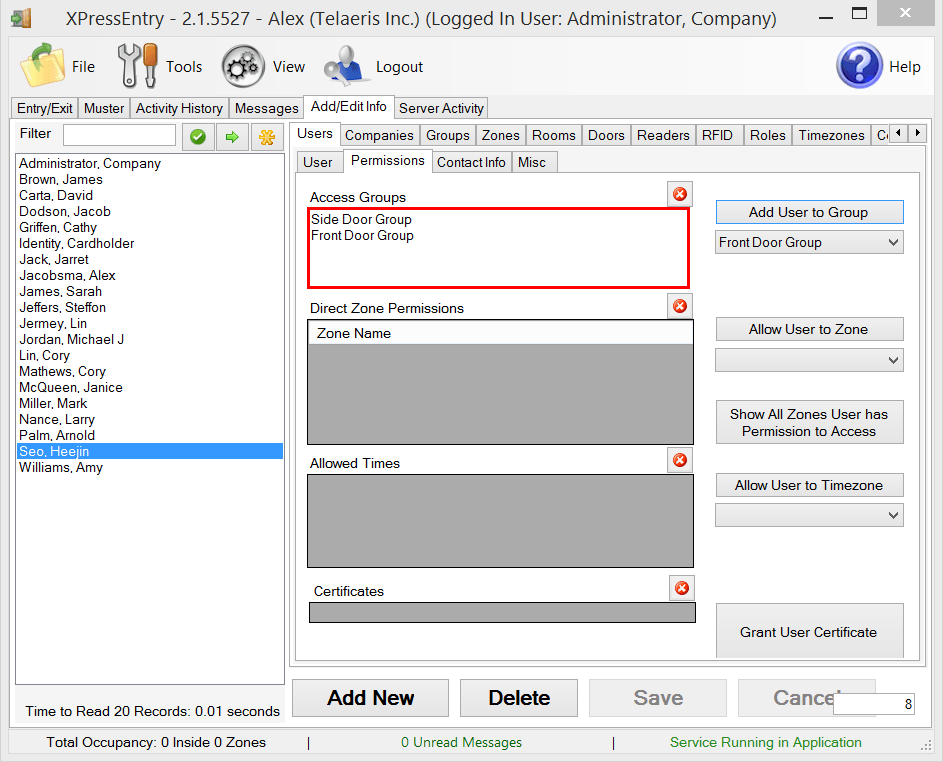
User Permissions
Users in XPressEntry have the same access rules in eFusion to each individual reader.
Figure 13- Permissions
Doors
Entry/Exit permissions in XPressEntry are set by doors. Doors contain up to two readers, an entry and an exit reader. Door access is determined by the user’s access to the door’s external entry or exit reader. Doors should be set by the user for each Handheld Reader in XPressEntry.
The XPressEntry Integration with eFusion does required to have both a start and end zone assigned. If no zone is assigned, handheld activity will not populate to eFusion. For most situations, each door’s zones should be set to the default: outside and building. For proper occupancy tracking, Set the start and end zone to zones created in the Zones tab. The start zone is the area the user would be entering from, and the end zone is where the end user will end up. External Entry Reader will be assigned to the eFusion Reader created for Entry and the External Exit Reader will be assigned to the eFusion Reader created for Exit, if there is one. You can also leave either the Entry or Exit reader blank if you are not utilizing the specific entry/exit mode.
Figure 14- Doors
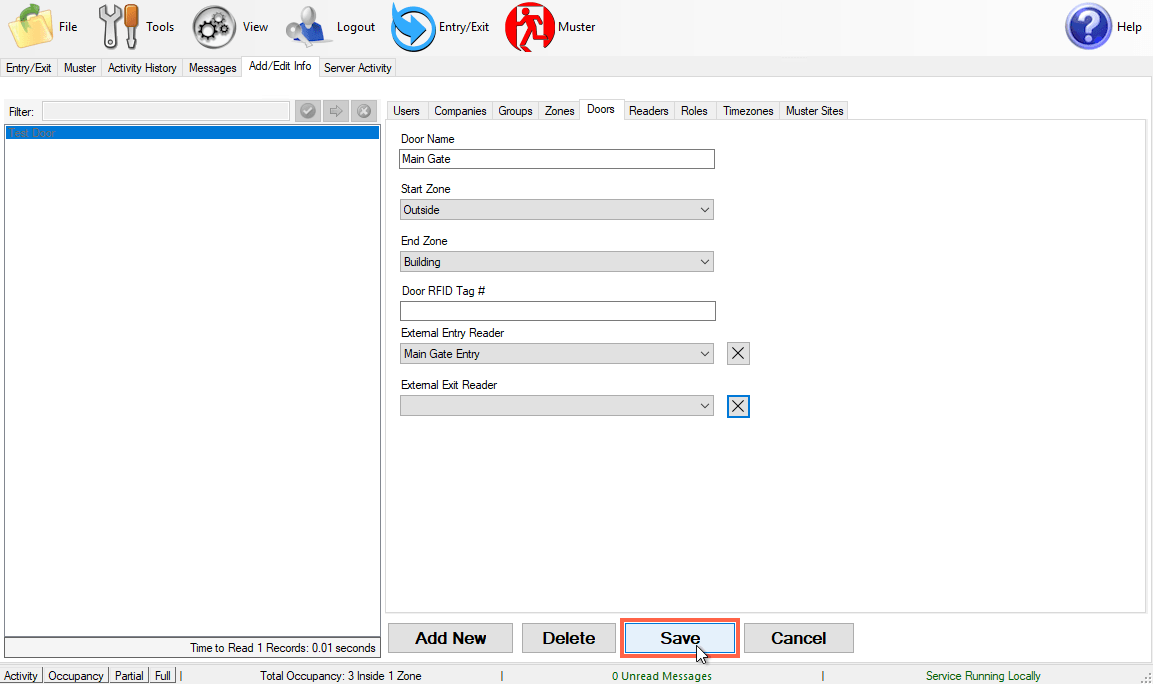
- Zones – For each door, set the start zone to Outside and the end zone to Building. This helps to determine directionality. If occupancy tracking is enabled, make sure to assign proper zones.
- External Readers – Attach the logical entry and exit door reader that you created in eFusion to a door. The readers are named based off the eFusion Door created.
Activities
XPressEntry will synchronize activities to eFusion if that option has been set by the Data Manager.
Entry/Exit activities will be sent to eFusion and display the results in the Transaction logs.
9.Wiegand Formats for Maxxess Systems
Maxxess Stores card numbers in a FacilityCode-CardNumber format
This means we need to show XPressEntry how those cards are formatted.
Depending on the card format, you will need to do something like the below to modify the standard wiegand formats to output the handheld badge numbers appropriately.
You will be adding the “Output Format” Section to the appropriate card formats.
[Wiegand26]

Enabled = True

Reverse Byte Order = True

Number Bits = 26

Field 0 = Parity Even, 0, 1, LEFT_TO_RIGHT

Field 1 = Employee No, 1, 16, LEFT_TO_RIGHT

Field 2 = Facility Code, 17, 8, LEFT_TO_RIGHT

Field 3 = Parity Odd, 25, 1, LEFT_TO_RIGHT

Field 4 = Not Defined, 0, 0, LEFT_TO_RIGHT

Field 5 = Not Defined, 0, 0, LEFT_TO_RIGHT

Field 6 = Not Defined, 0, 0, LEFT_TO_RIGHT

Field 7 = Not Defined, 0, 0, LEFT_TO_RIGHT

Parity Even Start = 1

Parity Even End = 12

Parity Odd Start = 13

Parity Odd End = 24

Output Format = %FACILITY_CODE%-%EMPLOYEE_NO%