XPressEntry – AMAG Documentation

1.Purpose
The purpose of this page is to instruct the user on how to synchronize an XPressEntry System with the AMAG Symmetry software.
2.Setting Up Symmetry to Synchronize with XPressEntry
Symmetry Version 8.1 (Standard and HSE)
It is assumed Symmetry 8.1 is installed on a server prior to integration with XPressEntry. Additionally, the Advanced Reporting 8.1 (or 8.1.3) ISO is required for Integration. Please contact your AMAG dealer to receive the Advanced Reporting installer.
Symmetry HSE Version 8.1
Symmetry HSE Version 8.1 requires patch number 180601 from AMAG. Without this patch, transactions submitted to Symmetry from XPressEntry will not be able to identify the user.
Symmetry Version 9.X
It is assumed Symmetry 9 and higher is installed on a server prior to integration with XPressEntry. Symmetry 9 contains Advanced Reporting database views built in. Because of this, the Advanced Reporting installer is not necessary.
All Versions
If XPressEntry will be used for Entry/Exit, the Data Connect License is required to be applied. If XPressEntry will be used for Mustering only, the Data Connect License is not required.
2.1.Minimum Database Permissions Required
At a minimum, the service account running the XPressEntry service needs the following permissions to the AMAG database.
multiMAX- db_datareader
multiMAXImport- db_datareader and db_datawriter
multiMAXExport- db_datareader
For Symmetry 9.0+
multiMAXTxn- db_datareader
2.2.Order of Operations
- Apply License
- Install Advanced Reporting (Symmetry 8.1 Only)
- Set up Symmetry Data
- Enable Synchronization from XPressEntry
- Set up XPressEntry Data
3.Data Connect
XPressEntry communicates with Symmetry in two ways
- Pulling data from Database Views
- Data Connect Insert
If you do not have a Data Connect License, please contact your Symmetry Dealer.
3.1.Applying the License Key
In order to add the license key to your symmetry system, go to Maintenance tab and select System Licensing.

Select Add and enter your license key information. Once the license has been applied, restart Symmetry to configure the new options.
3.2.Configuring Data Connect
Navigate to the Data Import form (Operation>Data>Data Import). Set the Import Database Scan Period to as often as you would like Symmetry to scan for newly imported transaction records. Select OK.
4.Setup Symmetry Data and Settings
4.1.Handhelds
For every physical XPressEntry handheld reader, you should have two logical readers in the Symmetry System. They should be distinguished with the words “Entry/Exit” or “IN/OUT” at the end of them. These readers are only theoretical and represent the location in which an XPressEntry Mobile Reader will be used.
4.2.XPressEntry LAN Chain
To begin, you should add the readers to the Symmetry system. You will need to be logged in with the Installer permissions in order to do this.
In order to add readers, you must first create or specify a LAN Chain. It does not matter what the LAN Chain is named, but it is helpful for the name to be related to XPressEntry for organization purposes. To do this, you must first select a LAN Chain port.
Select “Client Ports” under the Install tab. Select “New”.
Select from the list of available ports and fill the other two fields out as shown below.
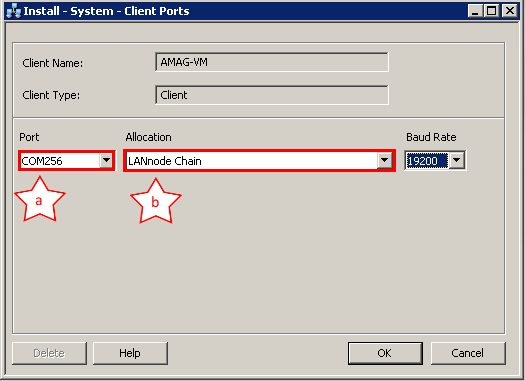
- Port- Select a port that is not and will not be in use.
- Allocation- Select LANnode Chain.
Select “OK”
After specifying the type of port, select Chains>LAN under the install tab and click “New”. The IP Address can be outside of the active domain. Make sure that enabled is not checked.
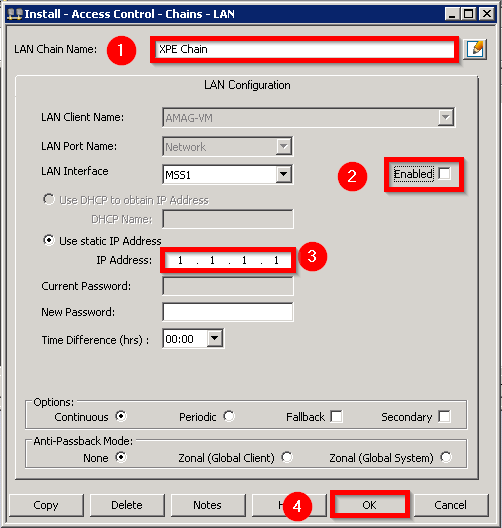
- LAN Chain Name- The name that will carry the Nodes which carry your handheld readers.
- Enabled- Does not need to be enabled because this chain because it is logical only
- IP Address- Fill in a fake IP address. Because the reader is theoretical, it does not actually use an IP address.
- When finished, press OK.
4.3.XPressEntry Nodes
Once you have created a LAN Chain, you will need to create one or more nodes in order to add XPressEntry Handhelds.
Under the Install tab, select Node. There are several options you can choose under Node Type. Choosing “multiNODE 2150 Series 8DBC” will allow you to add 8 handhelds to this node. Be sure that enabled is checked and select OK.
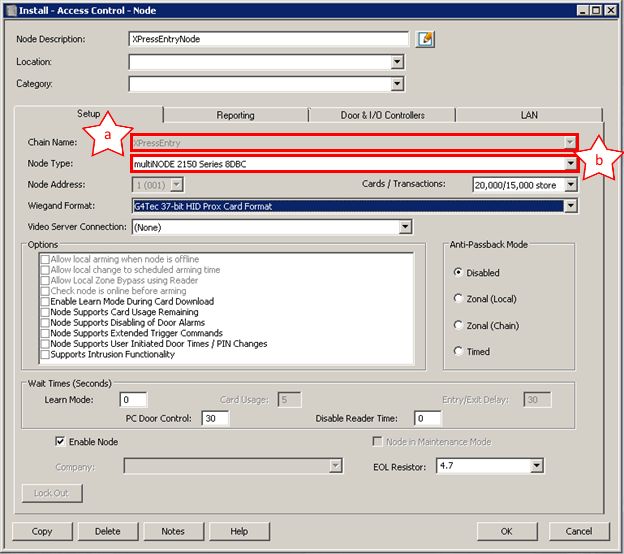
- Chain Name- Select the Chain that you created during the second step (Figure 2).
- Determines the number of handhelds that can be stored in this node. Use one of the multiNODE 2150 Series node types.
- multiNODE 2150 Series 8DBC- Carries 8 Readers
- multiNODE 2150 Series 4DBC- Carries 4 Readers
- multiNODE 2150 Series 2DBC- Carries 2 Readers
4.4.Adding XPressEntry Handhelds
After creating LAN chains and nodes, we can add the handheld readers to the system. Under the install tab, select Reader. For each physical XPressEntry handheld that you have, create two logical handhelds in the Symmetry system; one for entry and one for exit. Under the setup tab, select the company the reader belongs to. In the “Connected To” grouping, select the node you created above as well as the type of controller you had selected for the node. Each reader created in the same node will have a different port number. Select OK when finished.
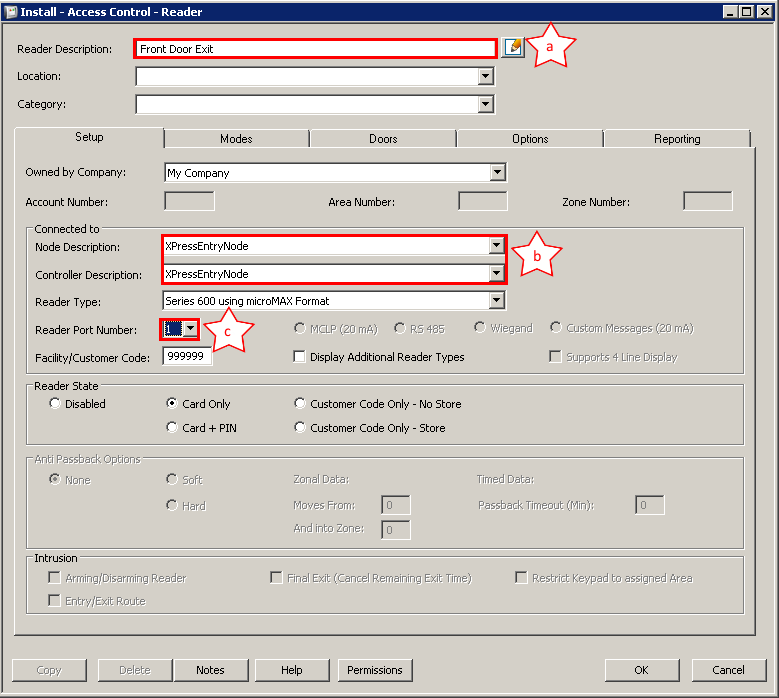
- Reader Description- This is the name of the logical reader. Its name should contain the location of the reader and the directionality (Entry or Exit).
- Node Description- This is the node you created.
- The port of the reader on the node. There are eight of them if the node type is multiNODE 2150 Series 8DBC.
In most situations, you should add two readers (an exit and an entry) for each door. Usually, there should be at least one XPressEntry handheld for each door you are tracking. We will go into the way this works when we review XPressEntry.
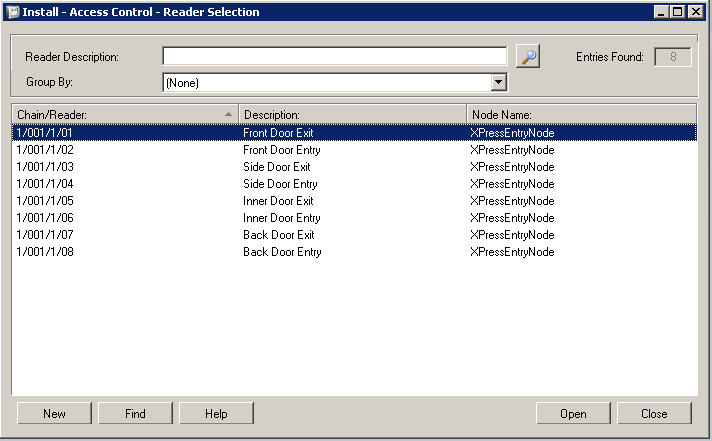
4.5.All Readers
After creating four physical readers, the list of readers should look similar to the example below. If the eight door controller was selected, a separate node will need to be created for the fifth handheld.
5.Enable Synchronization
XPressEntry uses a module called “Data Manager” to synchronize all data with Symmetry.
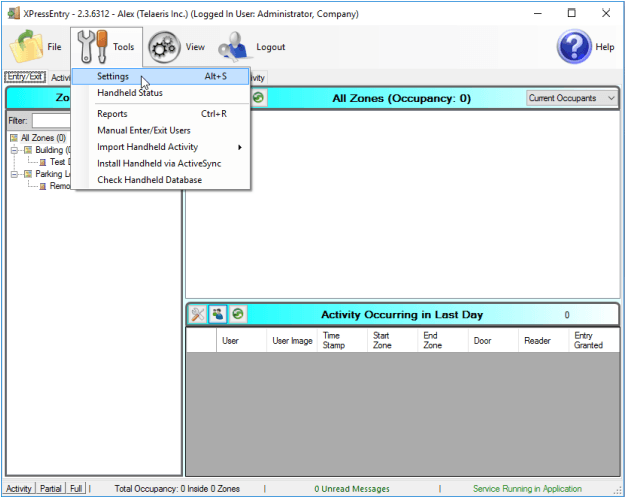
From the main page of XPressEntry, go to XPressEntry / Settings (CTRL+S or Tools>Settings)
5.1.General Tab
From the Settings page, select the Logging Page
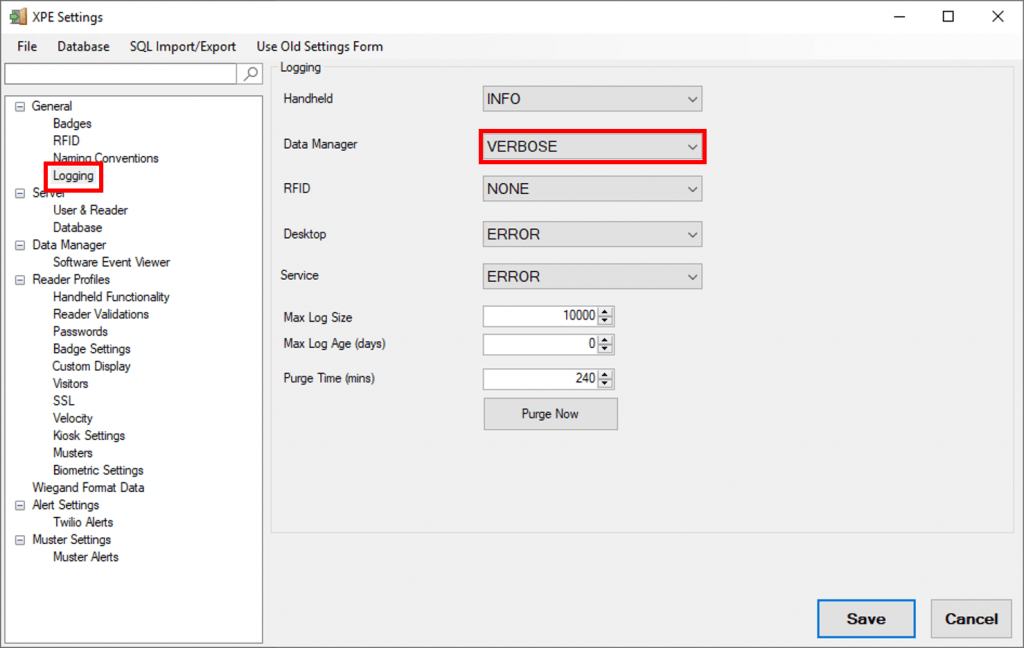
- Set the Log level to Debug or SQL- this will allow you to view log entries during the sync process
- Max log size- 5000 or higher
- Max log Age- 1 Day or higher
Once the integration is complete, set the log level to Critical, so only error messages will be tracked.
5.2.Reader Profile Tab
The Reader Profile Tab is where you configure the handhelds.
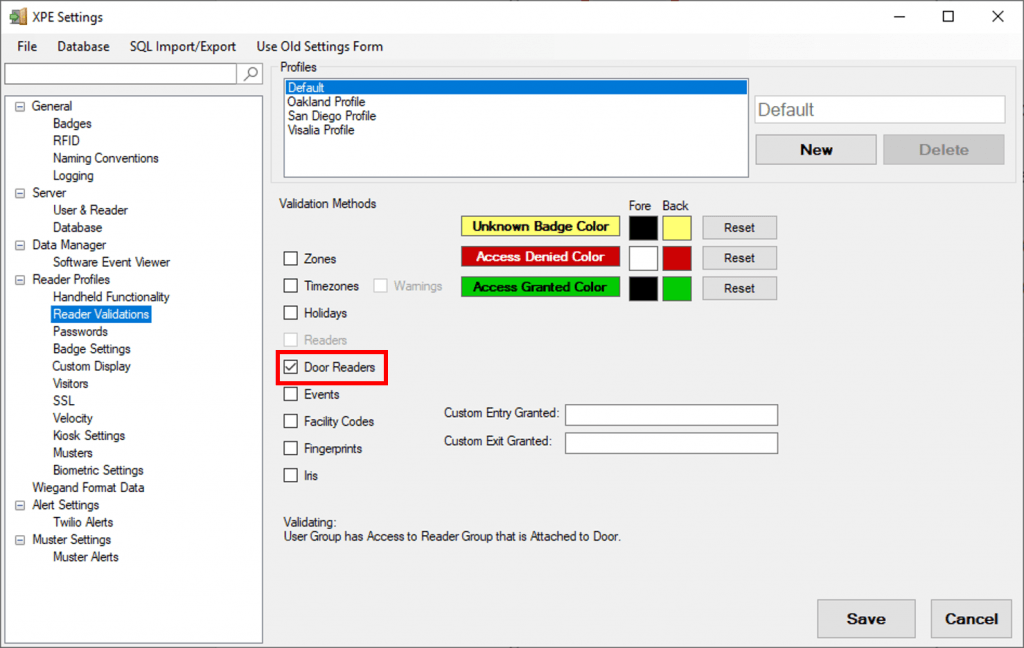
The only important change to make on this tab is to make sure “Door Readers” is the only mode that is checked under “Validation Methods”. Select “Save” at the bottom right when finished.
5.3.Data Manager Tab
From the Settings page select the Data Manager Tab.
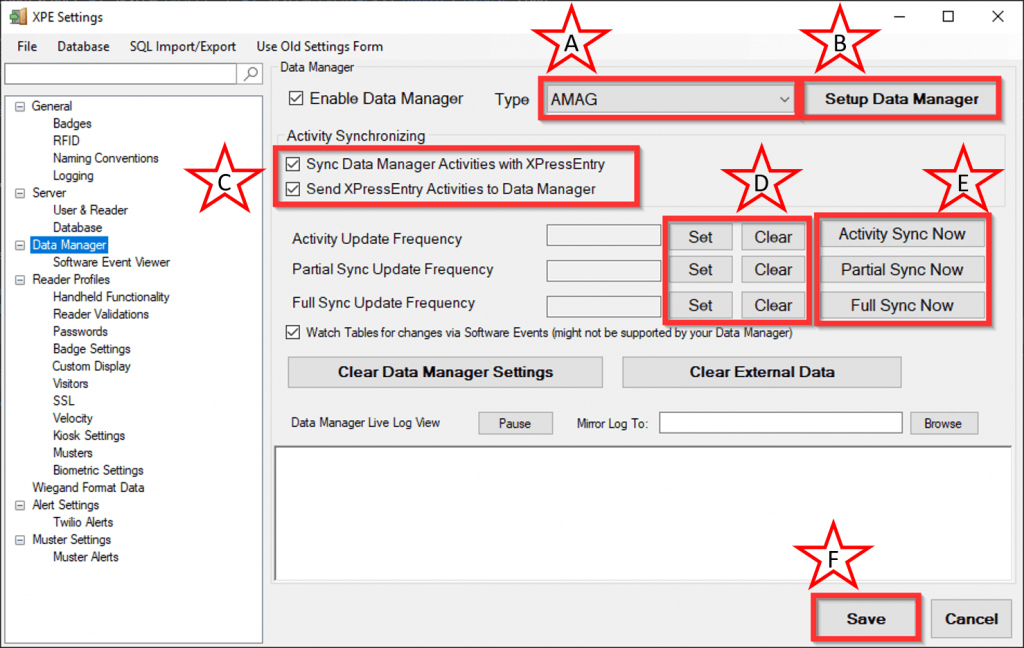
- Type- This is the integration type. Select AMAG.
- Setup Data Manager- Sends you to the setup form for Amag’s data manager.
- Activity Synchronization options- Used to send XPressEntry handheld activities to Symmetry.
- Update Frequency options- Sets and clears the intervals in which the data manager updates XPressEntry.
- Immediate sync functions- Runs an immediate update.
- Save and Apply Settings- Saves all settings from the setup form, update frequencies, and activity Synchronization options.
Set the Update Frequency to as often as you want the system to update. Note that only one update can run at a time and if this value is very low the system will constantly try to update (this is not always a problem).
- Full Sync Update- This sync will grab all relevant records from Symmetry and update them in XPressEntry. If there is a large number of users in Symmetry, this sync option can take some time.
- Partial Sync Update- This sync will grab records from all tables but will limit the number of Users that are retrieved from Symmetry. It will only grab the last x number of users that were added to the system. This is valuable when you do not want to wait for a long sync, but want to add a new user into the XPressEntry system.
- Do use this sync to quickly update any table in XPressEntry.
- Do use this sync to quickly add a new user into XPressEntry from Symmetry.
- Do NOT use this sync to delete a user from XPressEntry who was deleted in Symmetry.
- Do NOT use this sync to update a user from XPressEntry who was changed in Symmetry.
- Activity Sync Update- Use this sync to send XPressEntry Events to Symmetry. These events will show up as Symmetry Alarms. The “Activity Synchronizing” section contains two options.
- Sync Data Manager Activities with XPressEntry – This option allows you to pull activities from Symmetry. This will change the location of the user within XPressEntry
- Sync XPressEntry Activites to Data Manager – Will push XPressEntry handheld activities to Symmetry.
All of these options can be changed at any time. Changing any option will immediately take effect.
5.4.Symmetry Setup
The following sections demonstrate how to configure the sync with Symmetry. Once completed, select Test Connection, or Save Settings if on the Activity Tab. Then Exit the form.
On the Data Manager tab of the Settings form, select “Save and Apply Settings”. You are then ready to complete a full Sync.
5.4.1.Connection Tab
Press the “Setup Data Manager” button to get the AMAG specific setup screen.
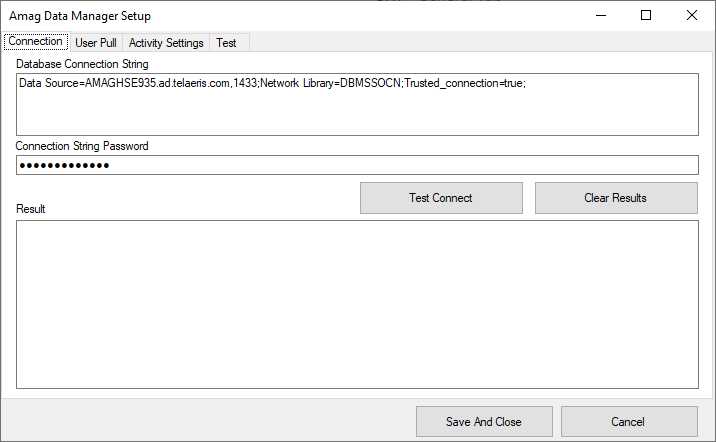
Connection Settings
Configure the connection string to point to the Symmetry Database. It is recommended that your connection string uses Windows Authentication (Trusted_Connection=Yes or equivalent Integrated Security).
If you do not use Windows Authentication, you may hide the password in the connection string by placing it in the Connection String Password box. In the connection string, add “@Password” as a placeholder for your password (as shown in the connection string above).
Note- This password is not secure. Using this feature in a production environment can result in a security breach.
Select “Test Connect”. If configured correctly, the result will display “Successfully Connected to the Symmetry database!”
5.4.2.User Pull Tab
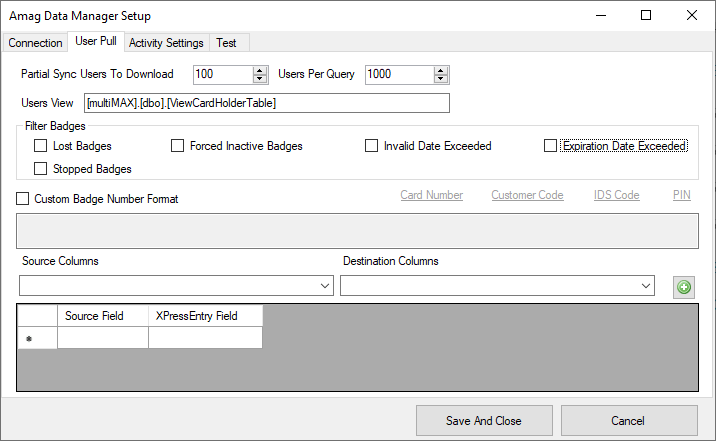
Filter badges
In large installations, you may not want to pull all badges that are no longer in service. Badges can be filtered by their invalid status. Selecting any of the options within “Filter Badges” will filter for badges matching that criteria.
Custom Badge Number Format
Cards pulled from AMAG can be formatted before they are placed in the XPressEntry database. The four fields that can make up a badge number are Card Number, Customer Code, IDS Code, and PIN. Double click on the options beneath the text box in order to add the appropriate text to the text box.
Note- This field is only used in specific circumstances. This field should be disabled in most installations (ex- enabled on CASI Rusco Card type).
Source/Destination Columns
If User Defined Fields are needed in the XPressEntry system, they can be specified in this section. Enter the name of a source field from the AMAG view in the source column dropdown. Select the field name to place this value into in the Destination Column dropdown. Then Select the add button. Values added to the grid will attempt to map and be pulled into XPressEntry on a user sync.
Select Test Connect once all fields have been configured.
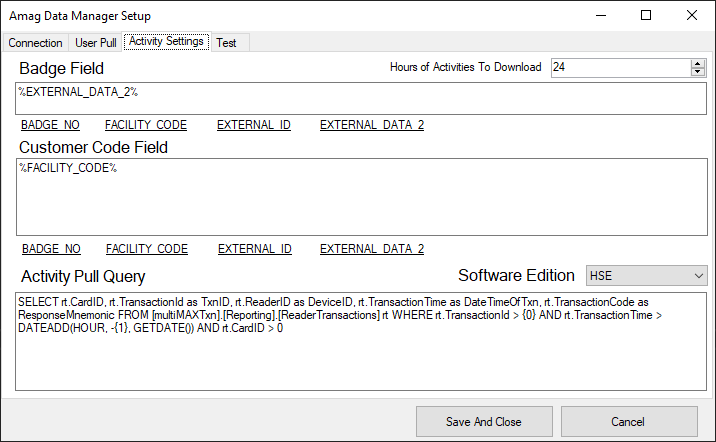
5.4.3.Activity Tab
The Activity Settings tab allows you to format the way XPressEntry pushes Activity records, as well as adjust the query to pull Symmetry Activities.
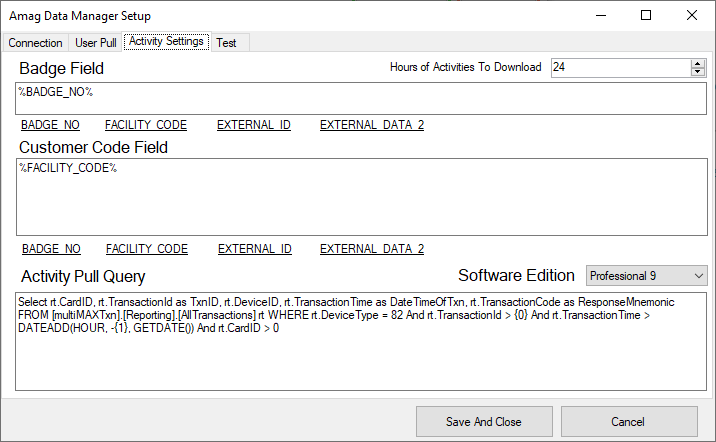
Badge Field
This is the XPressEntry field that is pushed into the badge field of the Symmetry Transaction import table to be handled by Data Connect. It should only be updated from the default if XPressEntry is using a custom badge format.
Customer Code Field
This is the XPressEntry field that is pushed into the Customer code field of the Symmetry Transaction import table to be handled by Data Connect. It should only be updated from the default if XPressEntry is using a custom badge format.
Software Edition
Select the Edition of Symmetry that XPressEntry is syncing with.
Activity Pull Query and Software Edition
Select the software edition of the Symmetry system in order to fill the correct Activity pull query. This query can be edited if required, but should not need any adjustment for the editions listed in the the drop down.
Select Save Settings once all fields are configured.
5.4.4.HSE SR Series Setup
When syncing XPressEntry with an HSE system, there are a few specific options that need to be selected.
- Under the User Pull Tab, you are required to set up a Custom Badge Number Format. SR series cards are concatenated together from two fields. Because of this, you must pull both the customer_code field and card_number field from AMAG into the badge number within XPressEntry. Enable the Custom Badge Number Format as shown below-
![]()
- Under the Activity Settings Tab, Software Edition should be set to HSE.
- Additionally, we cannot push the badge_no field like we would in the Professional Edition, because the badge numbers in XPressEntry are the combination of two fields in Symmetry. Instead, use %EXTERNAL_DATA_2%. This contains only the card_number portion of the card from the Symmetry system.
6.Symmetry Sync Check
The purpose of this section is to help the operator understand exactly what data XPressEntry is pulling. For a quick setup, please navigate to the next section, “Configuring XPressEntry using Symmetry Data”.
The mapping of each table pulled from XPressEntry is shown below.
Symmetry>XPressEntry
- Companies>Companies
- Cardholders>Users
- Cards>Badges
- Readers>Reader
- TimeCodes>TimeZones
- Access Codes>Groups
- User/Access Codes>Groups
- Reader Groups>Groups
- User/Reader Groups>Groups
- Reader/Users Permission>Groups
6.1.Companies and Readers
Companies and readers are the simplest tables to pull from Symmetry. All Companies and Readers should be available to view in their respective tabs.
6.2.Users
Here is a sample of a properly synchronized user:

All External Records (From Symmetry) will display in red as an “External Record” at the top of the form. This label will not display for any records that were created from within XPressEntry.
XPressEntry will pull the user’s image and badge number from Symmetry. The badge number can be seen at the bottom of the screen.
6.3.User Permissions
Users in XPressEntry have the same permissions to each reader as they do in Symmetry. This is regardless of whether the user is assigned an Access Code, Reader Group, or direct access to a Reader. However, the way in which the data is displayed is a little different.
The following is an example of the permissions a user has in Symmetry vs. how the data is displayed in XPressEntry.
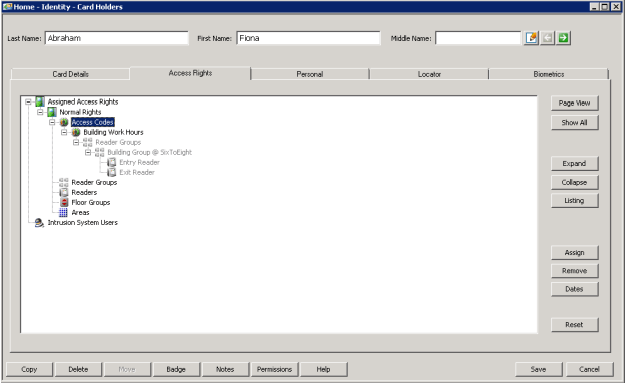
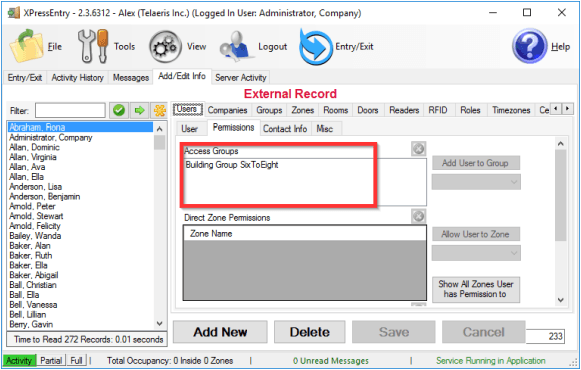
In order to see the readers Fiona has access to, navigate to the “Groups” tab. Select “Building Group SixToEight” from the list on the left.
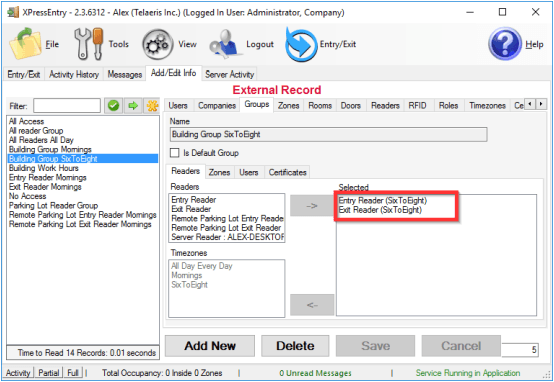
Each user with assigned permissions in Symmetry will have the same permissions in XPressEntry.
Permissions in Symmetry can be assigned in 3 different ways.
- Access Code- XPressEntry pulls all readers associated with the Access Code at the reader’s specified time.
- Reader Group- XPressEntry creates a Group for each Time Code a Reader Group uses.
- Ex- 5 people are given access to Symmetry to Reader Group 1 between 9 AM and 5 PM. 7 People are given access in Symmetry to Reader Group 1 between 6 PM and 4 AM. XPressEntry creates 2 groups; 1 for the day shift and 1 for the night shift. Each group contains all readers in Reader Group 1 and access at the specified time.
- Direct Reader Access- XPressEntry creates a Group for each Reader/Time Code combination used in the Symmetry Database.
- Ex- 5 people are given access in Symmetry to Reader 1 between 9 AM and 5 PM. 7 people are given access in Symmetry to Reader 1 between 6 PM and 4 AM. XPressEntry creates 2 groups, one for the first group of people and one for the second with access to the single reader at the specified time.
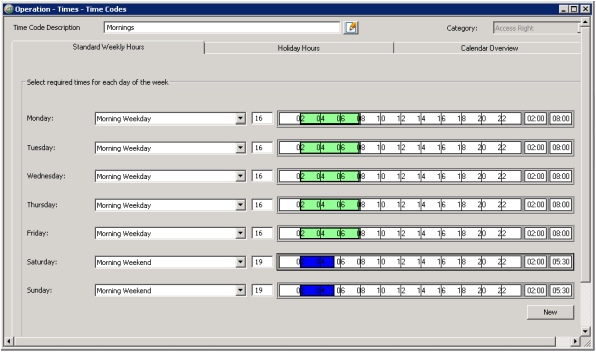
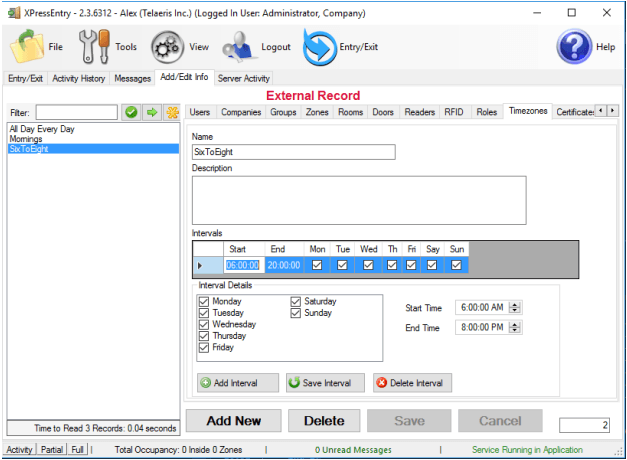
6.4.Timezones

Time Codes are pulled from each Symmetry to create Timezones. If a single Time Code has multiple standard time ranges for different days of the week, XPressEntry will create additional intervals to support this.
7.Configuring XPressEntry using Symmetry Data
Now that XPressEntry has Symmetry’s database, it needs to be configured to use this information. The tabs that need to be configured are the Doors, Readers, and Zones.
7.1.Doors
Entry/Exit permissions in XPressEntry are set by doors. Doors contain two readers, an exit and an entry reader. Door access is determined by the User’s access to the door’s reader. For entry, permission is based on the user’s access to the door’s external entry reader. For exit, permission is based on the user’s access to the door’s external exit reader.
Doors should be set by the user for each Handheld Reader in XPressEntry.
The XPressEntry Integration with Symmetry does not require additional start and end zones. However, XPressEntry can help keep track of what “zones” people are in if configured correctly.
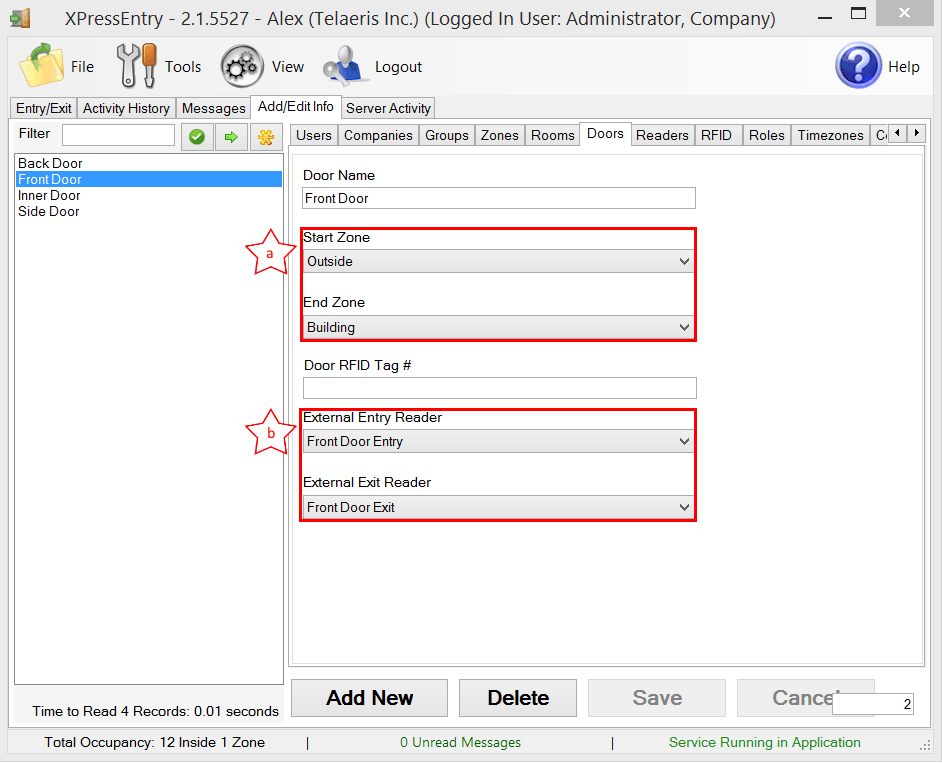
- Zones- For each door, set the start zone and end zone. This will “enter” a user in the specified zone when they enter or exit (or scan at a Symmetry readers).
- External Readers- Attach the logical entry and exit readers that you created in Symmetry to a door.
XPressEntry requires that you manually set up the doors in the system. There should be a door in XPressEntry for each physical station that an employee will have a handheld. To create a door, select “Add New” at the bottom of the form. Enter a name that clearly describes what this door represents. Select “Outside” for Start Zone and “Building” for End Zone. “External Entry Reader” is one of the entry readers you created in Symmetry. “External Exit Reader” is one of the Exit readers you created in Symmetry.
Doors can also be added for each of the physical door readers. If XPressEntry is set up to pull activities, it will move people in the system based on the reader they were scanned at and the zones attached to the door.
7.2.Readers
In XPressEntry’s Amag integration, it is not necessary to associate any reader in the system with a handheld. This association can be done on the handheld when it comes time to scan.
A handheld unit can logically represent any reader in the building. When the handheld is issued to an employee at a specific door, the employee must first set the door on the handheld. The XPressEntry Reader that the handheld represents is based on whether the handheld is in entry mode or exit mode.
For example, let us say that you have handheld A stationed at door A. Door A has two readers associated with it: Reader A-Entry and Reader A-Exit. The employee holding the handheld sets the handheld’s door to Reader A. When the employee sees a cardholder walking towards the building, he sets the handheld to Entry mode and scans the cardholder’s badge. The handheld in entry mode identifies itself as reader A-Entry and sends an activity to the server.
Later, there is heavy volume exiting Door B. Door B has two readers associated with it: Reader B-Entry and Reader B-Exit. The employee from door A is called to help and brings handheld A. He sets the door on his handheld to Door B and the mode to Exit. When he begins scanning people walking out of the door, the handheld identifies itself as Reader B-Exit and sends each scan as an activity to the server.
For more information about the functionality of XPressEntry, please look at the XPressEntry manual.
7.3.Activities
XPressEntry will synchronize activities to Symmetry if that option has been set by Data Manager. If XPressEntry is configured to “push” activities, they will appear in the Activity View (Home>Monitoring>Activity). If XPressEntry is configured to “pull” activities, the occupancy of the system will change each time a person scans at a reader that is mapped to a door in XPressEntry.
You may want to pull activities if…
- You want to use XPressEntry to manage Emergency Evacuations.
- XPressEntry uses Symmetry activities to determine who is on and who is off campus.
- In the case of a mustering event, XPressEntry will have an up to date list of who is on site on this day.
- Using this list, XPressEntry can be utilized to “muster” or mark people as safe to create a list of people who are still on site.
- You want to use XPressEntry’s features to determine who is on site, and what areas people are in.